Technical Starter Teardown - Just a bad brush?

Currently reading:
Technical Starter Teardown - Just a bad brush?

Joined
Feb 18, 2015
Messages
75
Points
105
Location
Waterloo
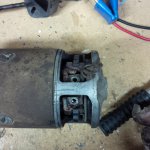
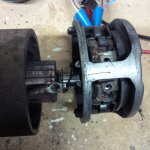
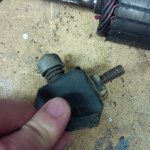
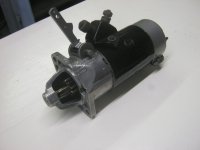
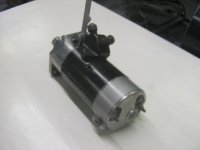
My starter died on me. The symptoms at first seemed to point to a low battery, since after pulling the starter it got weaker and weaker until it simply stopped for good; but after verifying 12V is at the starter and pressing the switch does nothing I went ahead and removed it (that was fun).

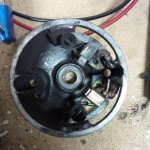
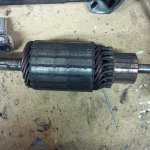
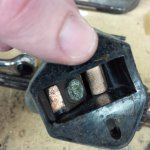
You can see in one of the pics the lower brush is completely warn, and when I put the armature back into place only the top brush retracts while the other one isn't affected by the armature, so I'm guessing that is the reason it died, which should be a cheap fix.

I want to give this thing a really good cleaning before reinstalling it, can anyone offer any advice on a good way to clean it up? Can I douse the whole thing into some kind of cleaning solution?

Also, the starter control cable has 2 or 3 broken strands so I guess I'd better replace it. If anyone has replaced a starter cable before I'd appreciate any advice on that.

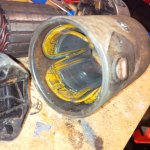
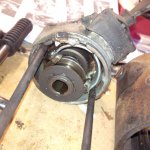
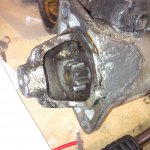
Attached some pics of the warn out starter.
 

Attachments

  • IMG_20150323_234452.jpg
    IMG_20150323_234452.jpg
    501 KB · Views: 55
  • IMG_20150323_234925.jpg
    IMG_20150323_234925.jpg
    487.5 KB · Views: 32
  • IMG_20150323_234935.jpg
    IMG_20150323_234935.jpg
    657.3 KB · Views: 49
  • IMG_20150323_235435.jpg
    IMG_20150323_235435.jpg
    588.2 KB · Views: 38
  • IMG_20150323_235508.jpg
    IMG_20150323_235508.jpg
    444.7 KB · Views: 32
  • IMG_20150323_235736.jpg
    IMG_20150323_235736.jpg
    522.5 KB · Views: 32
  • IMG_20150323_235656.jpg
    IMG_20150323_235656.jpg
    508.1 KB · Views: 39
  • IMG_20150323_235634.jpg
    IMG_20150323_235634.jpg
    566.2 KB · Views: 36
  • IMG_20150323_235516.jpg
    IMG_20150323_235516.jpg
    539.8 KB · Views: 40
Personally I would be very careful with the internals of a starter motor.
Looking at your photos, everything looks in good working order. The commutator looks undamaged and therefore you probably just need to replace the brushes.
As you have found out the starter is made of 6 main components.
Commutator, housing (windings), brush housing, drive housing,lever & switch.
For the first 2 I would advise cleaning with cleaning spirit, do not submerge it but you could use a tooth brush and then dry with compressed air.
For the housings you can use degreaser, petrol, cleaning spirit etc
It may be worth checking the bushes in the casings but these don't wear much.
Your switch looks okay but these are available new.
Check the clevis pin is ok in the lever & replace the lever if worn or damaged.
Check for any wear on the teeth of the drive gear, replace if required.
I then painted my main housing (mask the internals before painting) & also the brush cover.
Reassembled with a general lubrication of the end bushes (make sure you get all the washers in the correct order.
 

Attachments

  • IMG_9340.JPG
    IMG_9340.JPG
    1 MB · Views: 30
  • IMG_9341.JPG
    IMG_9341.JPG
    945.8 KB · Views: 25
I agree with Sean but would intervene there a little more with that starter. To me , there is a hint of wear to that commutator but the solution is someone skilled with a lathe or a new one. Neither is this is a way you will want to go so gently clean it up with very fine glasspaper and then buff using metal polish. the same goes for the starter switch contacts. Also, if you may as well replace the brush springs as well as the brushes.

I'm not sure if the "sticky" docs at the top of the page cover this but you really need the Haynes manual or download to cover every stage of this.

Worth getting the starter as near spot-on as you can.
 
One thing to note, is that for optimum performance, the brushes must be correctly aligned with the stator*. It's common to mark the brush holder and body with a scratch before disassembly. I notice that in your first photo there appears to be such a mark on the brush holder, but none on the body. If there is a matching scratch on the other side of the body, it's possible that it's been reassembled the wrong way around in the past. It may be worth checking.

Robert G8RPI.

* Techie bit, the rotating field from the armature affects the stator field, skewing it, so the brush position is off-set to compensate.
 
Last edited:
I agree with both Sean and Peter about the cleaning of it just get some sort of degreaser or and gently clean with a paint brush, I wouldn't worry about cleaning the internal windings they are probably best left alone.

As Peter says get a bit of fine grade abrasive paper and get the commutator nice and clean, TBH I think they all show a bit of wear it's inevitable with copper and I wouldn't be too worried about it unless it is excessive but in your case it looks ok. Afterwards make sure you clean up the gaps between the commutator sections, I would use a pointed wooden skewer, the type you use to barbecue meat to make sure you don't do any damage.

If I remember correctly it is not possible to reassemble it 180° out as the windings wire ends only line up with the end cap with the brushes one way round.

Tony
 
Back
Top