General Rusty Sump Guard

Currently reading:
General Rusty Sump Guard

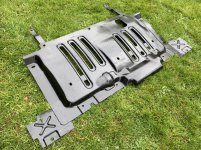
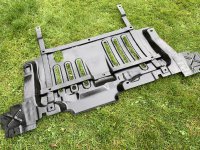
The two outer supports at the front look very much like an afterthought. They are much thinner steel, spot-welded to the rest. It’s as if they looked at the original fabrication and said ‘oh, there’s a gap there at either side - we’d better fill that in’. While the main part is thick flat strip and a tough steel tray, the side ‘wings’ are like foil by comparison.
Also interesting to note there are two designs of tray - one for the TA and one the MJ engine.
 
Last edited:
Hi.
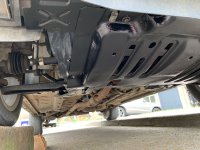
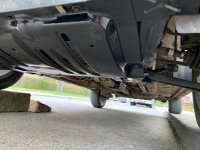
I'm really surprised at how badly they have rusted. Even in some of the photos the front subframe is showing signs of rusting. Mine although a City cross is three and a half years old and with no visible rust. It was 15 months old when I got it but I waxoyled it and this year with Lanoguard. An annual check is worthwhile as is regular cleaning of the underside with a pressure washer. Don't forget the mud trap ledge in line of site through the front wings behind the struts.
 
View attachment 216680

2014 4x4 Sump Guard -wonder why fiat never bothered to galvanise!? Thought i heard a knocking under the car!!
Apparently it wasn’t as corroded last year!
Car received an Advisory for this on recent MOT so have just changed to another OE one but treated with waxoyl.
Apparently its a testable item if originally fitted to the car!!
Guess some run without it on but its there for a reason

I would buy a new one and get it de-painted and then galvanized it, and then eventually powder coat it again. :D
 
Brush painting Hammerite on a cold day means it’s a bit ‘lumpy’, but this has to be better than it was? The four key bolts all pass through the 4mm steel bars, but I still don’t understand the point of the really thin ‘tabs’ at the front corners? Will put back on the car now.

Thankfully no sign of any sort of rust anywhere else. Like murphyv310, I was amazed to see that the driveshafts and subframes in the other photos also appear quite rusty. I suspect in both cases, cars that have seen little use and not had a good post-winter jet washing.
 

Attachments

  • 56D7AC3D-0FFD-492B-983B-C3B2FE880650.jpeg
    56D7AC3D-0FFD-492B-983B-C3B2FE880650.jpeg
    707.6 KB · Views: 99
  • 6EFCEC05-47F8-4F80-82D5-FACC3F682838.jpeg
    6EFCEC05-47F8-4F80-82D5-FACC3F682838.jpeg
    6.7 MB · Views: 102
Nice job, I had to admit looking at my pics, it seems that the subframe and shafts are rusty, this is a trick of the camera, they're just a bit grimy, and the various paint coverings are intact. The driveshaft cups do have a light coating of scale, but assume this is because they're untreated
 
It was the cushion ones I was thinking of, for a car with increased ground clearance, it seems pretty low under there.

Unlikely mine'll be going through snow, just waiting until I can stretch it's legs off road

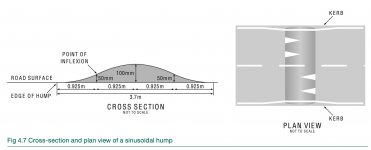
This prompted me to look up a couple of things: the 'permitted height' for speed humps, and whether there were any rules about minimum ground clearance for car makers. To the latter, no is the answer - although very few have clearance less than 100mm unladen. And for the humps, the generally recommended height is 75mm, although the rules do allow up to 100mm. (If you fancy some reading, the info is here: https://assets.publishing.service.g.../918429/ltn-1-07_Traffic-calming-guidance.pdf).

So there :)

You'd think being a designer of these sorts of things, I'd have known that...

Also being a typical designer, it didn't occur to me to measure the ground clearance of the Panda
 
100mm is one helluva hump! Wouldn't like to hit one of those at speed on a dark night. :eek:
 
Last edited:
Very nice, particularly your rustic axle stands...

Ha ha! Crude but it works. The sawn off sleeper is (by chance) the same height as the kerb, but too tall to just drive on to without it bouncing away... and the piece of tree is left over from some log-cutting fro the wood burner that happened to be 'just right'! I used to have some 'proper' ramps but they were getting a bit too rusty to be trusted :)
 
100mm is one helluva hump! Wouldn't like to hit one of those at speed on a dark night. :eek:

Bear in mind of course (as Im sure you did really) that is the high point of the peak... but that there is an angled approach to smooth that off. The maximum all-vertical height permitted is just 6mm I think.
 

Attachments

  • Untitled 3.jpg
    Untitled 3.jpg
    117.6 KB · Views: 43
Last edited:
I was about to service my TA 4x4 for the first time today so had read up on the rusty sump guard stuff. Mine was not too bad - just a bit of surface rust here and there.
All good I thought until I came to undo the bolts holding it in place. Even with a good soaking of penetrating fluid half of them would not budge and started to round off. I tried ring spanners, open ended spanners and 6 point sockets but they would not budge.
I have only had the car 6 months so do not know its history other than it is a 2015 with 19k on the clock.
Any suggestion or shall I take it to a garage and let them sort it out?
Chris
 
Last edited:
No other advice on removing them other than try and get penetrating fluid to the top of the bolt thread, most of them are just through captive nuts and only a couple go into rivnuts in the subframe, treat them a couple of times and give it time to penetrate, and use a good penetrating fluid, not WD-40.

Only other thing so can think of is heat, or hammering a smaller socket over the rounded heads.

You might be able to grind the heads off if that fails

Replace them with M6 stainless bolts and washers with a liberal coating of copper grease.

Thanks for the suggestions. I have left the bolts soaking in penetrating fluid so I will see if they ease up.
I have also been thinking of trying an impact wrench. I have a compressor so could get an air powered one for not a lot of money. I've never tried one so wondered if it would help in this situation - or am I better sticking with spanners?
 
I have an electric one which is not bad for stiff fixings, I'm not sure how much I'd trust it on rounding or crusty fasteners.

And ideally you'd want to use specific impact sockets, if you don't already have some.

Give the penetrating oil overnight to soak, and give it another go, I've often had some success using a good set of mole grips on knackered bolt heads if they're too far gone for sockets or spanners.
 
Back
Top