;************************************************
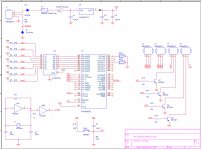
;* Project: Fiat Seicento RPM counter *
;* Author: Nebojsa Mrmak *
;* Date: 04 Feb 2008 *
;* *
;* Note: Check out www.fiatforum.com *
;* for more information *
;************************************************
ORG 0000h
MOV SP,#030h ;stack pointer vector
JMP INIT
ORG 013h ;interrupt that occurs when a pulse is detected
JMP PULSE
ORG 01Bh ;Timer 1 interrupt vector
JMP INT_T1 ;Jump to the timer1 interrupt routine
INIT: ;initialize our stuff
ORG 100h ;program start vector
SETB PX1
MOV TMOD,#00010001b ;establish T1 as a 16 bit timer - at 12MHz ~ 0.1s
MOV IE,#10001100b ;enable ints, enable T1, INT0 int.
MOV TH1,#11111101b ;reset the timer
MOV TL1,#11110000b ; -||-
;init some values here:
MOV P1,#1
MOV R0,#0
MOV R1,#0
MOV R2,#0
MOV R3,#0
MOV R4,#0
MOV R5,#0
MOV R6,#0
MOV R7,#0
MOV 0018h,#0
MOV 0019h,#0
MOV 001Ah,#0
MOV 001Bh,#0
MOV TCON,#01010000b ;start the timer
MAIN:
;The following four blocks are used to display the numbers on four 7-seg displays.
MOV A,#0
ACALL MASK
MOV P1,#0
MOV P0,A
MOV P1,#1
MOV A,0018h
ACALL MASK
MOV P1,#0
MOV P0,A
MOV P1,#2
MOV A,0019h
ACALL MASK
MOV P1,#0
MOV P0,A
MOV P1,#4
MOV A,001Ah
ACALL MASK
MOV P1,#0
MOV P0,A
MOV P1,#8
;and repeat.
JMP MAIN
INT_T1:
;timer overflow interrupt!
PUSH ACC
PUSH PSW
MOV TH1,#11111101b ;reset the timer
MOV TL1,#11110000b ; -||-
CPL P3.0 ;just flash a debug LED, safe to remove this line
MOV A,R0
ADD A,#10
JNC NO_OVERFLOW
INC R1
NO_OVERFLOW:
;if the low byte of the timer is still less than 255
MOV R0,A
POP PSW
POP ACC
RETI ;end timer overflow interrupt here
PULSE:
;ecu LT pulse interrupt start!
MOV 80A7h,#10101011b ;reset the watchdog timer.
;delay a little, debouncing while i was testing it with a button.
;Possibly safe to remove when in a car, ecu shouldn't have bounce.
MOV R7,#10
LOOP: MOV R6,#10
DJNZ R6,$
DJNZ R7,LOOP
;end delay
JB P3.3,NEXT ;if button is still pressed, do the interrupt
RETI ;else return from interrupt
NEXT:
MOV TCON,#00000000b ;stop the timer
PUSH ACC
PUSH PSW
MOV P2,R0 ;debug, outputs R0 value to port 2, safe to remove this line
MOV A,R0 ;push R0 and R1 onto the stack
PUSH ACC ;R0 and R1 hold the number of times the timer overflowed x10, and since it overflows once each
MOV A,R1 ;1ms, then it's the number of ms passed between 2 revs
PUSH ACC
;the following block practically divides the timer by 66
;(max. value the timer can achieve is 666, so you get 1/10 of that value, and the max is 0.001s)
MOV A,TL1
MOV R2,A ;move TL1 to r2 (TL1 - timer 1 lower byte)
MOV A,TH1
MOV R3,A ;move TH1 to r3 (TH1 - timer 1 higher byte)
MOV R1,#66 ;move 66 to R1 and 0 to R0 so we can divide
MOV R0,#0
LCALL div16_16 ;call the division routine (borrowed from someone else)
MOV A,R2 ;put the lower byte of the result into 0018h
MOV 0018h,A
POP ACC ;pop R1 and R0 from the stack
MOV R1,A
POP ACC
MOV R0,A
MOV A,R0 ;add the calculated number of ms on the timer to the number of overflows
ADD A,0018h
JNC NO_OVERFLOW1
INC R1
NO_OVERFLOW1:
TEST0: ;a small test to see if we're going to divide by 0 (we don't want that)
CJNE R1,#0,TEST_END ;if either register is non-zero, carry on
CJNE R0,#0,TEST_END
POP PSW ;if both are zero, pop the values from the stack and return from interrupt
POP ACC ;better to give up here than divide by 0, we'll get the rpm on the next 2 pulses
RETI
TEST_END:
MOV A,R0
MOV R2,A
MOV A,R1
MOV R3,A
MOV R1,#11101010b
MOV R0,#01100000b
LCALL div16_16 ;get the rpm using the formula: 60000/10* ms passed
MOV A,R3
MOV R1,A
MOV A,R2
MOV R0,A
;the following few blocks divide by 10, and get the individual digits that we're to output on our 7-segment displays
;for example, 1234 rpm:
;1234 div 10 = 123, mod = 4, least significant digit is 4
;123 div 10 = 12, mod = 3, second digit is 3
;12 div 10 = 1, mod = 2, third is 2, fourth is 1
;save each digit to it's designated ram address, which will be read and displayed in the main loop.
;note that the least significant digit is always zero, to make the display more readable (less fluctuations, easier code)
;and why the hell would you care if you're at 3501 or 3500 rmm anyway? :)
MOV R3,#0
MOV R2,#10
LCALL div16_16
MOV A,R0
MOV 0018h,A
MOV A,R3
MOV R1,A
MOV A,R2
MOV R0,A
MOV R3,#0
MOV R2,#10
LCALL div16_16
MOV A,R0
MOV 0019h,A
MOV A,R3
MOV R1,A
MOV A,R2
MOV R0,A
MOV R3,#0
MOV R2,#10
LCALL div16_16
MOV A,R0
MOV 001Ah,A
MOV A,R3
MOV R1,A
MOV A,R2
MOV R0,A
MOV R3,#0
MOV R2,#10
LCALL div16_16
MOV A,R0
MOV 001Bh,A
CPL P2.1 ;debug, safe to remove this line
MOV TH1,#11111101b ;reset the timer
MOV TL1,#11110000b ; -||-
MOV R0,#0 ;reset the overflow counter
MOV R1,#0
POP PSW
POP ACC
MOV TCON,#01010000b ;re-start the timer
RETI ;return from interrupt
MASK: ; Subroutine that translates digits to 7seg
INC A
MOVC A,@A+PC
RET
DB 0C0H ; Mask for 0
DB 0F9H ; Mask for 1
DB 0A4H ; Mask for 2
DB 0B0H ; Mask for 3
DB 099H ; Mask for 4
DB 092H ; Mask for 5
DB 082H ; Mask for 6
DB 0F8H ; Mask for 7
DB 080H ; Mask for 8
DB 090H ; Mask for 9
; **** the following routine is NOT mine, i borrowed it from www.8052.com since i couldn't have been bothered to write my own.
; **** it's very well documented, so you should have no problems with it if you need to know how it works anyway
; **** it divides R1R0 by R3R2 in 16 bit and stores the result in R3/R2 and the rest in R1/R0
div16_16:
CLR C ;Clear carry initially
MOV R4,#00h ;Clear R4 working variable initially
MOV R5,#00h ;CLear R5 working variable initially
MOV B,#00h ;Clear B since B will count the number of left-shifted bits
div1:
INC B ;Increment counter for each left shift
MOV A,R2 ;Move the current divisor low byte into the accumulator
RLC A ;Shift low-byte left, rotate through carry to apply highest bit to high-byte
MOV R2,A ;Save the updated divisor low-byte
MOV A,R3 ;Move the current divisor high byte into the accumulator
RLC A ;Shift high-byte left high, rotating in carry from low-byte
MOV R3,A ;Save the updated divisor high-byte
JNC div1 ;Repeat until carry flag is set from high-byte
div2: ;Shift right the divisor
MOV A,R3 ;Move high-byte of divisor into accumulator
RRC A ;Rotate high-byte of divisor right and into carry
MOV R3,A ;Save updated value of high-byte of divisor
MOV A,R2 ;Move low-byte of divisor into accumulator
RRC A ;Rotate low-byte of divisor right, with carry from high-byte
MOV R2,A ;Save updated value of low-byte of divisor
CLR C ;Clear carry, we don't need it anymore
MOV 07h,R1 ;Make a safe copy of the dividend high-byte
MOV 06h,R0 ;Make a safe copy of the dividend low-byte
MOV A,R0 ;Move low-byte of dividend into accumulator
SUBB A,R2 ;Dividend - shifted divisor = result bit (no factor, only 0 or 1)
MOV R0,A ;Save updated dividend
MOV A,R1 ;Move high-byte of dividend into accumulator
SUBB A,R3 ;Subtract high-byte of divisor (all together 16-bit substraction)
MOV R1,A ;Save updated high-byte back in high-byte of divisor
JNC div3 ;If carry flag is NOT set, result is 1
MOV R1,07h ;Otherwise result is 0, save copy of divisor to undo subtraction
MOV R0,06h
div3:
CPL C ;Invert carry, so it can be directly copied into result
MOV A,R4
RLC A ;Shift carry flag into temporary result
MOV R4,A
MOV A,R5
RLC A
MOV R5,A
DJNZ B,div2 ;Now count backwards and repeat until "B" is zero
MOV R3,05h ;Move result to R3/R2
MOV R2,04h ;Move result to R3/R2
RET
END


") It's yours as much as it's mine
It's yours as much as it's mine