Technical Rocker arm sideways play

Currently reading:
Technical Rocker arm sideways play

StefP0342

Member
Joined
Mar 6, 2023
Messages
13
Points
77
Location
Amersfoort
Hi!

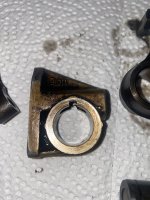
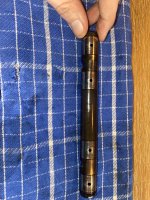
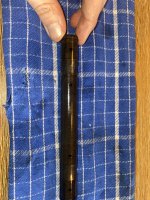
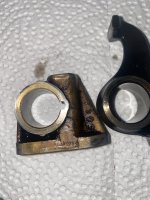
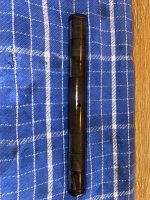
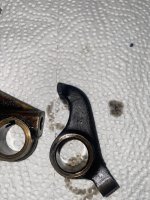
My 1970 Fiat 500L started to run a little rough and noisy (noise is like valve clatter when clearance is incorrect) after about 2-3 minutes after startup, so I wanted to adjust the clearance to the correct settings. When adjusting the clearances, the bolts were completely worn so I had to order new ones in order to set the clearances. After I set them correctly, the engine still runs very noisy as if the clearance is too loose. I set the clearance tighter and wider, but the noise remains in both settings. I noticed that rocker 2 (counting from the flywheel side) has quite some sideways play on the rocker arm. If I move the arm in both directions quickly i hear the sound which i also hear when the engine is running. A local mechanic told me the play in the rocker arm did not matter, but I don't trust the noise when the engine is running.

Could the sideways play in the rocker arm be the cause of the noise? if so, what is the best way to fix it?

I could not really find the answer in other threads so I hope some of you have an answer.
 
Rootes group used a light green type of metallic paint on their factory reconditioned engines. The nearest I could get to it was a Hammerite shade for my old 1937 Talbot 10hp.
View attachment 419830
I have seen the Roots Group paint job, though much preferred the BMC Gold Seal job on their recon engines, Ford used to do a darker blue if I recall correctly, the REME ones were just what I would call a sickly peppermint green.Re the Talbot 10Hp, I always fancied the later Sunbeam Talbot 90 and like many cars over the years I should have bought one when the prices were only in double figures. An ex boss from when I was an apprentice has recetly bought an Allard J2, I believe, that and the AC Ace and D type Jaguar are something I could only yearn for.;)
Just remembered, at the same Government approved Auction Company many years ago I bought a pallet of thick rubber squares, some months later I got a banging on my front door and was confronted with two very large gentlemen who introduced themselves as Military Police, after which the next words they said were to the effect that they "were not arresting me yet!" ,
It turned out the pallet of rubber squares were anti sonar tiles for nuclear subs and that some Government "scrap men" had exceeded their remit. Fortunately I had the full receipt to prove I had done nothing wrong and they returned the next day with a van to collect the tiles.
I would say neither the Government or the Auction company reimbursed me!:(
 
Last edited:
Bear with me on this...there may be mistakes; we are all prey to them when we rely on memory or the wisdom of others. ;)

I have attached a main image of the dismantled rocker-shaft of a 110F engine. You will find this marked on the aluminium parts that support it. This is an important thing to note (and here is the memory bit), because the design of the shaft on the ones marked 126(A) may be different.

You can see the highly polished surface, which is the underside of the shaft when installed, where the rocker-arms are thrust upwards in the course of their work. Turn the shaft over and the shaft is unworn, but there is an additional oil supply drilling. In theory, this shaft can be rotated 180 degrees in the vertical plane and it may be possible to bodge a bit more life out of it. As far as I remember, I have handled one of the later shafts that had the oil-drilling on one side only. If this shaft was dismantled and reversed there would be no oil feed to the loaded interface between the rocker and arm, which would lead to disastrous wear or seizure. Is this a possibility in this case?

As an aside, I notice that the rocker-arms pictured, which are from separate assemblies, are marked differently and are slightly different visually. The chunkier (rustier) and in detail, less finely finished object is marked, "FUGINI", whilst the other has a symbol that is hard to decipher, but which may be a capital C with an E in the middle.

Yes, the shaft for the 126A is indeed different. The posts are marked "126AB-0CC" and the oil opening only exists on the bottom face. The rocker arms are all marked "FUGINI".

At the time in the early 90s at the same auction company I could have bought a REME "reconditioned" Rolls Royce Merlin V12 engine all in a palletised wooden box, I didn't and it sold for £500 hammer price. I often wondered if it was for a tank which could just stop or a rebuilt Spitfire which would have been a bit more concerning.;)

I recall there was a car that was powered by a Rolls-Royce Merlin V12 from a Boulton Paul Balliol. I always wondered where one could obtain such an engine!
 
Yes, the shaft for the 126A is indeed different. The posts are marked "126AB-0CC" and the oil opening only exists on the bottom face. The rocker arms are all marked "FUGINI".


I recall there was a car that was powered by a Rolls-Royce Merlin V12 from a Boulton Paul Balliol. I always wondered where one could obtain such an engine!
We have talked here before about that or similar car, as I understand it one was originally fitted with the Spitfire Supercharger,(the WW2 plane version not the Triumph car one, before someone says they didn't come with a supercharger standard;).) but they couldn't keep silencers on it, so had to opt for the tank option with carburetor. Either way must have been a handful. I think it was a John Dodd's version that got national publicity.
Mind you if you had one today, I am not sure how well it would run on E10:).
 
Bear with me on this...there may be mistakes; we are all prey to them when we rely on memory or the wisdom of others. ;)

I have attached a main image of the dismantled rocker-shaft of a 110F engine. You will find this marked on the aluminium parts that support it. This is an important thing to note (and here is the memory bit), because the design of the shaft on the ones marked 126(A) may be different.

You can see the highly polished surface, which is the underside of the shaft when installed, where the rocker-arms are thrust upwards in the course of their work. Turn the shaft over and the shaft is unworn, but there is an additional oil supply drilling. In theory, this shaft can be rotated 180 degrees in the vertical plane and it may be possible to bodge a bit more life out of it. As far as I remember, I have handled one of the later shafts that had the oil-drilling on one side only. If this shaft was dismantled and reversed there would be no oil feed to the loaded interface between the rocker and arm, which would lead to disastrous wear or seizure. Is this a possibility in this case?

As an aside, I notice that the rocker-arms pictured, which are from separate assemblies, are marked differently and are slightly different visually. The chunkier (rustier) and in detail, less finely finished object is marked, "FUGINI", whilst the other has a symbol that is hard to decipher, but which may be a capital C with an E in the middle.

View attachment 419825 View attachment 419828View attachment 419826
Okay, I have stripped the assembly and if I understand you correctly, I have 110F supports and shaft, but the rockers are 126? Now that I have stripped them I dont really know what to do with them haha, I did not find anything that is very obviously wrong. I think I will order a new assembly and put that on

Also I am extremely grateful for all of your input, it really helps me! Thanks a lot
 

Attachments

  • 6B0D190F-4C69-405C-A9C8-7AB8074D9AA8.jpeg
    6B0D190F-4C69-405C-A9C8-7AB8074D9AA8.jpeg
    1.4 MB · Views: 39
  • CB6881DF-FE3F-4604-90E6-6D2F335513F4.jpeg
    CB6881DF-FE3F-4604-90E6-6D2F335513F4.jpeg
    2.5 MB · Views: 39
  • C26D411A-8CC0-40E5-AE20-B6526BE0166F.jpeg
    C26D411A-8CC0-40E5-AE20-B6526BE0166F.jpeg
    2.5 MB · Views: 42
  • 63B428D9-9CC8-463B-AD3E-087B47D123BE.jpeg
    63B428D9-9CC8-463B-AD3E-087B47D123BE.jpeg
    1.4 MB · Views: 34
  • 94C8DD29-13F7-45AF-BACC-2D841A7F3604.jpeg
    94C8DD29-13F7-45AF-BACC-2D841A7F3604.jpeg
    2.5 MB · Views: 31
  • 9BF5ADE3-5D87-47D8-93C5-625DBDEF2EAB.jpeg
    9BF5ADE3-5D87-47D8-93C5-625DBDEF2EAB.jpeg
    1.5 MB · Views: 32
Last edited:
Okay, I have stripped the assembly and if I understand you correctly, I have 110F supports and shaft, but the rockers are 126? Now that I have stripped them I dont really know what to do with them haha, I did not find anything that is very obviously wrong. I think I will order a new assembly and put that on

Also I am extremely grateful for all of your input, it really helps me! Thanks a lot

I think you need a new assembly as the surfaces on that shaft look scuffed. Your next move would be to carefully measure the ovality of the shaft and to check the clearances between it and each rocker, which is quite tricky to achieve. I think you can be pretty certain that the decision to get a new one is the correct one and saves a lot of wasted time. :) When I have measured them, even apparently quite good, used assemblies have been out of tolerance.
 
I think you need a new assembly as the surfaces on that shaft look scuffed. Your next move would be to carefully measure the ovality of the shaft and to check the clearances between it and each rocker, which is quite tricky to achieve. I think you can be pretty certain that the decision to get a new one is the correct one and saves a lot of wasted time. :) When I have measured them, even apparently quite good, used assemblies have been out of tolerance.
I think I am going to order the new assembly then. I have only found an assembly on axel gerstl, is that an okay supplier? Are there other things I should be considering when installing the new assembly? Or just install and see if it works?
Again, many thanks for your support!!
 
I think I am going to order the new assembly then. I have only found an assembly on axel gerstl, is that an okay supplier? Are there other things I should be considering when installing the new assembly? Or just install and see if it works?
Again, many thanks for your support!!
Axel Gerstl is an excellent supplier. Given that you have a lot of people interested in this thread, I would await at least a second opinion considering this is 200 Euro.
The problem is that there may be other issues that have either contributed to this or have also been affected by the same cause. For example, there may be a problem in the oil supply or in the past it may have run on bad or low oil.
One thing is for certain, if this was the only problem, you will be amazed how well it ill run with a new one.
Good idea, I will await Some more replies.
There was a lot of oil (filthy oil, lack of flow of oil?)coming out of the shaft when removing the posts so to me, a lack of oil does not seem likely. As for the oil pressure: Should the light go off on turnover or when the engine starts up?
 
Last edited:
Good idea, I will await Some more replies.
There was a lot of oil (filthy oil, lack of flow of oil?)coming out of the shaft when removing the posts so to me, a lack of oil does not seem likely. As for the oil pressure: Should the light go off on turnover or when the engine starts up?
I have a brand new complete rocker shaft here in the UK, seems they are a rare thing as I can’t find any others in the UK.
4CB7ED18-3911-4FEE-B208-F9DEE6834451.jpeg9C4B83CC-E5AC-43B8-B9D2-ADB1F27FDA4A.jpeg
 
I have a brand new complete rocker shaft here in the UK, seems they are a rare thing as I can’t find any others in the UK.
View attachment 419922View attachment 419923
I would take up David's (Toshi) offer---just for the record, MOTOBAMBINO can supply brand-new, complete rocker-shaft assemblies for £175 (inc VAT). Of course if you are ordering from overseas, you may not have to pay the VAT.
 
I would take up David's (Toshi) offer---just for the record, MOTOBAMBINO can supply brand-new, complete rocker-shaft assemblies for £175 (inc VAT). Of course if you are ordering from overseas, you may not have to pay the VAT.
Apologies to Mark at Motobambino, I did look on the web site but failed to find the rockers for some reason. I would always recommend that company for 500 and 126 parts.
 
update: I have mounted all the parts and Some noises are now fixed. Sadly the big one still remains after warmup. I was looking through old invoices, and one said: “re-mounted cooling fin as that makes a rambling sound” (Koelvin in dutch). Could it be that that has come loose? I don’t know what part they could mean, the fan, or one of many fins inside the cowling. Any ideas?
If not i’m going to a garage with the fiat soon anyways so I will ask them to look into it
Just a thought, if you think fan related, drop off the fan belt for a test.
 
Could be a few things. First, to eliminate the fan itself from the noise source. Pull the belt off, and run the engine for a few seconds to see if the noise has subsided. The fans as they age are known to crack at the mount face and cause contact with the fan shroud surface.

If not, then it could be originating from a defector tab that is inside the fan shroud. Inside the shroud there is a welded tab that helps deflect air before the cylinders, these have known to brake loose on one side (IIRC, its spot welded on the back half, and bolted on the front half.
 
update: I have mounted all the parts and Some noises are now fixed. Sadly the big one still remains after warmup. I was looking through old invoices, and one said: “re-mounted cooling fin as that makes a rambling sound” (Koelvin in dutch). Could it be that that has come loose? I don’t know what part they could mean, the fan, or one of many fins inside the cowling. Any ideas?
If not i’m going to a garage with the fiat soon anyways so I will ask them to look into it
The 'cooling fin' could be the air -deflection plate that goes between the 2 halves of the fan-shroud, and is just on top of the fan. Normally, it is welded (with little lugs) to one half of the shroud, and then bolted in place onto the other half of the shroud. It can be got at by removing the top cover of the fan-shroud. You will see the plate straight away.
 
“The 'cooling fin' could be the air -deflection plate that goes between the 2 halves of the fan-shroud, and is just on top of the fan. Normally, it is welded (with little lugs) to one half of the shroud, and then bolted in place onto the other half of the shroud. It can be got at by removing the top cover of the fan-shroud. You will see the plate straight away.”
Again, thanks for all the tips. It is not the fan, noise continued without the belt, although the sound was less. Then I put a homemade stethoscope in the circled area and suddenly it was incredibly loud. Based on your descriptions this is exactly where this fin is located. Kind of strange How i missed it in previous attempts to locate the sound…
Anyway, to continue it would be best to dismount the top of the airhousing and inspect further?
 

Attachments

  • B531E685-B25F-4EB8-A0AB-0FA8178D624D.jpeg
    B531E685-B25F-4EB8-A0AB-0FA8178D624D.jpeg
    893.4 KB · Views: 38
FYI, the inside of the duct can be quite filthy so be prepared when you open it up. As Hobbler mentioned above, the fin (in my attached photo, the panel with the "V" indentation) is attached to the cowling on the duct opening half and two bolts on the generator half (apologies for the error there!). It may be lose making contact with the duct that is attached to the cover, right around where you have marked. The duct itself could have come loose and making contact against the top cover.

On a side note, I have never seen a fuel line in that position...I suppose if it works and hasn't given you any problems...
 

Attachments

  • IMG_4478.jpg
    IMG_4478.jpg
    1.7 MB · Views: 29
  • IMG_4479.jpg
    IMG_4479.jpg
    2.3 MB · Views: 31
Last edited:
FYI, the inside of the duct can be quite filthy so be prepared when you open it up. As Hobbler mentioned above, the fin (in my attached photo, the panel with the "V" indentation) is attached to the cowling on the duct opening half and a single bolt on the generator half. It may be lose making contact with the duct that is attached to the cover, right around where you have marked. The duct itself could have come loose and making contact against the top cover.

On a side note, I have never seen a fuel line in that position...I suppose if it works and hasn't given you any problems...
Yes, it would be a good idea to take the fan-housing top-cover off and inspect the 'air-deflector' plate. You might find that there are 4 holding luge---2 welded to one side and 2 bolts on the other side. 2 things to point out---(1) it would be wise to remove that fuel-filter because (a) it is in a position that if it should leak, it will leak onto the dynamo and, (b) you do not need a 4th fuel filter--the engine already has 3--tank unit,top of fuel-pump and top of carb. (2) I also have never seen a fuel line lead that way OVER the fan-housing, but you DO need a clip at the flexible fuel-line connection to the 'hard fue-line.
 
FYI, the inside of the duct can be quite filthy so be prepared when you open it up. As Hobbler mentioned above, the fin (in my attached photo, the panel with the "V" indentation) is attached to the cowling on the duct opening half and two bolts on the generator half (apologies for the error there!). It may be lose making contact with the duct that is attached to the cover, right around where you have marked. The duct itself could have come loose and making contact against the top cover.

On a side note, I have never seen a fuel line in that position...I suppose if it works and hasn't given you any problems...

I removed the top cover which was quite a struggle, one of the previous owners loved to really tighten screws down... Sadly there is one badly worn screw that attaches to the head so i hope that thread is not ruined..... sigh...
See the images/videos attached of what i found. There is nothing loose, and to my surprise it is quite clean...
The bottom of the airduct seems to have been hit or dented repeatedly, although the duct itself is still attached to the top cover.

I can not move the deflector plate at all (see the video)
I suppose the noise starts when the engine heats up, indicating the air deflector or top plate gets more room once the engine expands due to heat and therefore the air deflector starts to make more noise and maybe hits the air duct? Could that be what is happening? To me that is a bit of a stretch.

Do you see anything else abnormal? If not, how can I check what is wrong?

Yes, it would be a good idea to take the fan-housing top-cover off and inspect the 'air-deflector' plate. You might find that there are 4 holding luge---2 welded to one side and 2 bolts on the other side. 2 things to point out---(1) it would be wise to remove that fuel-filter because (a) it is in a position that if it should leak, it will leak onto the dynamo and, (b) you do not need a 4th fuel filter--the engine already has 3--tank unit,top of fuel-pump and top of carb. (2) I also have never seen a fuel line lead that way OVER the fan-housing, but you DO need a clip at the flexible fuel-line connection to the 'hard fue-line.

Also for the fuel line: i will add the clip, but rerouting it to the correct position will be tricky, considering the hard fuel line points towards the top of the shroud. I will also remove the filter, but all that is for later.

Edit: Could i start it without the top cover installed and let it run for 2-3 of minutes in order to test if the noise starts? Or is that a terrible idea?


Again, thanks for your help!

Stef
 

Attachments

  • WhatsApp Video 2023-03-21 at 20.29.19.mp4
    5.2 MB
  • WhatsApp Image 2023-03-21 at 20.29.22.jpeg
    WhatsApp Image 2023-03-21 at 20.29.22.jpeg
    551.9 KB · Views: 30
  • WhatsApp Image 2023-03-21 at 20.29.20.jpeg
    WhatsApp Image 2023-03-21 at 20.29.20.jpeg
    396.9 KB · Views: 26
  • WhatsApp Image 2023-03-21 at 20.29.18 (1).jpeg
    WhatsApp Image 2023-03-21 at 20.29.18 (1).jpeg
    555.7 KB · Views: 28
  • WhatsApp Image 2023-03-21 at 20.29.18.jpeg
    WhatsApp Image 2023-03-21 at 20.29.18.jpeg
    431.1 KB · Views: 30
Last edited:
When you touched the vane on the fan did I detect a rattle in your video? If so it is on the verge of failure.
also re heat expansion you are looking on the cooling side of the engine so that will not be a factor.
 
Back
Top