Many have commented about the difficulty in accessing or replacing glow plugs on the Panda with the diesel MultiJet Engine, which is necessary if the 'Check Glow Plugs' warning comes up on the dash. I replaced one of mine and found that, with the right tools its wasn't too tricky - maybe I was lucky. The photos are from a Euro 6 engined car (2018 model). The arrangement of the turbo and heat shield is not quite the same on earlier models but the principle is the same.
To test which plug is faulty, follow the first sections here until the exposed connector 'pin' on the end of each plug can be reached. Then use a multimeter on the resistance setting to measure the resistance between that connector and earth. It should be minimal (less than an ohm). If the plug has failed it will be open circuit.
The original-fit parts were labelled 'Hidria'. I replaced with NGK part number Y9001AS, about £14 each from GSF Car Parts.
Tools: standard 10mm socket and spanner, 9mm 6-sided deep socket, universal joint for socket, extension bar and ratchet (ideally 3/8th inch socket set owing to space); magnetic pick-up tool, 'pick' tool to release cable connector, low-range torque wrench (set to 12Nm)
You can click the photos to see them full size.
.jpeg")

Above: Start by removing the bolt securing the air intake to the bodywork, then remove the intake by pulling and twisting at the same time – this just detaches from the air filter housing.


Remove the heat shield from over the turbo (if the engine is warm, wait as it will be very hot here) - there are two nuts and two bolts, all 10mm heads. Take care not to drop the short bolt on the front, as it then falls onto the sump guard (on the 4x4) -- I did that when testing them, and it took longer to remove the sump tray to recover the bolt that any other part of this!


To test which plug is faulty, follow the first sections here until the exposed connector 'pin' on the end of each plug can be reached. Then use a multimeter on the resistance setting to measure the resistance between that connector and earth. It should be minimal (less than an ohm). If the plug has failed it will be open circuit.
The original-fit parts were labelled 'Hidria'. I replaced with NGK part number Y9001AS, about £14 each from GSF Car Parts.
Tools: standard 10mm socket and spanner, 9mm 6-sided deep socket, universal joint for socket, extension bar and ratchet (ideally 3/8th inch socket set owing to space); magnetic pick-up tool, 'pick' tool to release cable connector, low-range torque wrench (set to 12Nm)
You can click the photos to see them full size.
Above: Start by removing the bolt securing the air intake to the bodywork, then remove the intake by pulling and twisting at the same time – this just detaches from the air filter housing.
Remove the heat shield from over the turbo (if the engine is warm, wait as it will be very hot here) - there are two nuts and two bolts, all 10mm heads. Take care not to drop the short bolt on the front, as it then falls onto the sump guard (on the 4x4) -- I did that when testing them, and it took longer to remove the sump tray to recover the bolt that any other part of this!
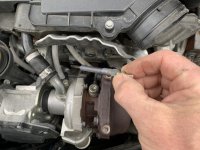
- Using a 'pick' tool, I was able to unclip the glow plug lead by pulling it straight towards me and move it to one side. (At this point, you can test each plug with a multimeter to find the faulty one. In the photo with the magnetic tool on the plug, it's attached itself to the metal pin you need to be testing) )
- The glow plugs need an unusual, 9mm socket. I used a 6-sided (high torque) deep socket (much less likely to round anything off than a 12-cornered one), coupled with a universal joint and the long extension of my 3/8" drive socket set. The plug was 'tight-ish' but not hard to initially loosen, and then unscrewed easily. Note it's a long and fine thread so needs lot of turns to fully remove.
- To extract the now loose plug from down where it lurks I used a magnetic pick-up tool.
- drop the new plug in, and using the same tools wind it up to finger tight.
- The torque wrench setting for the plug is just 12Nm - that really is just finger tight and the tiniest tweak further...
- Line the plug lead back up on the plug and use the blade of a long screwdriver to push it fully home until it clicks.
- Reassembly is (the classic) 'reverse of removal'
- Reiterating the point that (unlike mentioned in some other posts) it is a 9mm socket that's needed, with a universal joint too. This is a 3/8 drive that worked well in the fairly confined space.