Technical Rear Shocks Upgrade

Currently reading:
Technical Rear Shocks Upgrade

Never lift the rear of the car by jacking in the middle of the twist beam; it's not designed for this kind of point loading and you risk permanently distorting it. This will throw out the (non-adjustable) rear suspension geometry and excessive tyre wear will result.

When these cars were new, some had a label on the beam specifically warning against this, but I suspect mot of these labels will have fallen off a long time ago now.
Correct👍

And Important
 
So it looks as though when doing this job the only place you can use a jack is on the proper jacking points. I couldn't even see anywhere to put an axle stand.
 
I have 20mm plywood pads with 50 x 25 mm wood blocks screwed on. These go under the sill jacking points (marked by inverted triangle on the sill side). I can then safely use axle stands under the sills without bending the flange. At the front, I used them directly for jacking. The stands go under the subframe using the retaining bolt and shape of the frame to prevent the stand slipping. At the back, I jack under the spring pan near the shock absorber brackets. The axle stands go under the sills.

Edit - I made an L-shape beam from 6 x 2 stud work timber that goes from left to right all the way under the rear axle cross beam. It works and allows one jack to lift the whole back end. But it's such a hassle to use there is no benefit.
 
So it looks as though when doing this job the only place you can use a jack is on the proper jacking points. I couldn't even see anywhere to put an axle stand.
Empty boot
Empty fuel tank

Jack under the axle but not in the centre in stead near the spring where its stronger

It's stromger here and you are lifting less than 50% the weigh


Or just use the factory jack properly and use the pads for the axle stands
 
A bit like a poor man's tap where you cut a slot in a bolt.
It would be except for the tapper and pilot at the end of the thread make it almost impossible to cross thread

Since their introduction in late 1990s

Gone are the days when you had to try several times to start a bolt in a hole without cross threading it, and it required skill

It's funny. I remember how it often took several goes to start a bolt.. Yet didn't immediately notice that they now nearly always start first time now.

Same bolt is used on the Panda, 500, punto

Tens of millions fitted, without any problems
 
Tens of millions fitted, without any problems
But when you don't fit the top bolt first and don't understand how damaging these can be, they WILL go cross thread. The damage is so bad you can't clean the threads with a tap.

Fit the top bolt first and all will be well. Ideally check before offering up the new shock so you know the correct angle. Belt, braces and glue.
 
I'm in the process of trying to fit the new bump stops. It's very frustrating. I cannot get the rubber nipple to fit into the hole. I've cleaned the hole with a small rotary brush and have put washing up liquid on the nipple but it just doesn't want to twist in! Has anyone got any other ideas please? At this rate I'm going to have to cut down the diameter of the nipple and I really don't want to do that!
 
Cut a length if 20mm (3/4")** dowel to go inside the bump stop (square pine trimmed with a knife will do) and stick out by about an inch (or 30mm). Round off the top end. You do not want corners that can damage the rubber bump stop.

Use the jack to press the bump stop into place with red rubber grease as lubricant. Detergent is a bad idea as it's pretty corrosive to most metals. Apply pressure from the jack and rock the bump stop nipple to get it moving into place. Gradually add more jack and more waggling until it's done. It should have been Terry Wogan's Jack & Jill gag. ;):love:

** I think I used 20mm dowel. You'll need to check what fits.
 
I tried copper grease and a jack under the spring pan to compress them but still couldn't get them in. My patience ran out and I cut a couple of flats on the nipple flange with a Stanley knife. I then managed to twist them in.

Not sure how long it will be before they end up in the bottom of the springs. I will then resort to JB Weld or No More Nails to glue them in place.

I think they are a fairly bad design. I would love to know how they got them in on the production line.

Thanks for the help and advice everyone. It's much appreciated.

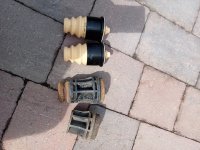
Photo shows the appalling state of the old ones against the new ones.
 

Attachments

  • IMG20230518113951.jpg
    IMG20230518113951.jpg
    5.6 MB · Views: 44
I think they are a fairly bad design. I would love to know how they got them in on the production line.

Thanks for the help and advice everyone. It's much appreciated.
A genuine replacement part is normally just a twist while pushing, simple

This kind of thing happens all the time

And why garages will not normally fit customer supplied part

Never had any experience of PUR brand, so dont know it it's just a bad batch
 
Last edited:
I've never heard of PUR brand either. My bump stops are made by Febi Bilstein. I will buy the genuine Fiat ones next time!
 
I can see why you had problem fitting them

If you compare these febi bump stops with yours

The shape of the nipples are completely different

The old febi has a gradual slop until it drops through the hole

Yours has much more of a ledge

IMG_20230518_194018.jpg

IMG_20230518_193925.jpg
 
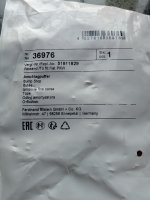
I can see what you mean. The number printed on the bump stop shows them to be manufactured 11/22. So maybe Febi have changed the design. Photos show packaging with part number etc. Unless I've been sold the wrong part. I'll try Googling the part number
 

Attachments

  • IMG20230518195928.jpg
    IMG20230518195928.jpg
    3 MB · Views: 27
  • IMG20230518195937.jpg
    IMG20230518195937.jpg
    3.2 MB · Views: 29
I agree. Doesn't look like a quality part does it! The (older?) grey Febi bump stop with the same part number looks better to me - especially as I'm sure it would be easier to fit.
 
Back
Top