Technical Rear Shocks Upgrade

Currently reading:
Technical Rear Shocks Upgrade

thornebt

Member
Joined
Jun 14, 2020
Messages
49
Points
64
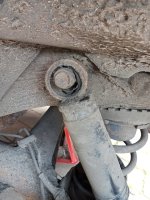
Both the rear bump stops on my 100hp Panda have become detached and are making a racket banging around inside the springs.

Is it possible to buy some better shocks that won't have the bump stops fall off after a couple of years? Surely not all shocks will have such bad design?

If better shocks aren't available I'll try to fit a central bolt to fix them into place although I realise that rust may prevent this.

I'm guessing that removing the shocks isn't too bad a job.
 
Some advise on here

 
Must be difficult tightening the top bolts with the car on the floor? Shame I haven't got a pit!
 
Must be difficult tightening the top bolts with the car on the floor? Shame I haven't got a pit!
Not as bad as you'd expect


There enough room


On the 100hp the distance from the ground to the wheelarch should be 621mm

So you can load the rear to close to this

Instead of filing the tank


169005163_2.jpg
 
I could probably remove the bump stops by cutting them in half as they would then fit through the spring coils. Without them I wonder if there is a danger of the springs compressing too much and maybe breaking. With them detached but still knocking about in the bottom of the spring it might save the spring compressing too much - but probably not!

I'm going to try to come up with a solution to fix them in place possibly with a central bolt as there seems to be a centre hole in the bump stop.
 
Bump stops sit inside the spring coils. My car has has a pair by Febi built for the Fiat Coupe. They give more wheel travel.

The shocks are bolted behind the wheel with a long bolt at the bottom and an overhung bolt at the top. To fit them correctly, Fit the top first that way you an avoid cross-threading the bolts. It is a self cleaning type and very easy to get wrong. Leave it loose. The bottom bolt goes through two tubes at the back of the spring pan. It can't be cross-threaded.
Fit both with threads nipped gently. Jack up the spring pan until the car lifts off the axle stand then fully tighten both bolts. You can now fit the wheels and take the car off the stands.
 
I would like to fit air springs at the back but finding the correct rating is near impossible. Everything I've seen is for much bigger vehicles.
 
Thanks very much. Very useful information. Can I do one side at a time? I read somewhere about putting a trolley jack under the rear axle trailing arm and doing both at the same time. If I can do one side at a time I will just follow your procedure.

It's a top tip about fitting top bolt first to avoid cross threading it. That could have been a disaster! Cheers.
 
Never heard of self cleaning bolts. Is it a good idea to put a smear of copper grease on the threads?
 
Never heard of self cleaning bolts. Is it a good idea to put a smear of copper grease on the threads?
If you use anything you will need to modify the torque settings

Be careful torquing the bolts, it's not logical there quite tight, the two bolts are different sizes

Yes I would grease, i use axle grease on any metal to metal

Anti-seize is a contentious topic. There isn't a simple answer as there is a lot of different types. Originaly the idea was the grease part boiled off and left a copper coating on the parts so in high temperature application steel to steel didn't rip out the threads.

As long as you start the bolts by hand, there's very little danger of cross threading, just standard practice


Fastening

Component

dia

Value
(daNm)

-

Bolt

REAR SHOCK ABSORBERS (S.M.)

M10 x 1.25

(Upper) 8

Fastening

Component

dia

Value
(daNm)

-

Bolt

REAR SHOCK ABSORBERS (S.M.)

M12 x 1.25

(Lower) 7

And

LubricantTorque Reduction
(%)
Graphite50 - 55
White Grease35 - 45
SAE 30 oil35 - 45
SAE 40 oil30 - 40
No lube0
 
If you look at the tip of the bolt the thread has two divots cut out. These clean the threads removing the need for the factory to run a tap down each hole to clean out any excess paint. It's useful but has to be absolutely aligned. If it gets cross-threaded, the cutting tip will tear the threads in the captive nut.

I like to use a stiff anti seize such as Action Can CS-90. It's not oily like CopaSlip. I have never had it shake loose even when stainless bolts are used. Stainless is of course unsuitable for structural jobs like suspension or chassis mounts. I have had stainless into aluminium (common on motorbikes) seize solid as the aluminium corroded. An end-to-end coating of CS-90 stopped this issue. I have had rusted exposed threads on Fiats where they poke through the captive nuts (e.g. rear seat mounting bolts on the 100HP) A dab of CS-90 stopped the problem becoming a corrosion issue.
 
It seems replacing the self cleaning bolts with standard bolts to avoid stripping threads would make sense - but that would probably open up a whole new can of worms about different steel properties. So I will stick with the standard bolts and be extremely careful.

I learn something new every time I visit this forum. Never heard of daNm but it seems that you just multiply by ten to get Nm. So 7 daNm is 70 Nm. Why don't they just stick the extra zero in instead of two extra letters!!!
 
It seems replacing the self cleaning bolts with standard bolts to avoid stripping threads would make sense - but that would probably open up a whole new can of worms about different steel properties. So I will stick with the standard bolts and be extremely careful.
No need

There special type of mathread and are designed to be powered in

But It's alway best practice to hand start any bolts first


Here's a photo of the end of of the actual bolt

IMG_20230514_223240.jpg


And here a similar bolt in action


We make this over complicated. Yes it's a specialist bolt with a pilot, chamfer and the first two threads of a smaller diameter. It's designed properly and for mass production by semi skilled operator.
 
That's an interesting video. You would think that any bolt being powered in at that bad angle would cross thread.
 
I hardly ever get a bolt cross threaded - I'm extremely careful. BUT, I cross threaded one of these on our 1.2. It was ridiculously easy to do.

Start it by hand and go carefully with no pull from the shock. If it's stiff, consider running a tap down the hole. If you do that, you must use an anti-seize paste or risk the threads rusting and jamming up.
 
I jacked up both sides of the car this morning to have a look at everything. The first thing I noticed was that the top bush on one shock was completely shot - see photo. The car passed the MOT a couple of months ago. Probably not the easiest thing for the tester to see but is I thought they should be able to check for movement in it. Additionally the shocks are different! So I've ordered two new shocks from GSF and the job is now on hold. It will give me a chance to give the bolts a good dousing in penetrating fluid.
 

Attachments

  • IMG20230515112856_BURST001_COVER.jpg
    IMG20230515112856_BURST001_COVER.jpg
    2.2 MB · Views: 34
I read somewhere about putting a trolley jack under the rear axle trailing arm and doing both at the same time.
Never lift the rear of the car by jacking in the middle of the twist beam; it's not designed for this kind of point loading and you risk permanently distorting it. This will throw out the (non-adjustable) rear suspension geometry and excessive tyre wear will result.

When these cars were new, some had a label on the beam specifically warning against this, but I suspect most of these labels will have fallen off a long time ago now.

Unfortunately tyre fitters do this all too often, and uneven tyre wear is quite commonly reported here.
 
Back
Top