Since I was asked by a few people to do this guide here it is 
Tools needed for the job are:
Flat head screwdriver, maybe even a few
Heatgun
Saw
Silicone or glue used for windshields
Black marker
And spraypaint if you want to paint the visor black or any other colour.
It's important to note that to take of your headlights you need to take of your front bumper so you also need:
17,10 and 8 socket wrench
Torx wrench set
Screwdriver
And an wrench extension for those hard to get bolts in the wheel arches
Now for the angel eyes
The angel eyes I've used are from ebay and I don't know if it's consider advertising if I share the link so I'll just say they're for a BMW E36 E38 E39 E46 E53 NON PROJECTOR. If someone needs a link just message me.
First thing when you need to do is take of your headlights and take them apart. If your car has original headlights you'll find it very hard to open them because they used something like a heatproof rubber to seal them so heating them doesen't help. It took me about an hour just to get one light open, but on the other hand my friend bought replacement headlights and he opened both in half an hour just with a heat gun.
When the angel eyes arrive they'll look like this
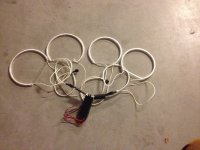
You'll get 4 angel eyes rings, 2 of these black boxes(I'm guessing transformers) and a couple of pieces of double sided tape
As you can see there is this peace of plastic connecting the two sides. You'll need to cut that off but carefully not to cut the wires
When you cut that off you'll need to sort out the mounting on the visor
Here is how I've done it
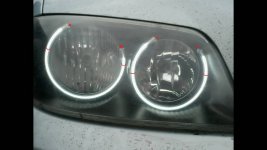
The two red dots on the top show where I've put the wires trough to the inside of the wisor and the two bottom ones are where I've fixed them in place to the visor.
To fix them in place I used a piece of old wire and drilled two holes in the visor and tied it from the backside. The angel eyes are really light so there is no need for some excessive mounts.
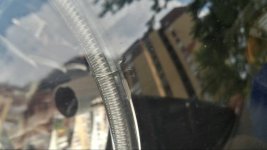
As you can see once fitted you can barely see the mounts
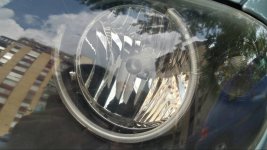
Once you've managed to fix them in place and to put the wires on the inside of the visor it's just a matter of wiring. I've wired them to the positional lights (if that's what they're called, the middle possition on the light stalk). The good thing is that you don't need to add any resistors or anything, you can just wire it to the factory wiring.
You can wire them to a seperate switch if you want. I've forgot to mention that that black box fits perfectly under the visor and you can use the doublesided tape to glue it in place so once you do everything it looks nice since there are no wires sticking out.
Now when you wired it and tested it you just need to put everything back together. This is probably the easiest part in the whole process because you just need to properly seal the headlight so no water can get in. Every part in the headlight has a specific position in which it sits and it won't close if it isn't positioned properly so you can't get that wrong.
Let the glue/sillicone cure before putting them back on the car.
This is the end product
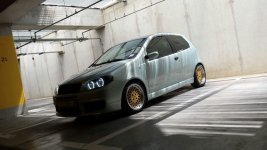
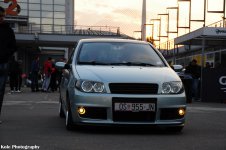
I've done this more than a year ago so it is possible that I've forgoten a detail or two so if you have any questions feel free to ask.
Hope this helps, cheers
Tools needed for the job are:
Flat head screwdriver, maybe even a few
Heatgun
Saw
Silicone or glue used for windshields
Black marker
And spraypaint if you want to paint the visor black or any other colour.
It's important to note that to take of your headlights you need to take of your front bumper so you also need:
17,10 and 8 socket wrench
Torx wrench set
Screwdriver
And an wrench extension for those hard to get bolts in the wheel arches
Now for the angel eyes
The angel eyes I've used are from ebay and I don't know if it's consider advertising if I share the link so I'll just say they're for a BMW E36 E38 E39 E46 E53 NON PROJECTOR. If someone needs a link just message me.
First thing when you need to do is take of your headlights and take them apart. If your car has original headlights you'll find it very hard to open them because they used something like a heatproof rubber to seal them so heating them doesen't help. It took me about an hour just to get one light open, but on the other hand my friend bought replacement headlights and he opened both in half an hour just with a heat gun.
When the angel eyes arrive they'll look like this

You'll get 4 angel eyes rings, 2 of these black boxes(I'm guessing transformers) and a couple of pieces of double sided tape
As you can see there is this peace of plastic connecting the two sides. You'll need to cut that off but carefully not to cut the wires
When you cut that off you'll need to sort out the mounting on the visor
Here is how I've done it

The two red dots on the top show where I've put the wires trough to the inside of the wisor and the two bottom ones are where I've fixed them in place to the visor.
To fix them in place I used a piece of old wire and drilled two holes in the visor and tied it from the backside. The angel eyes are really light so there is no need for some excessive mounts.

As you can see once fitted you can barely see the mounts

Once you've managed to fix them in place and to put the wires on the inside of the visor it's just a matter of wiring. I've wired them to the positional lights (if that's what they're called, the middle possition on the light stalk). The good thing is that you don't need to add any resistors or anything, you can just wire it to the factory wiring.
You can wire them to a seperate switch if you want. I've forgot to mention that that black box fits perfectly under the visor and you can use the doublesided tape to glue it in place so once you do everything it looks nice since there are no wires sticking out.
Now when you wired it and tested it you just need to put everything back together. This is probably the easiest part in the whole process because you just need to properly seal the headlight so no water can get in. Every part in the headlight has a specific position in which it sits and it won't close if it isn't positioned properly so you can't get that wrong.
Let the glue/sillicone cure before putting them back on the car.
This is the end product


I've done this more than a year ago so it is possible that I've forgoten a detail or two so if you have any questions feel free to ask.
Hope this helps, cheers

