OP
OP
Daleyboy10
New member
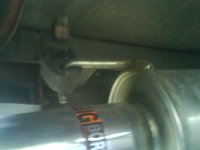
Got my water pump on saturday morning and fiitted it so everything is sweet again ")
need help with the windows though has anyone done/can do a guide to fitting the electric windows on a mk2?
i have everything needed to fit them i am just not that good with electrics so a rough clear guide would be sound.
Dale
need help with the windows though has anyone done/can do a guide to fitting the electric windows on a mk2?
i have everything needed to fit them i am just not that good with electrics so a rough clear guide would be sound.
Dale