Wahoooo Its gone really well! covered nicely. Only problem is i gotta drive to work tomorow so gonna have to stick it back in tonight. should dry out nicely overnight though. pop into halfrauds for some more laquer on my lunch break. Ill see if ican get some more pics to show you guys how it looks. Think Im the only one with a black dash now!!! hehe looks SWEET


You are using an out of date browser. It may not display this or other websites correctly.
You should upgrade or use an alternative browser.
You should upgrade or use an alternative browser.
Styling my interior
- Thread starter puntomadboy
- Start date
Currently reading:
Styling my interior
dan j
New member
alrite lads!
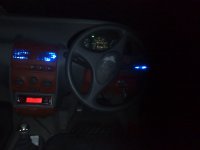
jus fitted my new kicker sub and amp and i got sum neons with it so i thought wat the hell and put dem in my vents, not sure if i like dem do wrong colour, tell me wat u lot think do
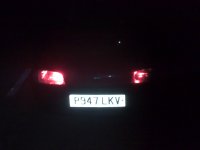
also got myselfsum red side lights i quite like dem!
jus fitted my new kicker sub and amp and i got sum neons with it so i thought wat the hell and put dem in my vents, not sure if i like dem do wrong colour, tell me wat u lot think do
also got myselfsum red side lights i quite like dem!
Attachments
- Joined
- Jan 14, 2008
- Messages
- 804
- Points
- 197
who wants to do mine or teach me?
- Joined
- Jan 14, 2008
- Messages
- 804
- Points
- 197
to paint the interior lol
its easy!! you just undo all the screws and it all comes out ded easy then you just use some cleaner on the plastic to make surethe paint sticks properly then I just used a spray can of the colour and did a couple of coats then laquered it! wait till its all dry and put it back in, means you have to have the parts out of the car for a couple of days. The dash was hardest cos I had to take the stering wheer wiper stalks clocks radio and ignition barrel off to get it out!
Like the painting. I May do my interior black and white.
Where did u get the paint (what paint?)
(i didnt read the whole thread im lazy)
Where did u get the paint (what paint?)
(i didnt read the whole thread im lazy
)- Joined
- Jan 14, 2008
- Messages
- 804
- Points
- 197
well ok but being a blonde female, i dont really trust myself
- Joined
- Jan 14, 2008
- Messages
- 804
- Points
- 197
Like the painting. I May do my interior black and white.
Where did u get the paint (what paint?)
(i didnt read the whole thread im lazy
its plastikote that you need to buy. from places like motorworld etc..
its plastikote that you need to buy. from places like motorworld etc..
Cheers
I got all mine from halfrauds
Plasticote royal blue and I used halfrauds own black and clear laquer.
Lizard (dont know your real name) it doesnt matter how much mess you make so long as you put some dust sheets or newspaper down, just dont do coats too thick! no different than doing a bit of graffiti
Plasticote royal blue and I used halfrauds own black and clear laquer.
Lizard (dont know your real name) it doesnt matter how much mess you make so long as you put some dust sheets or newspaper down, just dont do coats too thick! no different than doing a bit of graffiti
- Joined
- Sep 7, 2007
- Messages
- 2,373
- Points
- 373
- Joined
- Sep 7, 2007
- Messages
- 2,373
- Points
- 373
its plastikote that you need to buy. from places like motorworld etc..
i dont like that kind, seems to be a bit messy and flakes easy..
i used halford flexible vinyl paint...the coating is great and only £10 a can...
I'm liking the blue although think its maybe a little too much on the doors. The neons in the vents look pretty groovy, how do you do that then?
dan j
New member
well if ure ay good with wiring its easy!
you gotta have a power supply (live and earth- positive and negative obv) feed it in through a grommit lookin plug into the car then wire up the neons! you gotta take out the center bit with the vents in and run the wire up to there, then run two more wires from each side of the car for the side vents, put it back together and its done! only thing iis i cant have the blowers on through them vents just in case it melts so i use the one for the windscreen, takes longer to warm the place up but it looks good!
just smoothed out my glove box lid so once its sprayed should look naughty lol
dave_jayMK1
New member
- Joined
- Feb 24, 2008
- Messages
- 6
- Points
- 2
can you keep us posted on whether or not the spraypaint flakes. a friend of mine did the same to parts on his car, cleaned down, sprayed,laquered etc etc and after a few weeks it happened, think it was sumfin to do wi the little grooves in the plastic. it kinda put me off the idea.
- Joined
- Sep 7, 2007
- Messages
- 2,373
- Points
- 373
can you keep us posted on whether or not the spraypaint flakes. a friend of mine did the same to parts on his car, cleaned down, sprayed,laquered etc etc and after a few weeks it happened, think it was sumfin to do wi the little grooves in the plastic. it kinda put me off the idea.
that only happens if it has not been done properly...make sure the surface is clean and been sanded well enough.... then after about 2-3 coats of paint... make sure it is laquered...
most of the time it depends on what type of paint you use... the first one i had flaked in the bends of the surface (even after full preparation)... then i switched to a flexible spray, and since then no flakes....
hope this helps....
btw dont be put of by the idea, because if you make a mistake you can always remove the paint and try again...
Yup. I cleaned everywhere i haave painted with an alcohol based cleaner before applying the pain to make sure of a good stick. make sure it dries properly between layers put as many layers as you want on! then put between 2-3 coats of laquer leaving at least 12 hours between coats. sorted!
Similar threads
- Replies
- 0
- Views
- 342