Technical Multipla rear bushes

Currently reading:
Technical Multipla rear bushes

ATM

New member
Joined
May 11, 2018
Messages
1
Points
1
Hi All
After some advice for my 08 plate multipla. Garage have said it won’t pass next mot due to rear bushes being in their last legs. I believe fiat only sell the whole sub frame but that you can buy the bushes on eBay. So I’m wondering how big a job this is? And does anyone know of a reliable Norrh west (I’m in Manchester) garage that might be able to do it? As It seems a real shame to bin a great car for £100 worth of bushes! Thanks in Advance Al
 
I am about to do mine. Widemouthfrog has some great pictures of what he did taking the whole thing off and returning it.
I have taken a punt on polyurethane bushes from eBay. 68 quid. They took a 4 days to come and look ok.
It is a week or so before I fit them. I need to derust and protect subframe at the same time.
Posts on moriarty repair site show what's involved keeping it on vehicle and doing one side at a time.
 
Better off taking the whole subframe down. It’s actually pretty straightforward in that only 4 bolts hold the thing up and you’ll be unbolting these anyway to get each bush in.
To drop subframe you’ll need to disconnect ABS sensors, there is a connector you simply unplug on each side under the plastic floor strips by the rear doors.
Also you need to disconnect the brake hoses and handbrake cables. It’s worth having replacement hoses/pipes made up prior to the task as the likelihood of them breaking is high.
I have the dimensions and spec of the hoses on one of my threads from when I did mine, you’ll get them on eBay for a tenner but they are real easy for a mechanic to make up if your having someone else do the job for you.
Marty.
 
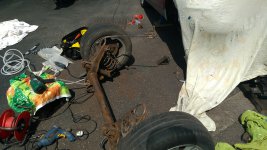
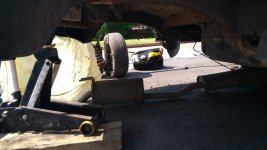
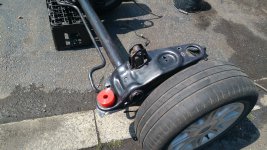
Did it today with help of mechanic on driveway. Dropped off rear subframe.
He dropped it out in about 1 1/2 hr and refitting was about another 3. In between I derusted the thing and used rust converter on in for about 4 hours.
Big jack under back at middle and axel stands on chasis about where handbrake is.
To get 4 bolts out he smacked them then used big impact driver to get them out. Exhaust dropped and just managed to get the whole thing out the passenger side wheel arch.

Old bushes shot, taken out with cold chisel and big hammer.
We left springs and shocks in place and kept wheels on during clean up.
The Bulgarian ebay Poly bushes went in with help of 65 mm socket and and even bigger metal round thing for the rear bushed. We used 12 mm threaded bar with washers on to push em through on front ones.
Lots of lube and a 4 inch big record vice to stuff the back one in. Then smacked the metal middle bits in with lube on. We put washes at top and bottom. The rear bush central metal bit has lots of space around the 12 mm bolt … so not sure this is ideal.
Measured rim of front and back wheels distance and he loosened and remade as 3 mm difference between the sides. New break pipes made up.
Took for a spin and seems OK.
 
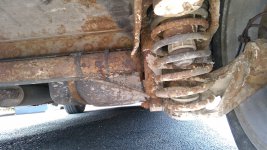
A few photos. Manic day.

It was really rusty. When all scrubbed down it was really quite solid. Glad I treated it though, should extend its life.
I mainly used angle grinder with cup twisted wire attachment.
Drill with smaller wire wool.
I had a bit of shot blasting grit and a Lidl gun to do some fiddly bits.
I used bilt hamber hydrate 80 to go over the rust and bear metal.
Plan is is waxoyl it or something soon. I need to do rest of underside and some of the undercoat is starting to go.
 

Attachments

  • IMG_20180523_115428.jpg
    IMG_20180523_115428.jpg
    1.9 MB · Views: 65
  • IMG_20180523_115529.jpg
    IMG_20180523_115529.jpg
    868.6 KB · Views: 64
  • IMG_20180523_135756.jpg
    IMG_20180523_135756.jpg
    2.4 MB · Views: 82
  • IMG_20180509_102709.jpg
    IMG_20180509_102709.jpg
    1.7 MB · Views: 62
18 mm socket is needed for the subframe bolts, not in some sets so I thought I would mention.

I am putting rust treatment stuff on all steel hydraulic lines on clutch and breaks, when doing the clean up underneath.
 
It's also worth pulling out what look like the end caps from a poster tube that fit in the ends of the main cross tube of the subframe, then spraying/running warmed up waxoyl or similar down the inside of the tube. I refitted the end caps with more goo as they were looking like they'd struggle to seal.
 
Back
Top