If you click on the 'Downloads' section (in the blue band at the top of the page), you can download for free a copy of the genuine Fiat 'shop manual for the 500.
On pages 48-51, you'll find info on ignition system fault diagnosis.
HT cable resistance:-
Early ignition systems used copper-core cable, this had zero resistance.
Then to try to avoid interference with radio signals, interference suppression methods were introduced on vehicle ignition systems. Initially this was achieved by fitting separate resistors onto each HT cable/lead.(+ capacitors and chokes on various electrical equipment - generator, wiper motor etc.).
Then resistive core cable was introduced, this is more effective at suppressing interference with radio signals as the resistance is spread evenly along the length of the cables. This type of cable comprise a graphite-impregnated fibre conductor and are insulated with either PVC for general use, synthetic rubber and a sheath of Hypalon where temperatures of up to 150*C. are encountered or synthetic rubber and a sheath of Vamac, where temps can reach up to 175*C.
For each type of insulation there are two ranges of cable resistance, these being 13 - 23 k.Ohms and 23 - 35 k.Ohms per metre (the lower resistance cable is used where it's installed length exceeds 300mm (12 inches).
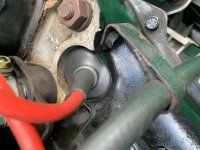
So how do you tell which type of HT cable is used on your car? :- On older cars Fiat used a green cable approx. 5mm (c. 3/16 inch) diameter - this is the old copper wire core type.
Resistors were fitted between the HT leads and the plug tops if a radio was fitted subsequently (no radio was fitted as standard in those days).
Later resistor core HT leads were larger in diameter, approx. 7mm, almost 5/16 inch and had no resistors fitted even if a radio was installed. This is most likely to be what is on your car.
Also, carefully examine along the length of the HT leads, if suppressed type, you'll probably see letters and numbers imprinted on the leads, if you see a number and the ohm symbol, you've got suppressed leads and can expect to see quite a high ohms figure when tested with your ohm-meter.
In summary, for typical small car engine HT cables, I would expect to see a resistance figure of probably 4k to 6k Ohms, possibly a bit more.
Not having a spare HT lead to try, shouldn't stop you diagnosing this fault.
You could possibly borrow one of the plug leads (might have to open out one of the terminals to fit the coil tower) in order to repeat your coil output test.
Alternatively, any sort of cable can be used to test the coil output - I've even used domestic single core cable, just stripped an inch and a half or so of insulation and folded the wire core ends so as to make good contact with the coil and distributor cap contacts, just route the wire away from any metal parts to prevent a short to earth (ground). (I once rescued a friend who used to pull the HT coil lead and take it with him as an anti-theft measure - this was fine until he lost his HT lead).
To test if you have output from the coil, with ignition on, distributor cap removed, contact breaker points closed and the distributor end of the coil HT(king) lead held approx. 1/4inch from any engine metal part, just flick open the points with a small screwdriver - you should see a strong spark jump the gap between coil HT lead and engine.
To test for a faulty rotor arm, do the above test i.e. flick open the contact points, but with the distributor end of the coil HT (king) lead held approx. 3mm (1/8") from the centre contact of the rotor arm. Ideally there should be no spark seen to jump across, but if you get more than one spark in 5 tries, the rotor arm is faulty.
Be aware that some Fiats used a rotor arm with a resistor fitted (either visible as a white resistor shape or embedded in resin) between the centre contact and the brass tip - these could fail suddenly. This resistor can be checked with an ohm-meter.
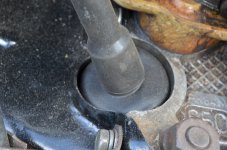
Distributor cap :- Check the centre sprung carbon brush is intact and free to move. Check for tracking marks inside and out. These are fine spidery lines of carbon formation that can run from one contact to another or else to earth (ground) and can short your coil output to earth (ground). Also check for carbon tracking on the top and underside of the rotor arm. Same check also on the coil tower.
As a temporary fix, the tracking line can be scraped away and sealed with e.g. nail varnish or similar, to tide you over until you can get a replacement cap/rotor arm/ignition coil.
Pay particular attention to connections - HT leads don't like to be yanked off, this can loosen or break the connection between the brass terminal and the delicate centre core.
LT connections - the LT cable from coil to distributor can become loose or corroded inside the crimped on terminal. If you tried another condenser, be careful that none of the connections to the little connector point on the distributor can touch to earth (ground). Also check that any connection to the set of contact breaker points can't touch to earth (ground).
And, while I agree with 'lazylobster's advice re. renewing the parts he mentioned (to ensure reliability), I'm just suggesting a few things you can check out straight away before ordering any parts - it'd be a pity to change a load of parts only to find it was a faulty connection all along. :bang:
Conversions (in case you need them) :- 150*C = 302F; 175*C = 347F.
13 -23 k.Ohms = 13,000 - 23,000 Ohms.
1 metre - 39.37 inches
Al.