Technical HI Need help with wiring 500 L

Currently reading:
Technical HI Need help with wiring 500 L

phoenix1

Member
Joined
Feb 17, 2016
Messages
319
Points
145
Location
Blackpool
Hi I am trying to work out how to get the two wires
from the rear view mirror down to the door switch
and also pick up power from fuse box.
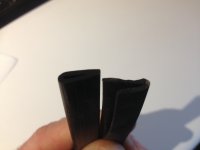
I can't seem to get a flexible wire up the screen pillar ,
the only way I can see is to hide it in the screen rubber
when fitted. (almost the last job ) Has anyone come
across this before.
Thanks
 
You are correct - it is slipped under the screen rubber - one either side
 
Thanks for that .Putting the front screen in will be one of the last jobs to do,so I wiill just tape them in position for now.(y)When I clean the screen I must be careful not to disturb the tax disc,it was last taxed in 1988.
 
Engine and box now in,electrics all sorted. In the center position on the dash
I have fitted a start button with a relay at the rear to take the current as I have a 650cc engine and a syncro box.Not an easy job putting engine in on your own,but its now done
 
Hi I have got all cables connected ,but where do the clutch and throttle springs go.
At the moment I am now modifying the cabin heater duct with a vice and hammer
to get clearance from the starter. (26 engine and box ) I am glad I read this on the forum first or I would be in trouble.
 
Clutch spring from lever rearward to an indentation in bellhousing in the horizontal
Throttle spring from lever to top of air box
Be sure that the rubber cover for the starter solenoid bolt is in place - it will be close to the heater duct
 
Thanks for that ,I wouldn't have found that little hole on the bellhousing.
I have got the plastic shield on the back of the starter as well as the rubber
cover and .I have about 5mm clearance to the duct.
 
Hi guys. Can anyone tell me where the identification plates go.I have 3 .
Ithink the main one goes near the stamping on the body to the right of the fuel
tank.One of the other plates is vertical ,with just E2 in a circle and two other
sets of numbers. the other one has only B.s>AU48:1965 stamped at the bottom .

Thanks again (y)
 
Hi again ,I have followed the instructions on the forum to alter the wiring
to suit an alternator,but i cannot see a terminal for the thinner wire. ( I think it goes to the warning light ) Should this wire alsu show any voltage mine shows 12v.
 
Hi again ,I have followed the instructions on the forum to alter the wiring
to suit an alternator,but i cannot see a terminal for the thinner wire. ( I think it goes to the warning light ) Should this wire alsu show any voltage mine shows 12v.

It should show 12v's. It should plug into the terminal marked IND or WL on the alternator. The warning light works by presenting 12v either side of the bulb which cancel each other out as there is no potential difference. One side from the battery, the other from the alternator. What you are seeing it the 12v coming through the bulb from the battery.

If the voltage output from the alternator drops below 12v's then the potential difference across the bulb maybe 1 or 2 volts hence the bulb glows dimly and maybe flickers on and off. Any greater voltage difference then obviously the bulb will glow more steadily, so if you alternator packs up completely then the light will stay on permanently. In reality it's probably more like 14v's.

The warning light works the same on the Dynamo as well, coz I have just seen Peter's reply;)

Tony
 
I had all sorts of fun when I came to do my charging light in my instrument pod as I have used LED and they are polarised - so no 12v either side for these babies - oh no.....
 
Hi guys. I can't see another connection ,could it be the terminal marked B+.
While I was looking for this I found ' Made in Poland ' on the plastic alternator
cover
Also does anyone know of an easy way to get the bottom channel and rubber insert
on the drivers door drop glasses.
 
Last edited:
It can go to the alternator D+ terminal but normally it would connect to the other end of the D+ wire, up near to where you have removed the voltage regulator that was used by the old dynamo. B+ is the main output to charge the battery.

Chris did a good post on dynamo to alternator conversion. I will see if I can find it.

Found it look at this thread, it may help.

https://www.fiatforum.com/500-classic/301313-650-engine-box-into-my-68-500-a-2.html
 
Last edited:
Thanks for that,all wired up now.A few more jobs like putting brake fluid in.(All new including master cylinder, lines and all 4 brake cylinders )
Connecting hot air to underfloor duct.
Still got to find an easy way to fit the drop glasses.
 
Hi again.
Doe's anyone know how to get the window drop glass into the metal holder with
the associated rubber gasket.I have tried but it seems bl??dy tight. Thanks:worship:
 
I'm just attempting the new window glass into the holder.
I didn't have the correct rubber item but bought a length of 2mm rubber strip instead.
Copious amounts of washing up liquid will do the trick hopefully...
 
Hi guys.

Nearly there ,can anybody tell me what the front hood and the

sunroof edging shold look like.i.e. cross section.
 
The one on the left is the original bonnet rubber profile.
The one on the left is the replacement type supplied of which I could not use as it was too thick and would not compress and therefore I couldn't shut the bonnet. I purchased one like the original off e-bay
 

Attachments

  • IMG_6438.JPG
    IMG_6438.JPG
    1.5 MB · Views: 43
Back
Top