Technical Hardtop Leaking

Currently reading:
Technical Hardtop Leaking

sjladopoulos

Son of the Propeller.
Joined
Nov 15, 2006
Messages
415
Points
92
Location
Athens
Dear All,
I m having a problem that most of you probably have had or still having but there is one detail that is deferent so I am forced to ask for help.
Well, yes, water is leaking into the cabin under heavy rain and when I wash the car. The thing is that I m talking about this problem while having the hardtop fitted on the car.:confused: Last weekend I used a silicon spray all over the rubbers of the hardtop and they all look in mint condition and have the required elastic ability to strongly seal the cabin from the outside world.
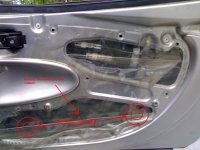
THE PROBLEM though is that the windows are probably adjusted in the way to firmly close against the soft top. The result of this is that when you now close the door, a gap of approx 3mm:eek: exists between the top of the windows and the rubber of the hard top.
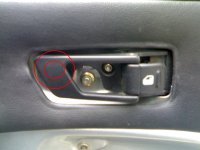
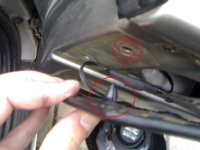
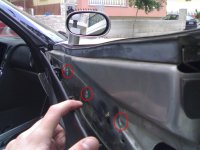
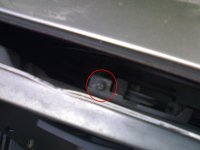
THE QUESTION: Has anyone removed the door panels to adjust the window tilt? If yes, could you please describe the procedure so I can have a go at it? The more details and hints the better.
Thanks once again!
Hope you and your B’s are in good shape. Take care all.
 
Special thanks to BILL33 for his very detailed explaination. He sent it to me as a private message because it was written in greek.
If anyone else needs the solution, we will be happy to translate it in english and post it.
Thanks BILL33!!!
 
Special thanks to BILL33 for his very detailed explaination. He sent it to me as a private message because it was written in greek.
If anyone else needs the solution, we will be happy to translate it in english and post it.
Thanks BILL33!!!

That would be fantastic. Need to have a mess around with that myself.

Cheers for now

Jon
 
That would be fantastic. Need to have a mess around with that myself.

Cheers for now

Jon

BILL33 wrote:
(Translated by me, sorry if something does not make sence  )

If I have understood correctly you want to make your windows rise higher.(closer to the roof actually)
I have removed the panels from both my doors before. You unscrew two Allen screws from the tweeter and from the door handle. Be careful not to break the plastic clips behind the leather panel. Use a fork so you can raise the panel without breaking them.
You will have a tough time removing the plastic around the door handle. I forced the
door lock a bit in and sideways and pulled the plastic out with no problem.
The top metal part is held by screws that you see only after you have removed the leather panel. Be extra careful not to damage the rubber surroundings this metal part has.
At the front side it is held by a clip but I recommend you glue it afterwards
because it is hard to make it go in place. After you have removed all this you will find
two screws on the top side of the window mechanism, one at each side. These screws adjust how much the window will rise, so by unscrewing them you can make it go higher.
Normally, there should be some rubber stops under the screws but in my car they
were worn out. If you want to adjust the tilt of the window, you will find the screws
on the window drivers(sides).
By screwing them you will force the window to tilt towards the roof.
Since you are willing to get in so much trouble it is a good chance to lubricate the window drivers.
In my car, on cold weather, the window got stuck half way through when lifting.
After lubricating the drivers everything worked fine.
 
If something is not correct please write it in order to correct it.:)
 
It has its own - similar rubber - just like the soft top, but does go over the bay rubber again. Mine though is OK from there.
The top of the windows seems to be the problem for me :(
 
OK, well this weekend I had a go in order to adjust the windows firmly against the hardtop, work that required the doors being stripped.
The whole procedure starts by removing the Allen screw from the bottom side of the tweeter (pic 1) followed by removing the same type screw from the inside area of the door handle(pic 2).
After removing the screw the plastic surrounding gets loose and you can then remove it. Removing the plastic is a bit painful. You need to be in the car with the door closed because you need to press the lock in. Keep the lock in, stick a screw driver under the side of the lock and pull the other side out with your hand. After it is half removed, the door needs to be opened because the handle needs to be pulled out in order for the plastic to come off.
Then for the passenger side door only, remove the arm by removing the three Allen screws shown in the picture (pic3).
After all that you need to remove the leather cover. Start lifting it from the top-toward-the-rear part, carefully unclipping the plastic clips (pic 4). You can use a special tool for this but even without it, by gently increasing pulling force all the clips will come off with no damage. Be careful as the tweeter does not go through the hole, so don’t take the panel very far :p .
You will now have to remove the top metal cover. There are three Philips screws holding the cover in place and are clearly identified at the bottom part of it (pic 5). At the front side the metal cover is attached to the rubber seal which you need to detach by simply pulling the clip off (pic 8). Then lift the metal part from one side (have the window totally opened) and it should easily come off with the top rubber as well.
If you are ok till this point then it all looks good. There are four screws that adjust the window position and it’s all up to you to start the game.
Two screws on the top allow you to fix the top window height (pic 6 & 6b) . Removing the membrane (pic 7) and having the windows half open reveals the rear tilt Allen screw (pic 7) and having the window 90% open reveals the front one (pic 7). Note: unscrewing brings the window away from the roof.
Now please put all parts back in reverse order but before doing that check that both windows go up and down without any resistance. Note: this is probably a good chance to add some lube.
I guess that that’s it. Good luck people!
 

Attachments

  • pic1.JPG
    pic1.JPG
    181.8 KB · Views: 69
  • pic2.JPG
    pic2.JPG
    176 KB · Views: 63
  • pic3.JPG
    pic3.JPG
    134.5 KB · Views: 68
  • pic4.JPG
    pic4.JPG
    143.9 KB · Views: 67
  • pic5.JPG
    pic5.JPG
    190.6 KB · Views: 80
  • pic6.JPG
    pic6.JPG
    127.6 KB · Views: 71
  • pic6b.JPG
    pic6b.JPG
    163.5 KB · Views: 87
  • pic7.JPG
    pic7.JPG
    197.6 KB · Views: 115
  • pic8.JPG
    pic8.JPG
    140.7 KB · Views: 80
Oops, I guess I forgot to tell you the outcome :)
Well, yes it does but only because the rubber that goes arround the windscreen is a bit worn out. Changing that will seal the cabin 100%.
After all the work was complete, I washed the car and I aimed at the top of the windows with high water preasure and a few drops came in from the top front corners due to the rubber I mentioned above. The rest of the surface is very nicely sealed now.
I will let you know after I change the rubber how it is.
Wind noice is down 50% as well ;)
Thanks for the complements.
 
Great Job...........Well done, think I'll have a go this weekend.

Thanks Alan and good luck to you!
Keep in mind that removing the plastic around the door handle needs a bit of power. Dont be afraid to break it, just try jiggling it out when the resistance gets tough. And remember that to begin with, you need to have the door shut and locked. This is the only tricky part.

Best Regards!
 
Back
Top