Technical Exhaust problem

Currently reading:
Technical Exhaust problem

Joined
Nov 5, 2023
Messages
1,308
Points
449
Location
UK
I changed the front subframe of my EVO a while ago, and that is fine. However to do this I had to take the exhaust off, and it didn't go back on properly. So ever since I've had a leak at the join of the front section and catalytic converter. The leak is at the join, in that the fumes come out of the top, from inbetween the two sections - in the gasket area.

Things i tried;

1) Tightening the bolts
2) Changing the exhaust because I have a spare front exhaust
3) Changing the gasket
4) Taking off the backbox and adjusting the front
5) Trying to clamp the top part (didn't really work)
6) Changing the bolts. Originally the exhaust was fitted with gigantic washers, in an attempt to push the top.

I'm lost with this now. Any ideas what to try next?

1726769329049.jpg
 
Righto that makes sense.

I just took a picture of the first new gasket I put on a few weeks ago, its quite bent out of shape, i'm not sure how well that pictured though.

1726770019157.jpg


Am I to assume to catalytic converter is the face that is out of shape, as I've had two front section exhausts on it?

And from what you've said the big washers were somehow keeping this together, i tried putting them back on but they just bent out of shape. These are the washers;

1726770445499.jpg
 
No.. Dont make any assumptions, it could be either part or more likely both. If the two parts dont meet faly because of this nothing you can do will sort it. It only needs to be bent by the thickness of a couple of sheets of paper and it wont seal. Probablyone part of the exhaust has been left unsupported / hanging at some time and this has opened the join slightly.
 
I suspect what happened in the past is that the cat/exhaust join were heated and then these big washers put on to drag the two parts together.

I'm currently looking for some new thicker washers, in case I try the same thing. Not sure yet though...
 
I bought these new washers, i'll put them on with some new nuts and bolts and hope I can squeeze the cat and front pipe back together enough.

 
This post contains affiliate links which may earn a commission at no additional cost to you.
First of all, "mate", you have improper gasket. Flat piece of steel, looks home made.
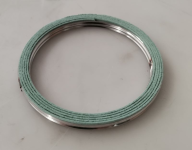
Proper one is stamped metal with "ring" protruding. Or composite material.
IMG_20240823_090253351.jpg
 
The gasket I pictured was from GSF.com, it's a composite of about 5 layers of thin metal. l put another one, more like the old one in your picture back on.

Where can I find the new gasket you have put on? I haven't seen those protruding rings before.
 
Well I tried using the big washers noted above but without luck. So this time I've bought a sheet of gasket material and intend to cut it and then glue the new cut to another complete gasket.

Bearing in mind that the leak is from the top only, my question is...should i cut a ring or arc? See the picture for an idea.


IMG20241105230727.jpg
 
Last edited:
When you changed the subframe did the engine go back on its mounts exactly as it should, if the engine is moved it’s possible the pipes won’t line up with one another that said they do seem to be joining together ok In the picture.

Next up is the mating surfaces, if there is rusting or pitting on the flanges then the gasket won’t help.

The thick gasket material in the last photo is most likely to create a good seal, it may depend on being able to get the bolts tight enough.

If you put the gasket on drive it for abit a couple of weeks, you then should be able to see witness marks on the gasket showing you the route the gas is taking to escape at the joint. That should give you some idea what specifically isn’t sealing

I just scrolled back to the top to re-look at the photo, has the top part of the flange been bent? Any chance the exhaust got dropped bagged or knocked while you were doing the subframe?
 
When you changed the subframe did the engine go back on its mounts exactly as it should, if the engine is moved it’s possible the pipes won’t line up with one another that said they do seem to be joining together ok In the picture.

I'm sure a previous mechanic had difficulty removing the last exhaust and heated it up to get it off, and heated it again to put it back in. So he's bent the down pipe. He also left off one of the heat shields and probably did the other sub-optimal repairs I've seen. I'm not keen on heating it myself, it could have an unintended outcome.

Next up is the mating surfaces, if there is rusting or pitting on the flanges then the gasket won’t help.

Good spot. If I recall correctly I did the exhaust but not the down pipe so I'll revisit that.

The thick gasket material in the last photo is most likely to create a good seal, it may depend on being able to get the bolts tight enough.

Hmm, think the solution might be here. GSF supplied a metal laminate gasket, that doesn't compress well as you've noted. I bought 4 different gaskets in the better material from eBay, but none of them were the exact size.

So now what I'll do is use the GSF gasket as a template to cut an exact right size in the better material. Fingers crossed! But this one's been rumbling or should that be blowing for a while now lol.

If that doesn't work I'll try making a protruding ring to attach to it.
 
Last edited:
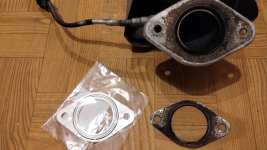
The way the two ears of the flanges are touching together without it sealing in the middle made me wonder if it should have had more of a ring type gasket rather than a flat seal. Obviously it would depend on what the two meeting surfaces look like.
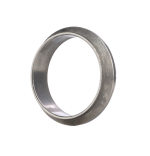
Maybe more like one of these types that keep the ears of the flange apart whilst sealing in the centre. In general if a ring type is used then one end of exhaust would have a grove or spigot for the ring to sit on when being mounted.
If a flat gasket like you are trying is correct , then with those flanges so badly distorted and touching each other, then the joint will never seal as it cannot put sealing pressure in the middle where the gases are coming past if it is hitting on the outer edges of the flange at the same time.:(
The sealing gasket that @GrandePunto PL suggested earlier may be a good compromise between the two designs, it all depends on the shape of the sealing area on the two pipes.
With flanges separated, if you put a straight edge across the two mating surfaces you will soon see why it will never seal as it is.
Another thing I have noticed in the past is where someone previously replaced the large bolts with tiny ones which don't put the correct force in the right area and soon come loose so get over tightened distorting the flanges even more.:)
 

Attachments

  • 1730879060545.png
    1730879060545.png
    341.1 KB · Views: 3
  • 1730879121922.png
    1730879121922.png
    299.8 KB · Views: 3
  • 1730879575591.png
    1730879575591.png
    9.2 MB · Views: 15
Last edited:
The way the two ears of the flanges are touching together without it sealing in the middle made me wonder if it should have had more of a ring type gasket rather than a flat seal. Obviously it would depend on what the two meeting surfaces look like.
Maybe more like one of these types that keep the ears of the flange apart whilst sealing in the centre. In general if a ring type is used then one end of exhaust would have a grove or spigot for the ring to sit on when being mounted.

I've seen those and wondered if they'd fit, but there is no groove that i remember seeing. ePER does list flat gaskets for this car.

If a flat gasket like you are trying is correct , then with those flanges so badly distorted and touching each other, then the joint will never seal as it cannot put sealing pressure in the middle where the gases are coming past if it is hitting on the outer edges of the flange at the same time.:(
The sealing gasket that @GrandePunto PL suggested earlier may be a good compromise between the two designs, it all depends on the shape of the sealing area on the two pipes.

I've looked for those gaskets but couldn't find any, they would be ideal, i can have another look.

With flanges separated, if you put a straight edge across the two mating surfaces you will soon see why it will never seal as it is.

As the problem is the down pipe the flat surface is hard to see from the driveway, but I now know to look, check and sand etc.

Another thing I have noticed in the past is where someone previously replaced the large bolts with tiny ones which don't put the correct force in the right area and soon come loose so get over tightened distorting the flanges even more.:)

I bought M10 and M12 bolts in the hope of putting extra force into the joint but the hole is M8 only. I suppose I could drill it and make the hole a little wider. But it looks like you're saying don't do that?
 
As the problem is the down pipe the flat surface is hard to see from the driveway, but I now know to look, check and sand etc.
I bought M10 and M12 bolts in the hope of putting extra force into the joint but the hole is M8 only. I suppose I could drill it and make the hole a little wider. But it looks like you're saying don't do that?
It will be a bit more than a light sanding to get those flanges flat.

Ideally when correct gasket and flange bolted tight there should still be a gap where the bolts squeeze the flange which shows the holding effort is in the centre where the gas is, At the moment all the squeezing effort is lost as it is only drawing to outer lips together, not the middle, so no matter how much tighter the bolts are no more effort can reach the middle once those lips touch.

Yes better with original, just not smaller bolts.

The main thing is with flange that distorted it cannot hold gasket tight in the centre to seal properly
 
It's not 55194844 is it?
This one?
I didn't think to look on ePER?! I've only recently learned how to use the system properly so may not have known where to look?!

Although oddly ebay says this part won't fit.

I've just mauled my first attempt at a DIY gasket. So I may be buying one of these :)
 
This post contains affiliate links which may earn a commission at no additional cost to you.
I did buy the one linked.

Its not a massive leak, so i can march slowly to resolution. I'll update when i've tried the new gasket, and otherwise had a look at the system etc. in a week or so.
 
What I would be inclined to do given this isn’t a highly prized car, I’d sand the flanges on both side flat probably using a stone.

Then bend the the bolting parts of each flange back with some gentle application of a big f-off hammer.

Then finally bolt it up with a bit of exhaust putty between the joint then never touch it again
 
What I would be inclined to do given this isn’t a highly prized car, I’d sand the flanges on both side flat probably using a stone.
I have a belt sander which would get rid of surface rust, assuming I have enough space under the car, so i'm going to have a go at flattening it somewhat, if not completely.

Then bend the the bolting parts of each flange back with some gentle application of a big f-off hammer.

Made me laugh, thanks. I wasn't aware that they could be moved with a big hammer, but it stands to reason.

Then finally bolt it up with a bit of exhaust putty between the joint then never touch it again
I've had it in mind to try exhaust putty, i even have some, but each morning when the car starts there is water dripping out of the gasket area. I think thats pretty normal but reckoned the putty would dissolve fast. I could possibly get away with some at the top though, as that wouldn't get wet.
 
I have a belt sander which would get rid of surface rust, assuming I have enough space under the car, so i'm going to have a go at flattening it somewhat, if not completely.


Made me laugh, thanks. I wasn't aware that they could be moved with a big hammer, but it stands to reason.


I've had it in mind to try exhaust putty, i even have some, but each morning when the car starts there is water dripping out of the gasket area. I think thats pretty normal but reckoned the putty would dissolve fast. I could possibly get away with some at the top though, as that wouldn't get wet.
The putty should be impervious to water.

When heated the putty should harden and completely seal the joint
 
Back
Top