Tuning Canterbury 695

Currently reading:
Tuning Canterbury 695

Has anyone fitted the four piece aluminum trim that fits on the door and rear quarter panels?
It appears that you fit them on the swage line but advice is sought please.
 
Are these what you mean Andrew ? IMG_1476028885.694081.jpg
 
They are very similar - but are longer as in the door trim is the full width of the door - and from this I presume it fits on the swage line....it's just how.....
I guess it has to be just above or below the line to get the trim clips to fit?
 
Yup - almost exactly......mine is a smaller, more compact, more well packaged pocket rocket.
The lines of a 500 are far more classic than the boxy 131
Visiting the paint shop tomorrow to sign off pre paint preparation.
Delivery to my home complete next Friday - one week to rebuild before very challenging new career starts.
 
After my visit to the paint shop it transpires that the Giannini side trim I found does fit in line with the door handle as shown in the earlier post.
It was my last check before painting.
The bolt on arches look great, we agreed on some final badge positions - it's not following any rules or previous models so we can make hay.....
They are painting it up on stands with a masked curtain underneath - as there are all sorts of exotica under side.
I left the original 500 wheels with them as the Borrani rims need a powder coating
Delivery of finished car to me next Friday!!!!
 
A bit of a busy week - leave my job in London - newly painted road racer delivered - daughters birthday party with a house hold full of 11 year olds and pick Borrani rims from powder coating.
Come on Friday!!
 
It's coming tomorrow at lunchtime!!!
Body shop guy is over the moon with it.....I have yet to see the finished article - the colour scheme may be a bit "Marmite"
Photos coming....
 
The beast has arrived!
It transport went without a hitch.....now the re-build commences.....
The wheels will be ready next week so best get a move on.
I think it will look superb
 

Attachments

  • IMG_0372.JPG
    6.1 MB · Views: 77
  • IMG_0373.JPG
    4.2 MB · Views: 70
  • IMG_0374.JPG
    5.8 MB · Views: 74
  • IMG_0375.JPG
    5.6 MB · Views: 60
Wow photos!(y) More please.
That's a very shiny finish.:worship:
As you said previously Andrew....a bit Marmite; even part of the colour scheme nicked from it:D, but Marmite is very good for you .:D
 

Attachments

  • index.jpg
    index.jpg
    16.9 KB · Views: 167
Sure more photos to follow - I only had twenty minutes before a birthday party had to be constructed - currently have a house full of children (nothing new there!)
Finish is mirror perfect
Just got to build it well now....
 
Last edited:
Love the engine lid, like lots of others and the paintwork looks like a top job and a lovely colour.

It's a bit misleading at the moment as it is missing all it's bling and nice wheels. Once it has all that in place it's certain to turn most heads, I nearly typed a few but I think more realistically most is more likely, especially if it is going to be as noisy as I imagine it is.:eek:
 
I admit a defeat - building the doors has me foxed
Can somebody please give me a build order
Aluminum trim
Quarter light
Window mechanism
Lock mechanism
I've been fighting it and have decided to ask the experts their experiences......
Please save my fingers......?
 
Window mechanism including glass and lock mechanism first.

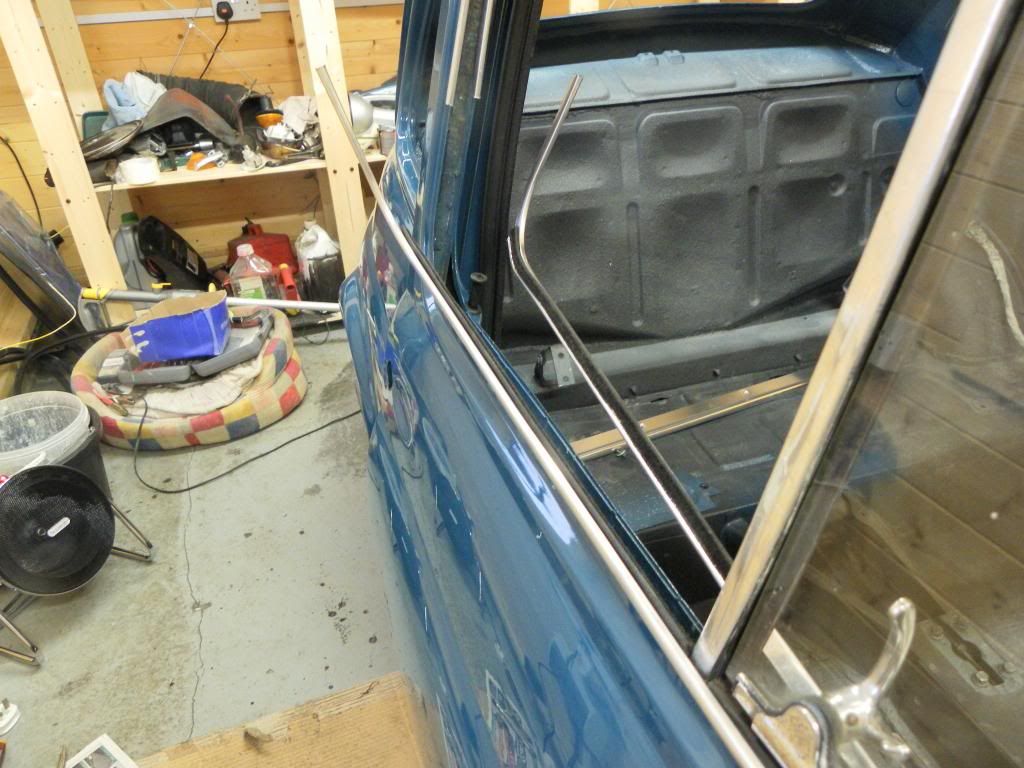
Ally trim but don't fix it along the bottom and lower part of the door by the B post. You need to leave it out so you can get the quarter light in. As per picture below.

Then quarter light it goes in at an angle. The bottom goes in first with top of it pointing towards the top of the B post so that you can get it past the door glass which should be wound right down, obviously. It's a bit of a squeeze but it will go in if you are patient, don't try and force it or it will screw up the ally. Then finally the guide for the sliding glass that goes inside the door.

 
Back
Top