Firstly, here's the summary of the procedure I followed:
Tools used:
Car jack x 2
Block of wood
Axle stand
Socket wrench
Torque wrench
17mm socket - for droplink balljoint nut
13mm socket and 6in extension - for ARB bracket bolts
2-4 temporary bracket bolts M8, 13mm head, about 37mm long, plus a few washers, maybe a few 13mm nuts (£1 the lot from local parts store)
10in long Wilco chisel plus 10in 1/2in drive socket extension to increase length of chisel
Standard hammer
Procedure (summary)
Step 1: Jack up car on one side, support on axle stand, remove road wheel.
Step 2: Detach droplink lower balljoint from ARB.
Step 3: Remove and replace ARB bracket bolts with temporary bolts.
Step 4: Loosen temporary bolts to leave a gap slightly wider than the thickness of the chisel head to be used to split the brackets.
Step 5: Separate the upper and lower ARB brackets with the chisel and hammer.
Step 6: Remove the temporary bolts.
Step 7: Lift off the ARB upper bracket.
Step 8: Replace the ARB bush with new bush.
Step 9: Reinstall the ARB upper bracket.
Step 10: Reinstall the temporary bolts and tighten to press the upper and lower brackets back together.
Step 11: Replace the temporary bolts with the real ARB bracket bolts, tighten to correct torque setting.
Step 12: Reattach the droplink balljoint to the ARB.
Step 13: Refit road wheel. Lower car to ground.
Step 14: Repeat Steps 1 to 13 on the other side of the car.
Sounds straightforward right? Here's how it went...
Procedure (in detail)
Step 1: Jack up car on one side, support on axle stand, remove road wheel.
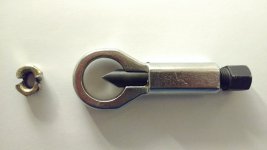
Step 2: Detach droplink lower balljoint from ARB:
Jack up the wheelhub to take the tension off the droplink - I used a block of wood and second jack under the suspension arm balljoint. Remove the droplink lower balljoint nut (I had previously removed the old nut and replaced with a new nut in preparation for today), and detach the droplink from the ARB.
Step 3: Remove and replace ARB bracket bolts with temporary bolts:
The reason for replacing the bolts with temporary ones is that when chiselling the brackets I didn't want to damage the real bolts.
Tip: to aid/keep the temporary bolt vertical in the wrench socket, screw a nut all the way up to, and lined up with, the temporary bolt head, increasing the size of the bolt head. This helps when trying to locate the bolt into the subframe bolt hole/bracket captive nut.
Step 4: Loosen temporary bolts to leave a gap slightly wider than the thickness of the chisel head to be used to split the brackets:
The gap to be left between the bracket and subframe. My chisel head is a couple of mm's thick so I left a gap of 3-4mm.
Step 5: Separate the upper and lower ARB brackets with the chisel and hammer:
I tried to do this the other day with a small 5in chisel - no chance. Needed something meatier and longer ie. a 10in Wilco chisel (£5 money well spent). Note the tip is about 15mm wide. Position the chisel in the join between the ARB upper and lower brackets (car front or car back of ARB bracket). I then extended the chisel handle by placing my 10in 1/2 drive socket extension at the back of the chisel, this allowed me to swing the hammer unobstructed outside the wheel arch. Whack with hammer to split bracket. Another poster above has attempted to describe the force needed to split the bracket, I would say that I found it's about 3-5 times the force needed to hammer a nail into wood. It's not a tap. I increased the force gradually so as not to overdo it. Repeat on the other side (front or back) of the bracket.
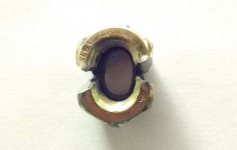
I'm not sure what "swaging" is, but after removal when I checked the upper and lower brackets what I found is that there is a ring of metal round the bolt hole on the underside of the upper bracket, and this metal ring locates into the hole in the lower bracket and appears to be the only thing holding the upper and lower brackets together. Didn't see any obvious signs of spot welding etc. But it is obviously a tight fit. Was the bottom of the ring "swaged" under the bottom bracket? Don't know. Note: the reason not to overdo the whacking force is that if you overdo it you might damage the aforesaid metal ring. Of course I didn't know that at the time.
Step 6: Remove the temporary bolts:
Take em' out allowing separation of the upper and lower brackets.
Step 7: Lift off the ARB upper bracket.
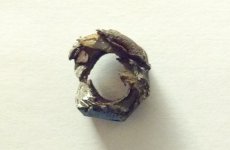
Step 8: Replace the ARB bush with new bush:
I found that both the old and new bushes could be split open easily with bare fingers to work them off/on the ARB.
Step 9: Reinstall the ARB upper bracket.
Step 10: Reinstall the temporary bolts and tighten to press the upper and lower brackets back together:
In the same way I didn't want to damage the real ARB bolts when splitting the brackets, I didn't want to strain/damage the real ARB bolts when pressing the upper and lower brackets back together (I assume that when the manufacturer builds the ARB they use a press or something to press the bracket halves together - not what the ARB bolts are designed to do!). If the first temporary bolts were damaged on bracket splitting (the screw threads on mine were damaged by the chisel), use new ones. I tightened front and back bolts gradually going back and forth between the two, to make sure the brackets and holes were aligned.
Here's where it got interesting. For some reason I can't remember I wasn't happy after installing the temporary bolts, so I took the front one out and started to reinstall it, but it got harder and harder to get the bolt in, and was impossible to screw all the home. I took out the bolt and top bracket and found I'd driven the bolt in at the wrong angle and crossthreaded. I couldn't get a bolt into the captive nut even with the bracket off the car! Sh*t! After some mucking about I tried screwing in a bolt from the other side of the captive nut and that seemed to sort it out. Phew. Almost a showstopper.
Step 11: Replace the temporary bolts with the real ARB bracket bolts, tighten to correct torque setting:
OK, temporary bolts out, real bolts in. Not so fast. The next near disaster - what I thought could happen, happened: the front ARB bolt dropped inside the hollow subframe, rolled off somewhere into subframe oblivion, and I couldn't get it out! F***! Who designed this f***ing stupid car?!
This is where your temporary bolts come to the rescue. I had to use one of them (cut down shorter) instead of the real thing.
So a tip: In case the same should happen to you, have a couple of spare 13mm M8 bolts and washers handy for this job (and a hacksaw).
But think I'll order some new ARB bolts anyway. Anyone know where I can get some, cheap?
The remaining steps are straightforward...
Step 12: Reattach the droplink balljoint to the ARB:
...and lower the wheel hub back down.
Step 13: Refit the road wheel. Lower car to ground.
Step 14: Repeat Steps 1 to 13 on the other side of the car.
=== THE END ===
The knocking and banging from the front of the car when I run over potholes etc. has now diminished to just quiet thumps and bumps. I wouldn't have believed replacing two bushes could make such a difference.
I spent about £25 for tools and sundries, the tools are now permanent additions to my toolbox, the bushes cost £15. 2 garages quoted me £100 to do the job, inc. parts, labour and VAT, so I saved about £60 doing the job myself.


")