Technical 1978 124 Project

Currently reading:
Technical 1978 124 Project

Re:- Broken stud removal.
I'm a great believer of using penetrating fluid (you choice) and giving it plenty of time to work.

I'd position the cyl. head with the broken stud vertically, remove the stud and apply penetrating oil. I might gently heat the head surrounding the broken stud and then apply the penetrating oil, the sudden cooling may draw in the penetrating fluid better.
Chances are that the broken portion of the stud is bottomed out in the threaded hole.
It's important to start drilling at the exact centre of the stud - if below the surface, given that the cyl. head is al. alloy, I might try refitting the exhaust manifold to try to guide the drill bit. Or I might drill a hole is a piece of steel plate, align this hole with the exact centre of the broken stud, clamp the plate to the cyl. head and use it as a guide for drilling the stud centre.
There are stud extractor sets that include guide bushes for the drilling process. I prefer to use a spline type of extractor rather than the tapered screw type. E.g. :-
IMG_20250324_231847.jpg


IMG_20250324_231902.jpg


In my early days (with very few tools and even less money) I used to drill 2 holes, a small one the full of the broken piece of stud and a larger hole halfway in, then tap the tapered square tang of a file in and use this to wind out the broken stud - if done gently, this often worked but if the tang of the file broke off in the broken, stuck, stud...

An even easier way of removing studs broken off below the surface is not to use any penetrating oil, just use an arc welder to stick a flux-coated rod to the broken stud, disconnect the rod holder, allow the heat to spread into the head and then try using the welding rod to wind the stud out.

This is also how a broken head bolt can be removed in situ without having to remove the cylinder head...
And if a cyl. head bolt were to break, the broken threaded piece (the fracture point will usually occur in the threads that were not engaged with the threads in the cyl. block) will not be tight so should be easy to unscrew and remove. So, no big deal.
 
Last edited:
Re:- Broken stud removal.
I'm a great believer of using penetrating fluid (you choice) and giving it plenty of time to work.

I'd position the cyl. head with the broken stud vertically, remove the stud and apply penetrating oil. I might gently heat the head surrounding the broken stud and then apply the penetrating oil, the sudden cooling may draw in the penetrating fluid better.
Chances are that the broken portion of the stud is bottomed out in the threaded hole.
It's important to start drilling at the exact centre of the stud - if below the surface, given that the cyl. head is al. alloy, I might try refitting the exhaust manifold to try to guide the drill bit. Or I might drill a hole is a piece of steel plate, align this hole with the exact centre of the broken stud, clamp the plate to the cyl. head and use it as a guide for drilling the stud centre.
There are stud extractor sets that include guide bushes for the drilling process. I prefer to use a spline type of extractor rather than the tapered screw type. E.g. :-View attachment 465535

View attachment 465533

In my early days (with very few tools and even less money) I used to drill 2 holes, a small one the full of the broken piece of stud and a larger hole halfway in, then tap the tapered square tang of a file in and use this to wind out the broken stud - if done gently, this often worked but if the tang of the file broke off in the broken, stuck, stud...

An even easier way of removing studs broken off below the surface is not to use any penetrating oil, just use an arc welder to stick a flux-coated rod to the broken stud, disconnect the rod holder, allow the heat to spread into the head and then try using the welding rod to wind the stud out.

This is also how a broken head bolt can be removed in situ without having to remove the cylinder head...
And if a cyl. head bolt were to break, the broken threaded piece (the fracture point will usually occur in the threads that were not engaged with the threads in the cyl. block) will not be tight so should be easy to unscrew and remove. So, no big deal.
Excellent - thank you. I have succeeded in removing the broken piece with a drill, some oil, a tapered extractor and 1/2 pound of patience. And the threads are okay! Whew.
 
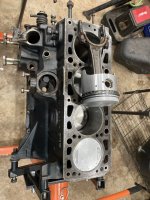
Update: I’ve reinstalled the crankshaft, following the steps in Haynes. I *think* the cylinders are done; I’ll begin putting the pistons in this afternoon. Here’s a video:

 
Okay question: i cannot seem to find torque spec for the crankshaft end bearing covers (each with 10mm bolts). I found one reference online for 59 ft:lb, but no mention in either the Fiat service manual or the Haynes. I must be missing something ? I don’t want to over or under torque….
 
Okay question: i cannot seem to find torque spec for the crankshaft end bearing covers (each with 10mm bolts). I found one reference online for 59 ft:lb, but no mention in either the Fiat service manual or the Haynes. I must be missing something ? I don’t want to over or under torque….
Iirc, your engine is a 1756cc unit, correct?

My Haynes manual only covers cars up to 1977, and gives the main bearing torque figure as 59 ft.lbs, however afaik, this figure only applies to 10mm bolts.

Iirc, later 1756cc engines used 10mm bolts on the front? bearing cap and 12mm on the other bearing caps, the figures then became 59ft lbs for the 10mm cap bolts and 85 ft.lbs for the 12mm bearing caps.
Just to clarify, Tightening Torque figure for 10mm bolt (head size = 16mm) - 59 ft.lbs.
12mm bolt (head size = 19mm) - 85 ft.lbs

Iirc, you purchased a copy of the Pininfarina Spider 'Shop Manual as recommended by @Slotman, does this manual not give these torque figures?
 
Last edited:
Iirc, your engine is a 1756cc unit, correct?

My Haynes manual only covers cars up to 1977, and gives the main bearing torque figure as 59 ft.lbs, however afaik, this figure only applies to 10mm bolts.

Iirc, later 1756cc engines used 10mm bolts on the front? bearing cap and 12mm on the other bearing caps, the figures then became 59ft lbs for the 10mm cap bolts and 85 ft.lbs for the 12mm bearing caps.
Just to clarify, Tightening Torque figure for 10mm bolt (head size = 16mm) - 59 ft.lbs.
12mm bolt (head size = 19mm) - 85 ft.lbs

Iirc, you purchased a copy of the Pininfarina Spider 'Shop Manual as recommended by @Slotman, does this manual not give these torque figures?
Thanks @124BC1 - Yes I bought the Pininfarina shop manual, but that too does not (or I didn't find it) list the torque spec for those bearing covers. They are all 10mm bolts (fore and aft) on the 1756cc motor; so I think I will go with your recommendation. And the one reference I found was for 80nm which does turn out to be 58/59 ft/lb... Oh and my Haynes covers up to the 1980 model...
 
If you look at the items in the right hand tray ^^, you may notice a broken twist drill and that one of the broken thread extractors has been twisted at both ends thereby locking it's removal nut in place - this is what can happen when you loan tools to someone who might just be one of the 'ignoranti'.

I forgot to mention another tip re. removing a broken stud - some suggest using a left hand spiral/helix drill bit - the thinking being afaik that as you drill in, in a counter-clockwise direction, the force may unwind the broken stud, especially if the drill bit tries to snag/jam.
 
Thanks @124BC1 - Yes I bought the Pininfarina shop manual, but that too does not (or I didn't find it) list the torque spec for those bearing covers. They are all 10mm bolts (fore and aft) on the 1756cc motor; so I think I will go with your recommendation. And the one reference I found was for 80nm which does turn out to be 58/59 ft/lb... Oh and my Haynes covers up to the 1980 model...
Not sure if this helps but it's from the Pininfarina manual..
 

Attachments

  • 20250427_184353.jpg
    20250427_184353.jpg
    843.1 KB · Views: 34
Break! No, I didn't fall down or win the lottery. I'm not going to post for a bit because I'm making a x-country road trip with some friends.
I have organized myself in the shed so I *should* be able to pick right back up. I just need to procure some replacement mounting studs for the intake and exhaust, lap the valves, and then follow the manuals to put things back together with the new gaskets etc.

Hope your weeks go well in the interim!
 
IMG_8288.jpeg

Greetings, good people. I’ve been away. I am back.
Pictured above: new rings on the pistons which have now gone in. I’ve worked the cylinders a bit more to assure (almost) no ridge and am going to proceed as if (laughing) everything is just fine.

Hope you all are well.
 

Attachments

  • IMG_8288.jpeg
    IMG_8288.jpeg
    2.1 MB · Views: 15
IMG_8291.jpeg

Reassembly is going slowly and smoothly. I had a moment of perplexity when I couldn’t find some bolts for the six shaft seal housing but then I discovered my well-labeled and orderly box of bits. I forgot that I was organized about that.

Question: next up is the mechanical fuel pump (among other things). This car does have the pump PLUS was fitted with an elec pump back near the tank. Did it really work to have both operating? (Rhetorical at this point). And - if I am going to keep the elec fuel pump (I have a new carb I’m putting on that recommends elec) do I do away with the mechanical pump?

Thanks in advance…
 
Gosh I'm a bit out of my realm with fiat, but as I recall from my experience with chevys it wasn't advised to run both a mechanical, and an electric fuel pump together, as it was possible for the diaphragm to rupture in the mechanical pump allowing the electrical pump to fill the engine with gas.
I just replaced the mechanical pump in my spider and it works great...i might be tempted to run what was original to your car unless as you say the carburator manufacturer recommends an electrical....
Hopefully you will get some better advice than mine! :)
Thanks, @Slotman - I, too, am perplexed and am wondering if this is perhaps the most significant of the 5 or 6 reasons I've found that the engine was not running! What I don't recall is if the mechanical pump was stubbed off - if the hose was blocked to prevent it from pushing fuel. I might go back and look at my earlier video / pics...
 
Thanks, @Slotman - I, too, am perplexed and am wondering if this is perhaps the most significant of the 5 or 6 reasons I've found that the engine was not running! What I don't recall is if the mechanical pump was stubbed off - if the hose was blocked to prevent it from pushing fuel. I might go back and look at my earlier video / pics...
I am running a mechanical fuel pump with twin 40 IDF’s and it works great. The only downside is a long crank to prime the fuel system if you park the car up for a few weeks.
Electric fuel pumps can be more tricky and might need a pressure regulator and a shut off switch. Too much fuel pressure can flood the carb and may result in petrol gettinh into the sump and contaminating the engine oil
Then there is the cost! Mech fuel pumps can be £30-40. Elec pump £70-140, Pressure regulator and £70 Elec pumps also need a filter in the suction side of the pump (stated by pump manufacturer)
Cool - I’ll know more at my next garage time: meanwhile this is what I have to install and it looks like it’s fitted for mechanical pump, so I might just simplify my life and delete the elec pump… https://www.midwest-bayless.com/p-2...3236-dfev-genuine-weber-fiat-124-131-new.aspx
 
Back
Top