Technical Becky's rear brake cylinders

Currently reading:
Technical Becky's rear brake cylinders

Joined
Oct 1, 2017
Messages
7,313
Points
2,292
Location
Edinburgh Scotland
Since we bought Becky (2010 Panda 1.2 Dynamic Eco - for the few of you who don't know) I've been gradually working my way through the small list of "things to do". Timing belt, big service, front brakes, etc, etc all done. During the service (some time ago now) I noticed the rear cylinders were "damp" under their dust rubbers, on both sides. I bought two new cylinders the next day but they've just sat in my spares box waiting for me to get round to it! Having just (unexpectedly) had to replace the front struts I took the opportunity to pop the rear drums off and have a closer look at these brake cylinders. The dampness has now progressed to what could legitimately be called a leak - no wetness outside the rubbers yet though - also there is corrosion which makes both rear facing pistons "sticky" in the bores - The return springs are now only just managing to overcome this.
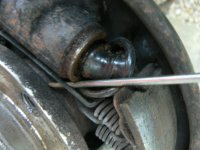
P1080664.JPG

So definitely time to do something about them. In fact this is the last "serious" thing I know of that needs "fixing" - well Ok, there's always that rear axle - so the light is visible at the end of the tunnel.

Closer inspection shows heavy corrosion of the small fixing set screws and tube nut.
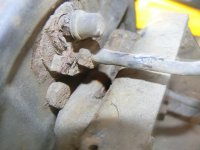
P1080657.JPG

I've read about how much of a problem the tube nut/brake pipe can be and I'm prepared to make a new pipe if needed. Likewise with the securing (6mm?) set screws which look as if they are likely to sheer so I am quite expecting to have to renew them (got new ones already) but what I hadn't realised is that the rear most screw is partly blocked by the end of the axle itself so you can't get a socket or even a split ring key on it
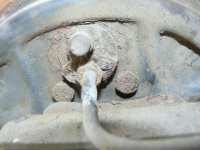
P1080659.JPG

I've looked on you tube and come across the Bodgit and Leggit chaps who did it by removing the backplate from the hub to give access.


The backplate is secured by some small Allen screws though and if they round off/strip/snap then I'm just giving myself even more problems so I'd rather not do this. Their back plate and cylinder didn't look half as corroded as mine and yet they thought to mention this as a possible problem. So, today I popped into Kenny Harrison's Garage, feeling just a little nervous that once again I was asking advice without handing over any money, and asked how they did them. I was greeted by my first name an wasn't made to feel a nuisance at all. The advice was to try the conventional approach first - lots of releasing fluid, some gentle tapping and spannering. If that doesn't work make "nicks" with an angle grinder in the lugs of the cylinder casting where the holding screws are and then hit them with a cold chizel. Bits of these lugs can be easily knocked off - Apparently - the casting, cast iron on mine but some are ally, is brittle so bits can be broken off so releasing the screws enough to be able to turn them. I've never thought to try this but I like the idea. You can see how "vulnerable" these lugs are here in this picture of the new cylinder. I was deeply touched when, as I was walking down the road away from the garage, maybe 75 yards away, one of the mechanics with whom I'd been talking came running down the road behind me, dragged me back into the workshop and gave me new securing bolts for the cylinder. He wouldn't take a penny for them! You just don't get that sort of thing happening these days do you? My opinion of these chaps has now gone right off the top end of the "Richter" scale!
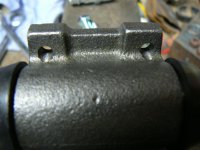
P1080667.JPG

So my guess is that it might be quite a "neat" solution.

The B & L video also shows a lining which has detached from the shoe due to failure of the adhesive bond. My shoes are looking pretty "ratty".
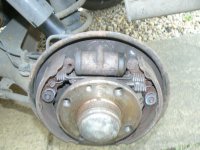
P1080660.JPG

Lots of corrosion on the metal parts and just generally "tired" linings and, if you look closely, I think there are some signs of bonding failure - quite probably these are the original shoes?
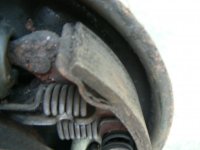
P1080661.JPG

The drums looked really crusty when I bought her and the lips on the inside were so deep that I had an awful time trying to get the drums off (even with handbrake cables totally disconnected). I have a small grinding wheel which goes in my drill which I used to get rid of the lip and then spent a good half hour with a hammer knocking the worst of the crusty corrosion off at that first service, but even so they still look pretty poor.
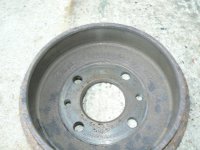
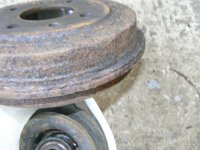
P1080662.JPG

P1080663.JPG

I think a set of drums and linings to go with the new cylinders will be the way to go. I should have shares in S4p.

Anyone done this job and run into problems? Or got tips they would care to pass on? I'm just off to try a search but I find sometimes I miss things because I didn't use the right words in the search box. So advice from anyone would be most appreciated.

Just to illustrate my ignorance of the internet, is it ok to post the reference to, for instance, the Bogit and Leggit video as I did here? I'm not doing anything wrong either on our forum or in the wider aspect of it all? Also, I like to post illustrations of what I'm doing etc because I think it makes the viewing of the post much more interesting. Is it ok to do this or am I using up too much of the forums photos storage? I just don't know about these sort of things.
regards to all
Jock
 
Last edited:
Shoes look fine to me?
Unless you mean the curved part with the gap Asim fairly sure that's part of the design of them? As when I did the shoes only 500 they were like that on the new ones
Thanks Chris. Yes there does seem to be a fair bit of "meat" still there on the linings. I'm just very slightly suspicious that that bit of "stuff" in the depression in the second image is a sign of things not being perfect with the adhesive? but it might just be paint lifting? I'll be taking the linings off altogether to access the cylinder so I'll have the chance to give it all a good clean and inspect. I may just change the cylinders and run the shoes and drums on for a while, However if I go for new drums I'll be fitting new shoes too. I'll see what it all looks like when I've got both sides stripped and cleaned.
 
I did mine around 6 months ago.

I soaked all the nuts and bolts in plus gas several times the week before.

The brake pipe nuts came off no problem, and if I remember correctly, I managed to get both cylinder bolts out using a spanner. The one behind axle was a bit of a pain, but turned it a little bit at a time with a spanner, and it came out.
 
My brake pipe flare nuts were all seized (every one on both cars). You need to watch the tube VERY carefully as you turn the flare nut. The aluminium corrodes just enough under the plastic sleeve to grip the nuts. If you are lucky, warming the nut with a gas cooker lighter flame will be enough to soften the plastic and the nut will turn.

Failing that try to spin the wheel cylinder off the flare nut. I have not tried so this might not be possible. It does work on snipped-off brake hoses. Its then easy to warm the bare nut and clean up the scrap coating, etc.

The raggy plastic can be peeled back for about 1". I coated the bare aluminium with some stiff copper paste. The usual CopaSlip (other brands are available :) ) is a bit too fluid but would do the job. The 1.2 has now done 2 winters like that and all is fine. The MOT tester is also happy.

On the 100HP, I fitted a single long braided hose from the chassis connector to the caliper as each one replaced two rubber hoses and the metal pipe. It may be a bit OTT on the drums with its single rubber hoses. HEL are very good and reasonably priced.
 
I did my rear wheel cylinders recently.
The cylinder bolts were not going to undo with an open-ended spanner, no way.
So I took the longer but easier route.

Off with the hub. Always have new nuts around, so no waiting for them to arrive.
Jack the self-adjusters out to hold the shoes away from the cylinder.
Then off with the backplate. The two allen headed bolts came undone easily, although had recently replaced the axle. But when I replaced the axle, they came undone easily, and were 12 years old then.
With backplate hanging off the axle, cylinder comes out without fuss.
In the best Haynes tradition, replacement is the reverse of removal.

Sheer genius placing the bolts trapped by the axle.
 

I bought one of these quite a while ago on one of their VAT free offers - It was a wee bit cheaper then and with the VAT refunded it made it a very affordable purchase. I seem to remember I posted about how I'm using it but can't find the post!

I have five torque wrenches and was finding regular calibration checks cripplingly expensive. What I now do is, a couple of times a year, I check them by comparing their readings at roughly a quarter, half and three quarters of the values for the wrench being checked against the electronic tool (given that torque wrenches are usually acknowledged to be not very accurate at extremes of their range). I contacted the maker of the electronic tool and they told me that recalibration might be necessary after many years of use but that for what I'm doing with it they reconned that I wouldn't live long enough for that to come about! I'm sure this isn't quite as accurate as a recalibration done by a specialist but I'm confident it's getting close enough for anything I'm going to be doing - I'm not exactly rebuilding an F35 in my garage! The tool can be set to work like a "click" type wrench (like my Britools and Norbars), where it "bleeps" when you hit the preset, or in "progressive" which just displays the value you are pulling on the display (like my old beam type) using it this way is actually quite difficult as, like a digital multimeter, the numbers on the display cycle rapidly and it's very hard to see what it's actually telling you.

By the way it runs on two CR 2032 button cells (which, conveniently, also power my bathroom scales and are the backups on both of the alarm clocks in the bedrooms) The tool also has a "calibrating" procedure which I do each time I use it which aligns the tool to the battery voltage. So as the batteries age the tool still stays accurate - When the batteries become sufficiently discharged the tool warns you on the readout. I'm actually still on the original batteries!

Here's my "mid range" Britool (the one I use most) set up in testing mode:

P1080671.JPG

No, I'm not gripping it's square drive in the vice! It's slotted into a square adaptor which the vice is holding. The electronic tool itself (obviously a strain gauge) is excellent and I believe more than accurate to have become a replacement for all (except my smallest) of my wrenches. But, and there's often a "but" isn't there, as you can see from the picture, by the time you've got the tool assembled onto a handle of some sort (most people would probably opt for a power bar? so substitute that in your mind for the Britool in my image) and then stuck a socket on the end of that, it just sticks out so much that it makes using it in tight situations (cam belt tensioners etc?) impractical. Hence I prefer to preserve it's accuracy by using it sparingly to check calibration on my other wrenches and using then for tightening duties.
 
Shoes look fine to me?
Unless you mean the curved part with the gap Asim fairly sure that's part of the design of them? As when I did the shoes only 500 they were like that on the new ones

Replacement rear axles now on sale on Ebay for £175!!
 
Ive just notices Jock's corroded metal brake pipes. Those are on the bad side of BaaD !!

I would be looking at fitting a HEL braided hose from cylinder to body shell bracket. Scrap the bundys and rubber flexible. Looks like you will need males at both ends.

You will need plastic grommets at the bracket on the swing arm and a rubber bobbin inside to protect the hose. The standard hose retaining clips with with the braided lines.

Get four rubber grommets fitted when the lines are made up. They will protect where P clips or zip ties hold them down.

The male ends are on swivels so no worries about the lines getting twisted. I always use some good copper grease on stainless as it sets up galvanic corrosion with most other materials in contact.

These are the kit for a Panda 1.2 but I doubt they scrap the swing arm Bundy pipes. Talk to HEL They are very good (I live nearby so got mine direct from the factory).
https://www.ebay.co.uk/itm/HEL-Rear...pe:1.2&hash=item4b1da5e028:g:busAAOSw7gZa4HQc
 
Last edited:
This post contains affiliate links which may earn a commission at no additional cost to you.
Replacement rear axles now on sale on Ebay for £175!!
Thanks for this Panda Nut. I've turned up two suppliers in just a couple of minutes

https://www.ebay.co.uk/itm/Brand-Ne...986296?hash=item4682039fb8:g:WaoAAOSw65Jc6AP7

and

https://www.ebay.co.uk/itm/Rear-Sub...:Panda&hash=item23be47b8e0:g:g3oAAOSwb2xc-EFQ

I've been trying to make my mind up whether to completely strip Becky's rear axle out and send it off to be refurbished with a zinc spray finish (was it Dave McT who did this - looks like a good way to do it) or just do a rub down and repaint with the anti-corrosion paint I recently bought (painted the top spring plates with it) Then, when it later gets too corroded, replace it with one of these. At this price I don't think there's any contest. I'm going to do some researching into how likely this supply is likely to remain secure.

Hey, look, here's another one that seems to be in Denmark

https://www.ebay.co.uk/itm/FIAT-PAN...747&pg=2047675&_trksid=p2047675.c100005.m1851

PS - someone - was it you PB? bought one of these and seemed to think it was OK?
 
Last edited:
This post contains affiliate links which may earn a commission at no additional cost to you.
If you are thinking of replacing the axle (and you don't have a 100HP) then you would be far better going to a 500 axle. The improvement to the car is amazing. As I said, the first thing my wife and kids said was this is much better. There are some costs as you will need the 500 springs - the 169 springs are MUCH too hard with 500 axle.

If your old axle will clean up without too much work you can sell it and get some money back.

It's possible the later model Panda has the same axle as the 500. Worth a look if one comes up locally.
 
Last edited:
I find that if I just remove the hub access is easier. Just needs a big torque wrench and a supply of nuts. Thankfully, not necessary to do much very often.


:):):)


its the best way to do anything on the rear brakes


the wheel cylinder bolts will not be too tight. All four bolts on a 200K Panda came out easy enough even though they looked worse than yours.


I would consider adding a fitting kit and adjusters. You will not need to go back into the rear brakes for another 50K
 
Thanks for this Panda Nut. I've turned up two suppliers in just a couple of minutes

https://www.ebay.co.uk/itm/Brand-Ne...986296?hash=item4682039fb8:g:WaoAAOSw65Jc6AP7

and

https://www.ebay.co.uk/itm/Rear-Sub...:Panda&hash=item23be47b8e0:g:g3oAAOSwb2xc-EFQ

I've been trying to make my mind up whether to completely strip Becky's rear axle out and send it off to be refurbished with a zinc spray finish (was it Dave McT who did this - looks like a good way to do it) or just do a rub down and repaint with the anti-corrosion paint I recently bought (painted the top spring plates with it) Then, when it later gets too corroded, replace it with one of these. At this price I don't think there's any contest. I'm going to do some researching into how likely this supply is likely to remain secure.

Hey, look, here's another one that seems to be in Denmark

https://www.ebay.co.uk/itm/FIAT-PAN...747&pg=2047675&_trksid=p2047675.c100005.m1851

PS - someone - was it you PB? bought one of these and seemed to think it was OK?
You're right, I bought one from the topmost one of these three, only one selling at the time. The other two seem to have straight brackets, so perhaps the guys at AM Car Parts listened and got them straightened. I'd guess they are all coming from the same source in the far east somewhere.
The paint's a bit poor, but otherwise seems to do the job as the original did.
Faithfully replicated, including the left spring pan droop.
 
This post contains affiliate links which may earn a commission at no additional cost to you.
My brake pipe flare nuts were all seized (every one on both cars). You need to watch the tube VERY carefully as you turn the flare nut. The aluminium corrodes just enough under the plastic sleeve to grip the nuts. If you are lucky, warming the nut with a gas cooker lighter flame will be enough to soften the plastic and the nut will turn.

Failing that try to spin the wheel cylinder off the flare nut. I have not tried so this might not be possible. It does work on snipped-off brake hoses. Its then easy to warm the bare nut and clean up the scrap coating, etc.

The raggy plastic can be peeled back for about 1". I coated the bare aluminium with some stiff copper paste. The usual CopaSlip (other brands are available :) ) is a bit too fluid but would do the job. The 1.2 has now done 2 winters like that and all is fine. The MOT tester is also happy.

On the 100HP, I fitted a single long braided hose from the chassis connector to the caliper as each one replaced two rubber hoses and the metal pipe. It may be a bit OTT on the drums with its single rubber hoses. HEL are very good and reasonably priced.

I have a butane torch which I use for plumbing which I presume would do the job just fine? Might even have to be careful not to get things too hot! Thank's so much Dave and to all who've mentioned about these plastic coated aluminium brake lines. I think I'd have been in trouble - might still be - without this knowledge.

I've done that "trick" of spinning the cylinder off the end of the pipe on other vehicles in the past. Just depends on how much "slack" the pipe affords to allow the cylinder to be pulled clear of the back plate once you've got the securing screws out. I've been a bit busy with double glazing and decorating just lately so cars are taking a back seat just now (although Daughter in law is bringing her Jazz round tomorrow with what sounds like a binding N/S/F caliper/pads?) I'm going to have a good look at Becky's rear metal pipes and flex hoses before starting on the cylinders. I suspect the corrosion is such that cutting the hose and spinning the remains off the end of the front to rear pipe will be the way to go. I can then get as violent as I like with the old parts as it'll all be getting junked. Then a couple of new flexes (old ones are not far off ten years old now) and metal pipes to the new cylinders (which I've bought already).

You've given me something to really think about with your mention of the braided lines Dave. I remember reading your original post about your rear axle where you first mentioned this. I'm no stranger to braided brake lines from my days with competition vehicles where their use is common. However, as I have several rolls of brake pipe (Copper and Kunifer) and my own flaring tool I think, in this case, it just makes sense to stick with the standard set up - but thanks for making me think about it.
 
I have just done mine. No problem


heat the nut/back plate. NOT the pipe

Only undo a couple of degrees at a time. Tighten back up and oil. Gently, gently does it. Undo a bit more, tighten back up and so on. Just done two wheel cylinders on a Panda. Also replaced the brake pipes on a Suzuki Splash not had any that didn't undo.
 
Back
Top