Technical 100hp heater playing tricks on me... Help!

Currently reading:
Technical 100hp heater playing tricks on me... Help!

When a 100HP heater does finally give up the ghost, a standard aircon heater will fit and the control knobs will also fit the dash.

Not the perfect solution but a huge amount less expensive than a new 100HP heater unit.
 
Well my heater mystery continues...Havent bleed the system as yet because the heater will come on and behave if the car has been running a while.

Checked the actautor unit under the dash and it seem OK, no teeth lost and goes through the motions as I change the settings.

Are there coolent bleed value's on the 100hp system, cant seen to locate any?

What's wrong with Google? https://www.fiatforum.com/panda/297997-panda-100hp-no-hot-air-heater-4.html


It's a rubbish design fault that's persisted into the Fiat 500. The shaft snaps off leaving the flap stuck. The actuator gear teeth (which drive the flap) are fine. The only reliable fix would be a specially made metal shaft to replace the crappy plastic. Seriously not cheap and impossible to fit without removing the heater box.

My mistake on the bleed valve - there isn't one - sorry. Just make sure the coolant tank level is correct.
 
Last edited:
Still no luck in bleeding/draining the heater core. Cant seem to get the hoses off.

I assume the clamps and one-use wonders but the bottom looks like a quick release. Hard to get the right squeeze on it, any pointers?
 

Attachments

  • HeaterHoses.jpg
    HeaterHoses.jpg
    123.6 KB · Views: 69
I'm not convinced you have an air bubble problem. If you did the head gasket would be complaining.

Some OEM clips are crimped and have to be cut off. Other types need special pliers but they also need space alongside to attach the pliers. If access is bad you can cut them with a Dremel disc but be (very) careful to not catch the hose. Also make sure you will be able get a screwdriver (or 1/4" ratchet) in there to turn the screw on a worm drive hose clip.

PS Have you seen this? The Eleganza and 100HP use same heaters.
https://www.fiatforum.com/classifieds/showproduct.php?product=35550&cat=62
 
Last edited:
Have you read the repair thread? Heater parts are not available separately. All you can do is buy a complete replacement heater unit for £megabux. Alternatively, fit a manual control air conditioning heater from a lower spec Panda. The knobs are a straight swap and you lose the climate control but is that really so much of a loss?

The plastic peg on the air control flap breaks off where it slots into the actuator. The temporary fix is covered in the thread.

A proper job needs the flap removing and remaking with a metal shaft perhaps even with a metal flap. It's probably easier to 3D print a new flap but the weak spigot needs to be solved or that will go the same way.

And you'll have to remove the heater to gain access.
 
Last edited:
Have you read the repair thread? Heater parts are not available separately. All you can do is buy a complete replacement heater unit for £megabux...

The plastic peg on the air control flap breaks off where it slots into the actuator. ...

And you'll have to remove the heater to gain access.


Yes thank you Dave, all up-to speed, I wasn't quite clear on which part breaks. I can hear the flap open (with its distinctive cluck) but there no consistency...sometimes heat sometimes nothing

Can I assume I can remove the actuator unit and see if the peg is broken? Or is it a complete dash off job?
 
My last post reads a bit sharp (sorry).

It looks like the actuator gear set comes off easily enough. The clunk is probably the broken spigot jumping as the actuator tries to move it.

This is a total guess so don't take it as a sure thing.

It might be possible to Dremel cut a hole in the side of the heater case to extract the air control flap. If a big enough hole is possible, you could properly repair the broken end or even have a metal shaft/flap made. You could drill a 20mm hole and use an inspection camera to see inside and maybe work out if such a trick is worth trying. The cut out piece would be welded back with a soldering iron. Ideally, make a thin aluminium sheet cover overlapping the area to be cut out. This can then be screwed on and used to locate it correctly when it goes back. If the cut out piece is simply welded the alignment could be off causing the flap to get jammed.

You can tell I'm not expecting such a task to be easy, but the alternative involves extracting the whole dash and both front doors.


Has anyone had one of these heaters apart?
 
Last edited:
If it’s the bled flap drive broken we have a permanent repair for these which does not require the removal of the heater box. It’s all done in place and takes about 2-3 hours. Done around 15 of them now on pandas and 500’s and every one has been successful with no reports of the fault returning
 
If it’s the bled flap drive broken we have a permanent repair for these which does not require the removal of the heater box. It’s all done in place and takes about 2-3 hours. Done around 15 of them now on pandas and 500’s and every one has been successful with no reports of the fault returning

Excellent news and noted for when mine goes down. Where are you located?
 
If my problems remains I'll be off to Winchester to get that repair :)

I have discovered a new trick to get the flap open, turn the heat on then wind the fan upto full...clunk. The flap opens and I get heat, beautiful heat. I can reduce the fan from then on and the heat remains...:D

Maybe temporary solution until it fully gives up the ghost.

Mike
 
That is definitely the problem you have then as what you have described to get heat is how I check for this problem without removing parts. It’s the air pressure inside the box which pushes the flap to the opposite direction
 
Not been paying attention, only just found this thread.

If the actuator appears to be operational, it may be a control system problem. Before you panic, as the control system is the complete knob set and its gubbins behind, it might just be the temp sensor.

In the centre with the heater controls is a little round vent. This has the internal temp sensor in it. They can get clogged with fluff, and the temp control gets random. Run the vac cleaner gently over the vent, this may fix it.

When I first got the Panda it was very slow to react to temp changes, waiting until it was chilly before adding heat, or waiting until we were cooking before cooling us. One vac session later, been fine for the next 8 years. Always worth a try. (Applies to every car with auto climate, there's a little vent somewhere.)
 
This is a fix for an 04+ panda with climate where the heater flap pin has snapped off.
note 1. there is no need to either get or look inside the heater box.
2. avoiding turning on the ignition while the cog wheel is disconnected from the flap motor may keep the motor in sync and obviate the need to reset the climate system.
3. apart from the pin this is a robust and strong flap and takes the self tapper very well.
4. the teeth on the cog wheel perform no function whatsoever.
5. with practice, before removing anything, it is possible to reach carefully over the top of the flap motor and feel if the cog wheel is anticlockwise against the top stop when it should be blowing hot air. if it is and you are getting cold air the pin is almost certainly snapped. You can also check the movement of the cog wheel by changing the temp. setting just remember it doesn't react very quickly.
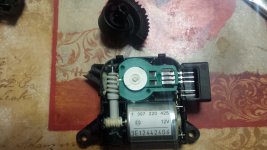
6. do not force the cog to turn in the motor, it contains a double worm reduction drive and won't accept reverse torque, if you have disregarded 2 above and need to turn the motor socket to realign the cog wheel it can be done with a 9v battery connected to the pair of pins in its electrical connector, be careful not to short anything.
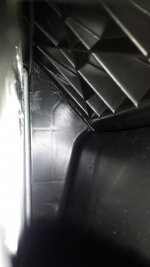
7. The flap only has an operational arc of only 70 degrees or so and is also limited by the gearwheel stops on the heater box and the stop on the outside of the flap motor. Internally the motor will go around all day hence 2 above.
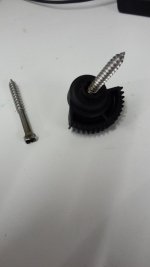
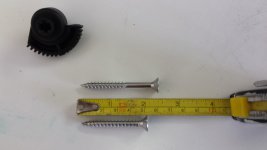
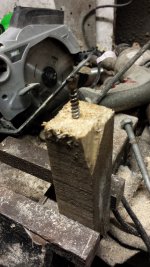
8. The self tapper/chipboard screw I used was 50mm by 6mm max thread diameter with a 12 mm head.

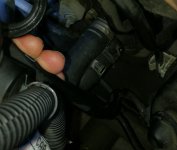
Here goes, remove fuse box cover(2 philips), steering column lower cover(3 philips), gear lever gator(prise upwards), gear lever surround(2 pozi and prise upwards), RHS footwell panel(2x 5mm allen), lwr. gear selector panel(2 pozi + 2 allen). Then remove dash bolts from inside fuse cover, under dash panel by left shin and in front of gear lever. strap dash panel back to seat frame and you should have enough access.
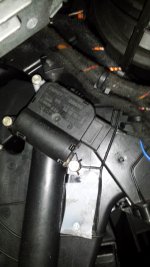
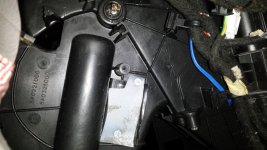
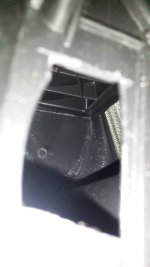
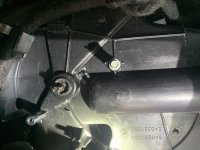
Remove the flap motor, a square box held by 3 very small hex bolts. The cog wheel is held between the motor and the flap pin by friction only. If the cog wheel has a small piece of plastic stuck in it you have found the problem(Google “panda owner loses cool”).Remove the remains of the pin.
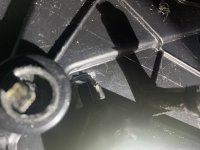
File or grind the head of a suitably large self tapper to fit the socket of the gear wheel. Drill small (maybe 1.5 mm) pilot hole straight and square into the flap through the hole where the gearwheel fits, drill hole a little low as the flap is centered by the pin and gearwheel. Insert self tapper, the philips head on mine worked well until he last few turns when I used a pliers.
Test with cog wheel and adjust screw rotation until cog wheel can rotate fully between both stops. Mechanically this is very strong, the tricky bit is getting the pilot hole straight and not too large and synchronizing the rotating parts, once again see point 2 above.
Straying outside my area of expertise, the climate reset procedure involves pressing auto and windscreen defrost buttons together soon after switching on the ignition, possibly with temp on lo first, holding until temp reading stops changing and waiting while it self tests.
Good luck.
 

Attachments

  • ph final view.jpg
    ph final view.jpg
    3.1 MB · Views: 273
  • ph screw in situ 2.jpg
    ph screw in situ 2.jpg
    3 MB · Views: 283
  • ph screw in cog.jpg
    ph screw in cog.jpg
    2.4 MB · Views: 246
  • ph screw detail.jpg
    ph screw detail.jpg
    2.5 MB · Views: 225
  • ph heater flap up.jpg
    ph heater flap up.jpg
    2.6 MB · Views: 244
  • ph heater flap down 2.jpg
    ph heater flap down 2.jpg
    2.7 MB · Views: 239
  • ph screw in wood.jpg
    ph screw in wood.jpg
    3.7 MB · Views: 253
  • ph actuator internal.jpg
    ph actuator internal.jpg
    2.9 MB · Views: 280
Always disconnect the battery then no worries if you forget and switch on the ignition. :)

Well done. :D

Sounds like a good fix. Also thanks for explaining how to get at it.

We could also consider drilling the flap shaft and tapping the hole to take an M5 set screw. 30mm should be more than enough. As you say, getting it drilled in-line will be the issue.

I'm not mad keen on self tappers the risk is we crack the plastic and then its game over. To keep an M5 screw from shaking loose, you could wrap the thread with a turn of PTFE tape.

DO NOT USE THREADLOCK ON PLASTIC. It causes the plastic to go brittle.
 
Just to add a note to my photos posted above,
1, Inspection hole cut in side of heater box, that's the heater core in the long bulge to the left of the hole so watch it! Aircon condenser just visible upper right, flap in up position so air is directed down to the heater core.
2. I used the shorter screw for the fix.
3. The screw fitted into the back of the cog wheel.
4. Filed screw in place, hole covered with tape and plastic patch
5. Everything back in place except the motor connector.
6. View through hole cut in box, flap at top of picture is down, no air getting to heater core on left.
7. Screw in square length of timber made rectangular shape of screw easy to achieve, it gets hot so cool it before trying it in the cog wheel.
8. Inside the motor, just for curiosity, if you get this far you could push some grease back around the cog and worm drives but it's not necessary. A 9v battery connected to the lower two of the five pins will rotate the motor.
While you're down there, so to speak, you might as well check the pollen filtre, it's behind an upright cover at the front of the heater box, held in by two hex head screws and a lot of friction.
 
Hi pal
Been reading your thread and think I have a similar issue but think someone has attempted repair previous the pin is metal but doesn’t look central to hole also when you rotate the pin is turns on an axis/arc shape
Also the motor connections are snapped don’t know if this is caused by the axis?
Maybe I’ll have to try to reposition the pin?
Any help much appreciated, also don’t know if you had this issue but cannot seem to alter direction of blowers just seem to come out of vents
Cheers
 

Attachments

  • DE8F0EDA-0107-471D-AD58-141EE89588B8.jpeg
    DE8F0EDA-0107-471D-AD58-141EE89588B8.jpeg
    3.1 MB · Views: 136
  • DA715972-DE58-4749-B999-C9256A53E96B.jpeg
    DA715972-DE58-4749-B999-C9256A53E96B.jpeg
    2.8 MB · Views: 112
The pin you show will not be a spindle it's be fitted to pin the arm to the air control flap. You will need to follow the instructions by Panhardrod to cut the box to align the flap with the lever and probably fit a new pin/screw/whatever.

Access will be a major pain but the alternative is dash out (see the Pandamime video on YT) followed by the car doors off to remove the structural frame underneath and finally get the heater out.
 
Back
Top