It will have those wires.....electric arial...permanent feed for clock and stn memory..etc etc


You are using an out of date browser. It may not display this or other websites correctly.
You should upgrade or use an alternative browser.
You should upgrade or use an alternative browser.
General From 2006 to 1986 - Punto to Panda.
- Thread starter Didge3
- Start date
Currently reading:
General From 2006 to 1986 - Punto to Panda.
Should I cut the red wire...? Or should I cut the blue wire...? Where is Tom Cruise when you need him
Should I cut the red wire...? Or should I cut the blue wire...? Where is Tom Cruise when you need him
Don't worry, worst that will happen is the clock will stop, no matter which you cut

Don't worry, worst that will happen is the clock will stop, no matter which you cut
Funny you should say that....
Should I cut the red wire...? Or should I cut the blue wire...? Where is Tom Cruise when you need him
Certainly not with his wife!
OP
OP
Ok so as much as I hate wiring today, I got some things done, and then slowly managed to revert them all :bang:
I had a close look at the wiring behind the stereo and started to fathom what was going where and what how. I then blew the radio fuse :bang:
Prior to shorting the fuse I had worked out most of the wiring though so that's a plus, here's what I've got,
![IMG_1660[1].JPG](https://cdn.fiatforum.com/data/attachments/83/83241-f6e0650fa7cc6113f0ce911f3e027fde.jpg "IMG_1660[1].JPG")
What plugs into the back of the stereo,
![IMG_1661[1].JPG](https://cdn.fiatforum.com/data/attachments/83/83278-295d083192b6129a60a5f03d52e14bb8.jpg "IMG_1661[1].JPG")
The brown connector is what I recognise and would usually use to connect a radio with,
![IMG_1663[1].JPG](https://cdn.fiatforum.com/data/attachments/83/83318-b9ddd7827c4f14e066a4739cae77e5b1.jpg "IMG_1663[1].JPG")
Unfortunately it's wires don't go anywhere....
![IMG_1664[1].JPG](https://cdn.fiatforum.com/data/attachments/83/83351-3ab58c93d0bb00759450f128f5a0138b.jpg "IMG_1664[1].JPG")
I also managed to get the dash off, which was as easy as everyone said it would be, managed to get the clocks off too but not far enough to actually see any bulbs, I assume I need to disconnect the speedo but couldn't get it far enough out to be able to see what I was doing....
![IMG_1656[1].JPG](https://cdn.fiatforum.com/data/attachments/83/83373-2d830ebff7af40f87c4261e65ce08345.jpg "IMG_1656[1].JPG")
I had a close look at the wiring behind the stereo and started to fathom what was going where and what how. I then blew the radio fuse :bang:
Prior to shorting the fuse I had worked out most of the wiring though so that's a plus, here's what I've got,
What plugs into the back of the stereo,
The brown connector is what I recognise and would usually use to connect a radio with,
Unfortunately it's wires don't go anywhere....
I also managed to get the dash off, which was as easy as everyone said it would be, managed to get the clocks off too but not far enough to actually see any bulbs, I assume I need to disconnect the speedo but couldn't get it far enough out to be able to see what I was doing....
So...one red wire....one black...four speaker wires...do I now win first prize??
I had a close look at the wiring behind the stereo and started to fathom what was going where and what how....
I also managed to get the dash off, which was as easy as everyone said it would be....
Looks like you've made a good start; but it also looks like someone's been in there, done some (cable) knitting, and then cut it all to shreds....
Additionally: the wiring does look different to mine. However, I'd be tempted to strip it all back to what looks like original FIAT stuff (with a Haynes/Porter manual on the passenger seat); and then start again, if you're going to fit a new HU....
Do you want me to scan in (using my iPhone, I'm afraid) the relevant bits of the manuals I have (even though the Haynes is a year out...)?
OP
OP
That covers the wires in the back of my existing head unit which was easy to decipher, the rest is a mess.So...one red wire....one black...four speaker wires...do I now win first prize??
It looks like she had several head units fitted in her life and therefore has the remains of lots of different wiring. A wiring diagram would be useful so I can tell whats supposed to be there and what isn't.Looks like you've made a good start; but it also looks like someone's been in there, done some (cable) knitting, and then cut it all to shreds....
Additionally: the wiring does look different to mine. However, I'd be tempted to strip it all back to what looks like original FIAT stuff (with a Haynes/Porter manual on the passenger seat); and then start again, if you're going to fit a new HU....
Do you want me to scan in (using my iPhone, I'm afraid) the relevant bits of the manuals I have (even though the Haynes is a year out...)?
I need to get a new fuse for the radio though now, and guess what everywhere is closed
I have a 50mile journey tonight so that'll be fun.
I did find somewhere to put my phone mount though
![IMG_1659[1].JPG](https://cdn.fiatforum.com/data/attachments/83/83401-28d85607805676e192eb6e5cc7573722.jpg "IMG_1659[1].JPG")
So looks like I'm going to be listening to my iPhone's puny speakers on my way home
fuse????? thats what tin foil is for..
right..please take this the right way...why are you worried about a few spare wires which are hidden by the HU??? why not cap them off and ignore them???
right..please take this the right way...why are you worried about a few spare wires which are hidden by the HU??? why not cap them off and ignore them???
Last edited:
fuse????? thats what tin foil is for..
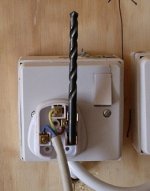
Or if your completely mental a drill bit
Attachments
fuse????? thats what tin foil is for..
right..please take this the right way...why are you worried about a few spare wires which are hidden by the HU??? why not cap them off and ignore them???
Im guessing pernicketyness? Also there is something to be said for doing a job yourself so you know its 100% correct, and learning more in the process
I can kinda relate, though I haven't had a look behind my HU and dash yet, though as I seem to have a bulb out that will be tomorrows job it will look like didge's....so don't look...

OP
OP
What if I blow something up? Its a 2.5A tiny fuse that I can't seem to find anywhere yetfuse????? thats what tin foil is for..
right..please take this the right way...why are you worried about a few spare wires which are hidden by the HU??? why not cap them off and ignore them???
I'm worried about the wiring because I'm changing the HU, in fact I've already got my new HU, which connects to the brown connector perfectly, unfortunately all of the wires that come out of the brown connector bar the ground don't go anywhere
I can't see mine at all in daylightI nipped out earlier and got a snap of the dash lights on my colour for you, so you can have something to look forward to. It was still light outside and they are plenty bright enough
I just need to try and get the dash clocks out a bit further so I can look behind, I assume I need to detach the speedo but I really can't see in the tiny gap.
Take out all the non original wiring and start again. They should be a permanent live and ground that will drop down from the upper dash, you can tell they are original by the striped insulation, I can't remember the colours though. You can connect the brown ISO connector to these and take a switched live from the brake light switch so the radio goes on and off with the ignition. Get a black ISO speaker connector and connect the speaker wires to this, you can then fit any aftermarket head unit straight to these.
I'm pretty sure you should have a larger than 2.5A fuse for the radio, sure it isnt 25A?
I'm pretty sure you should have a larger than 2.5A fuse for the radio, sure it isnt 25A?
OP
OP
It'd help if I knew what was original and what isn't. I did think 2.5 was a very strange number but there is definitely a dot between the two, it could be a bit of dirt thoughTake out all the non original wiring and start again. They should be a permanent live and ground that will drop down from the upper dash, you can tell they are original by the striped insulation, I can't remember the colours though. You can connect the brown ISO connector to these and take a switched live from the brake light switch so the radio goes on and off with the ignition. Get a black ISO speaker connector and connect the speaker wires to this, you can then fit any aftermarket head unit straight to these.
I'm pretty sure you should have a larger than 2.5A fuse for the radio, sure it isnt 25A?
Sorry this is so late; but the homewardette went out with friends: so me and Mrs h went for a nice relaxed Italian (turns out his name is Kris... -- he's the nicest waiter in the world; and works at Pizza Express in Stratford-upon-Avon...).
This is from my Haynes (1981 to 1991); but the Porter (1981 to 1994) diagram is identical...! (Phew.)
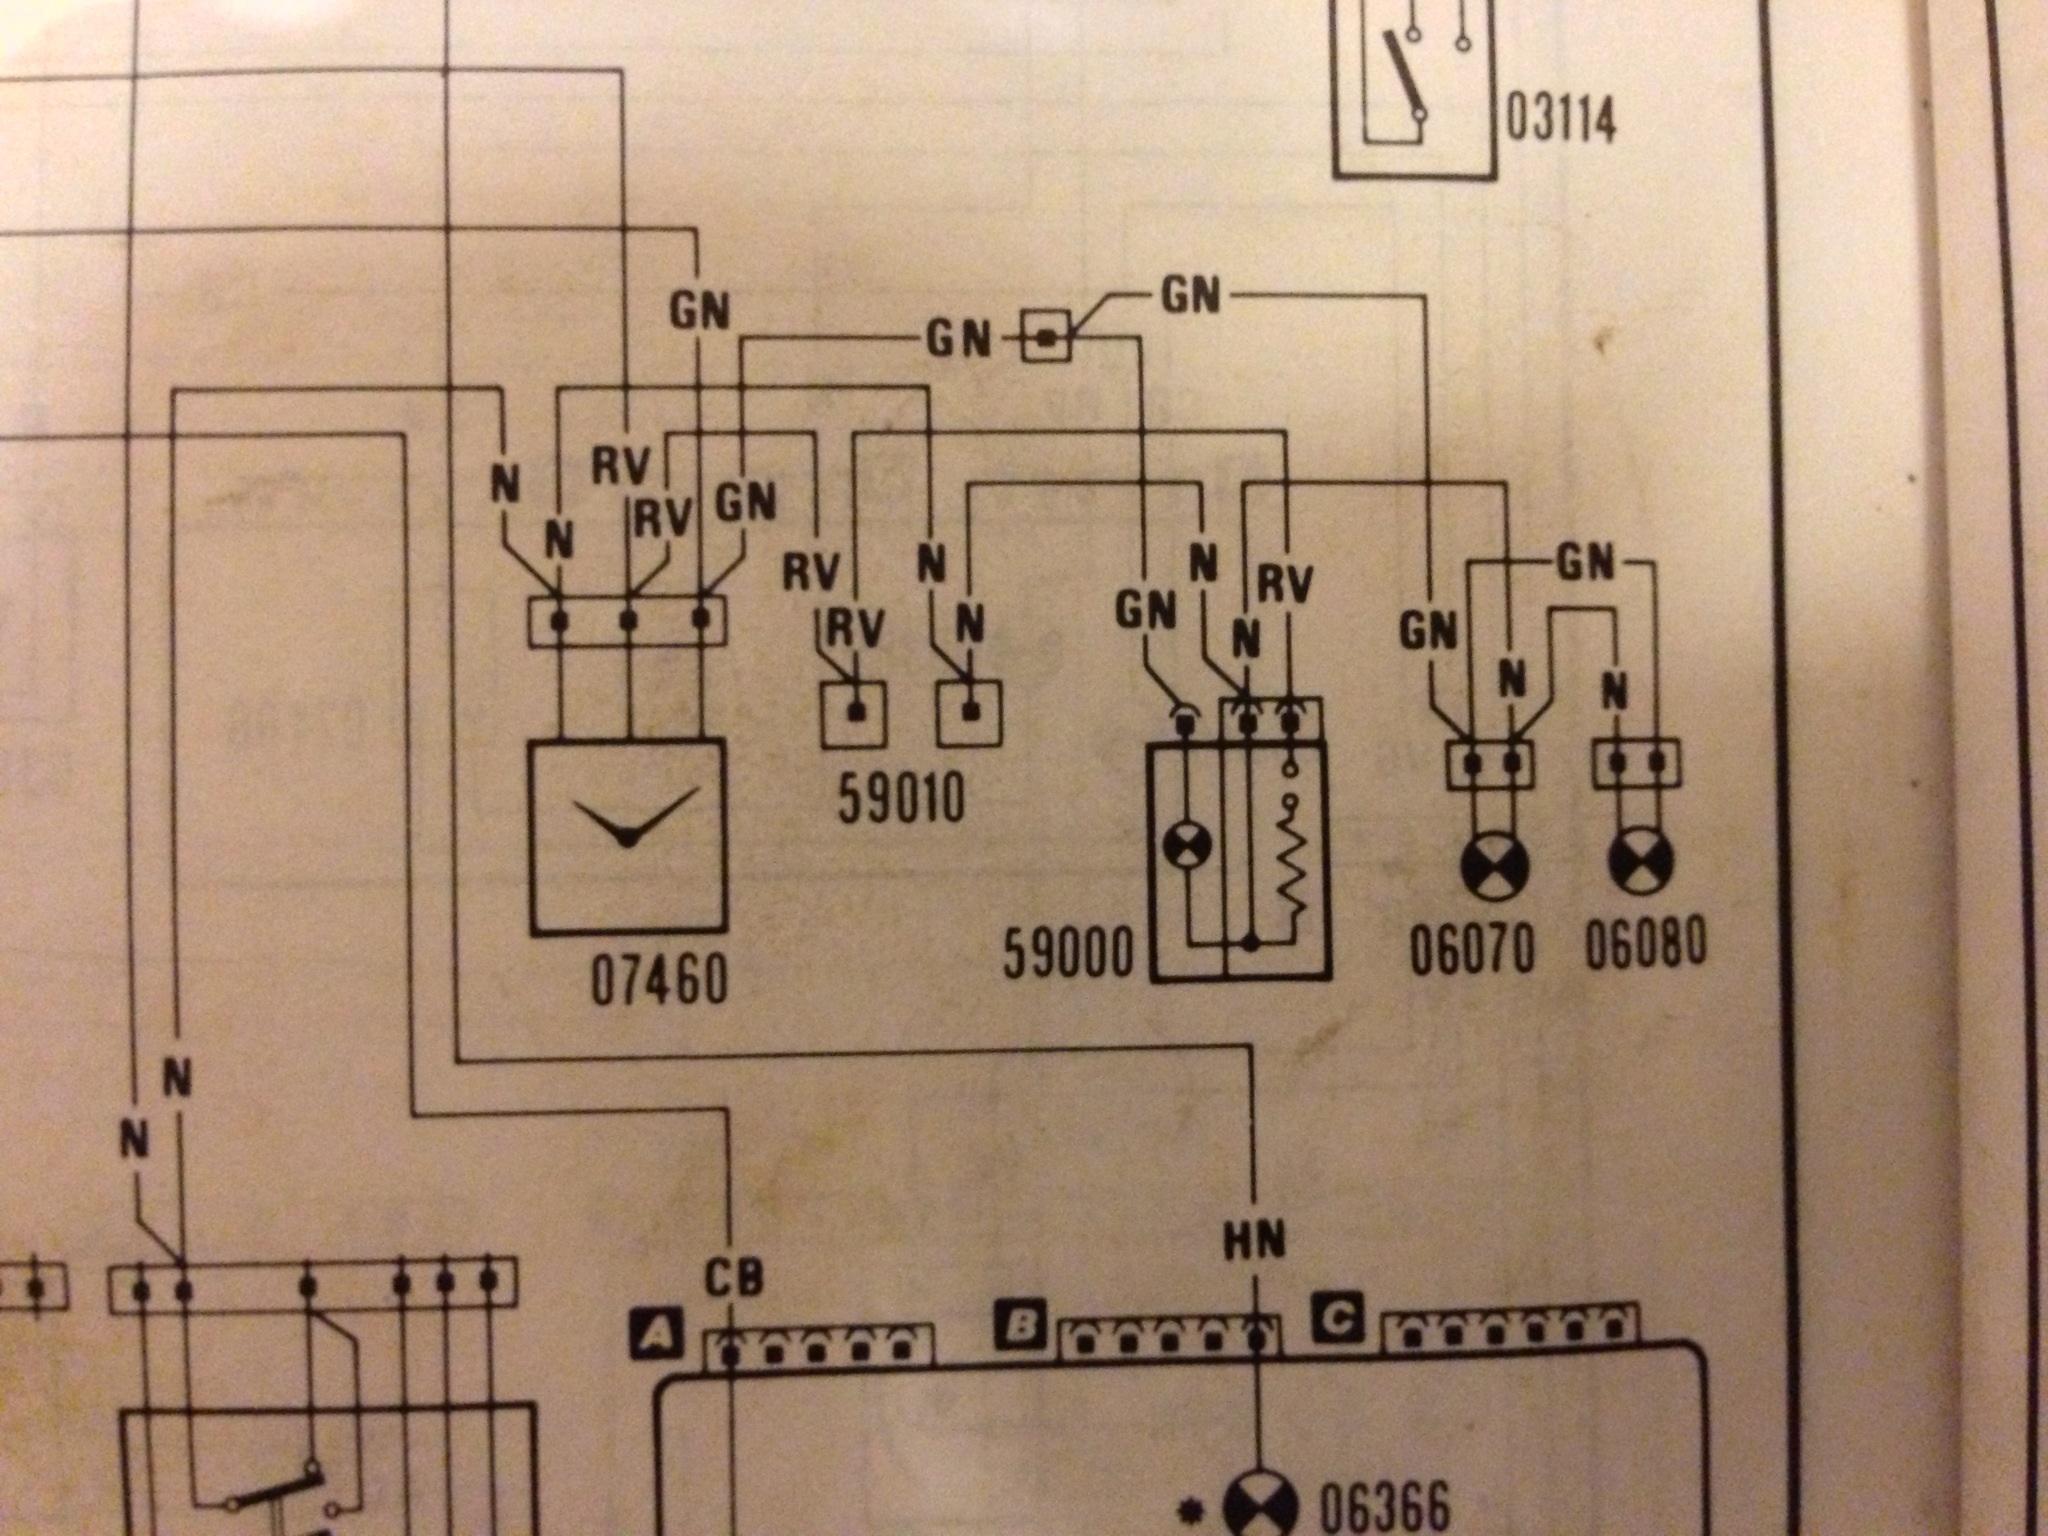
Key
The numbers are as follows (from left to right):
If you need any other parts of the wiring diagram, let me know -- I'll be around for a couple of hours, or so, now; although it will then be evening before I'm online again, probably.
This is from my Haynes (1981 to 1991); but the Porter (1981 to 1994) diagram is identical...! (Phew.)
Key
The numbers are as follows (from left to right):
- 07460 is the clock;
- 59010 is the radio (wiring);
- 59000 is the cigar lighter;
- 06070 is the "ideogram" (which means, I guess, the warning lights...?) light bulb; and
- 06080 is the heater controls light bulb.
- GN = yellow/black;
- N = black; and
- RV = red/green.
If you need any other parts of the wiring diagram, let me know -- I'll be around for a couple of hours, or so, now; although it will then be evening before I'm online again, probably.
Just spotted this thread.
Brown connector is from the head unit that was stolen 18 months ago so you can remove that. Red and black wires to current head unit are earth and ign. feed so you can use them for your new HU. Four wires going to chocolate block connectors run to the boot and can be used for rear speakers if you fancy it or removed if you don't.
Quite possible that a dash bulb has gone, last time I drove Charmania at night was two years ago. The speedo cable has a collar that needs to be slid back before you pull the cable out of the head, should be able to do that by feel then have a look at it to see how it works for reassembly.
Don't forget the fuses I gave you are in the door pocket!
Nice to see you both getting aquainted.
Brown connector is from the head unit that was stolen 18 months ago so you can remove that. Red and black wires to current head unit are earth and ign. feed so you can use them for your new HU. Four wires going to chocolate block connectors run to the boot and can be used for rear speakers if you fancy it or removed if you don't.
Quite possible that a dash bulb has gone, last time I drove Charmania at night was two years ago
. The speedo cable has a collar that needs to be slid back before you pull the cable out of the head, should be able to do that by feel then have a look at it to see how it works for reassembly.Don't forget the fuses I gave you are in the door pocket!
Nice to see you both getting aquainted.
Similar threads
- Replies
- 0
- Views
- 144
- Replies
- 13
- Views
- 389