

The thermostat contains a temperature sensitive material that opens and closes a valve which in turn controls the flow of coolant from the engine. This ensures optimum operating temperature is maintained within the engine.
Possible symptoms of a faulty thermostat:
a) Engine not reaching correct working temperature (thermostat not closing properly or missing altogether).
b) Overheating (not opening fully).
The thermostat is not available independently of the housing.
Suggested tools:
10mm socket, short extension, ratchet, broad scraper + new gasket.
(to check existing thermostat: long nose pliers, pan/kettle, thermometer) - see additional guide below.
If fitting a new thermostat check that gasket is included.
If wishing to re-use the engine coolant drain (via bottom hose) and set aside. Check general condition of top hose and decide on condition before proceeding (a good time to check all hoses and clips).
The thermostat housing is located below the distributor - access is good with spare wheel and jack removed.
Remove the 2*10mm bolts securing housing. If housing doesn't come away, a sharp hand-tap should break seal between housing and block. Expect coolant loss.
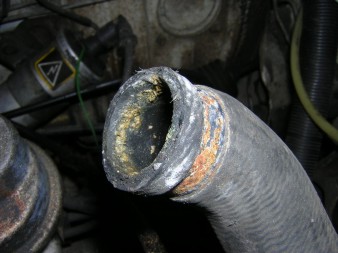
Undo hose clip to release housing (now easier to get at). Check for deposits inside end of hose (photo1) and around lip of housing which causes pitting - also check for cracks and/or brittleness in hose.
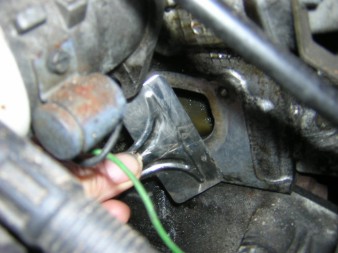
Use a broad blunt scraper to remove any old gasket from machined surface on block. (photo2: part of big bulldog clip used as improvised scraper)
The gasket supplied with my replacement thermostat was self-adhesive on one side (photo3) - be sure to line it up right 1st time. If unsure use a pen or similar through one hole as guide. If your gasket is not self-adhesive use a little grease to hold it in place. (photo4)
If re-using your old thermostat scrape all traces of old gasket from the mating surface before fitting new one.

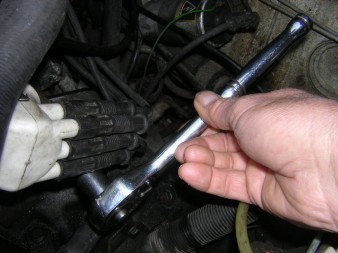
If you didn't drain down the engine flick some of the water out of the head and wipe dry the mating surface. When re-assembling (if using 1/2" drive) hold ratchet halfway along handle so as not to overtighten bolts (photo 5). Remember to refit hose clip before replacing hose onto housing - add a little grease or waxoyl to aid future removal. Don't overtighten hose clip - just enough to nip it up.
Now's a good time to 'reverse flush' the system. Remove the hose from the heater to the inlet manifold. As the return hose on mine is moulded onto the top hose I pushed the hose into the end of this and waited until clean water came out of the hose removed from the manifold. Then held the hose pipe to the inlet manifold union until clear water came from the top hose.
Work out how much antifreeze/corrosion inhibitor to add. By personal choice I avoid 50/50 mixture as anti-freeze has seeking properties and aim for around 25-33% mixture (approx 1.3 - 1.7ltrs) If you live in a hard water consider using demineralised water.
Top up expansion reservoir and start engine. As engine warms open heater valve (control lever to max.) and put heater fan on full. Help force out any trapped air by squeezing bottom hose. Open bleed vent located in heater hose behind carb to allow any further trapped air to escape. Re-tighten finger tight.
Caution: When working on a hot engine be aware of radiator cooling fan switching on.
TESTING THERMOSTAT
Testing Thermostat:
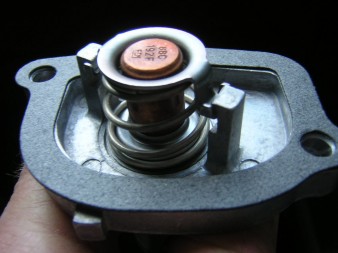
Heat sufficient water to submerge housing - stat should open at specified temp. and should be fully open before water comes to boil. Remove and blow on unit - it should immediately begin to close again. Mine wasn't seating properly ('A' on photo and arrowed in last photo from other side), which resulted in temp. only reaching around 70 degs (should be near 90)
Check that the small bleed valve ('B' in photo) in the housing is free from any sediment build up.
(Photos: opening temperatures stamped 88C on stat or cast in housing 87C)
Attached Thumbnails
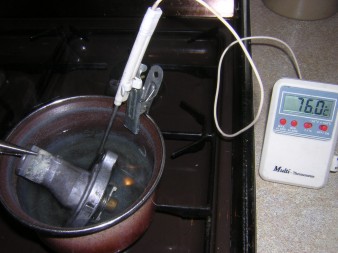
Take temperature and watch for valve to open
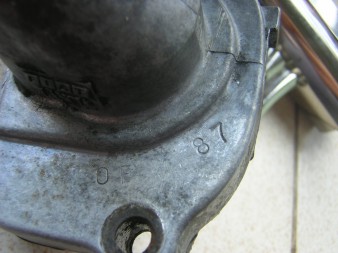
Opening Temperature stamped on housing...
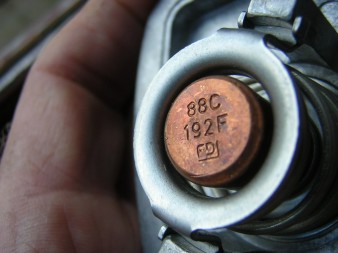
...or here on end of thermostat body
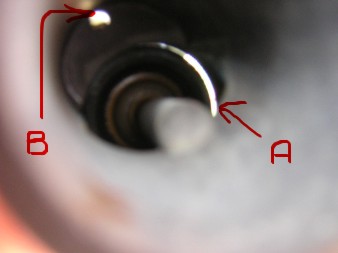
Bleed valve (B) and signs of a bad seal (A)...
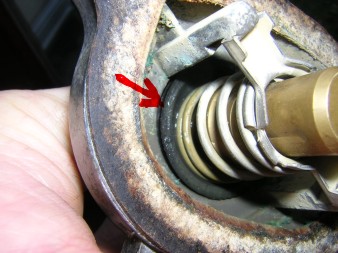
...also from other side (arrowed)
Possible symptoms of a faulty thermostat:
a) Engine not reaching correct working temperature (thermostat not closing properly or missing altogether).
b) Overheating (not opening fully).
The thermostat is not available independently of the housing.
Suggested tools:
10mm socket, short extension, ratchet, broad scraper + new gasket.
(to check existing thermostat: long nose pliers, pan/kettle, thermometer) - see additional guide below.
If fitting a new thermostat check that gasket is included.
If wishing to re-use the engine coolant drain (via bottom hose) and set aside. Check general condition of top hose and decide on condition before proceeding (a good time to check all hoses and clips).
The thermostat housing is located below the distributor - access is good with spare wheel and jack removed.
Remove the 2*10mm bolts securing housing. If housing doesn't come away, a sharp hand-tap should break seal between housing and block. Expect coolant loss.
Undo hose clip to release housing (now easier to get at). Check for deposits inside end of hose (photo1) and around lip of housing which causes pitting - also check for cracks and/or brittleness in hose.
Use a broad blunt scraper to remove any old gasket from machined surface on block. (photo2: part of big bulldog clip used as improvised scraper)
The gasket supplied with my replacement thermostat was self-adhesive on one side (photo3) - be sure to line it up right 1st time. If unsure use a pen or similar through one hole as guide. If your gasket is not self-adhesive use a little grease to hold it in place. (photo4)
If re-using your old thermostat scrape all traces of old gasket from the mating surface before fitting new one.
If you didn't drain down the engine flick some of the water out of the head and wipe dry the mating surface. When re-assembling (if using 1/2" drive) hold ratchet halfway along handle so as not to overtighten bolts (photo 5). Remember to refit hose clip before replacing hose onto housing - add a little grease or waxoyl to aid future removal. Don't overtighten hose clip - just enough to nip it up.
Now's a good time to 'reverse flush' the system. Remove the hose from the heater to the inlet manifold. As the return hose on mine is moulded onto the top hose I pushed the hose into the end of this and waited until clean water came out of the hose removed from the manifold. Then held the hose pipe to the inlet manifold union until clear water came from the top hose.
Work out how much antifreeze/corrosion inhibitor to add. By personal choice I avoid 50/50 mixture as anti-freeze has seeking properties and aim for around 25-33% mixture (approx 1.3 - 1.7ltrs) If you live in a hard water consider using demineralised water.
Top up expansion reservoir and start engine. As engine warms open heater valve (control lever to max.) and put heater fan on full. Help force out any trapped air by squeezing bottom hose. Open bleed vent located in heater hose behind carb to allow any further trapped air to escape. Re-tighten finger tight.
Caution: When working on a hot engine be aware of radiator cooling fan switching on.
TESTING THERMOSTAT
Testing Thermostat:
Heat sufficient water to submerge housing - stat should open at specified temp. and should be fully open before water comes to boil. Remove and blow on unit - it should immediately begin to close again. Mine wasn't seating properly ('A' on photo and arrowed in last photo from other side), which resulted in temp. only reaching around 70 degs (should be near 90)
Check that the small bleed valve ('B' in photo) in the housing is free from any sediment build up.
(Photos: opening temperatures stamped 88C on stat or cast in housing 87C)
Attached Thumbnails
Take temperature and watch for valve to open
Opening Temperature stamped on housing...
...or here on end of thermostat body
Bleed valve (B) and signs of a bad seal (A)...
...also from other side (arrowed)