Tools Required:
Materials:
Time:
Overview:
According to Fiat, the clutch fluid in the Ducato should be changed every 12 months. What appears to be a complex operation is in fact fairly simple. The problems are all to do with access to the various components.
To gain access, to the bleeding nipple, the air filter top cover and filter element need to be removed. Once they are out of the way, you can clearly see the bleeding nipple (located on the bell housing) and the small fluid reservoir. This reservoir is piggybacked off a larger rectangular reservoir, which houses the gearbox oil. You do not need to touch that reservoir, but only deal with the small cylindrical one.
The method of changing the fluid is to remove as much of the old fluid from the reservoir, (I used a syringe to suck it out)then pumping new fluid into the bleeding nipple, which then forces the old fluid back out of the piping up to the reservoir. As you continue to remove the old fluid from the reservoir, the new fluid is forced upto the reservoir. You continue to do this until the reservoir is containing clear fluid only.
Procedure:


- Phillips head screwdriver.
- 2 Syringes with 6mm tubing
Materials:
- DOT 4 Hydraulic fluid
- Old rags
Time:
- Allow 1 hour.
Overview:
According to Fiat, the clutch fluid in the Ducato should be changed every 12 months. What appears to be a complex operation is in fact fairly simple. The problems are all to do with access to the various components.
To gain access, to the bleeding nipple, the air filter top cover and filter element need to be removed. Once they are out of the way, you can clearly see the bleeding nipple (located on the bell housing) and the small fluid reservoir. This reservoir is piggybacked off a larger rectangular reservoir, which houses the gearbox oil. You do not need to touch that reservoir, but only deal with the small cylindrical one.
The method of changing the fluid is to remove as much of the old fluid from the reservoir, (I used a syringe to suck it out)then pumping new fluid into the bleeding nipple, which then forces the old fluid back out of the piping up to the reservoir. As you continue to remove the old fluid from the reservoir, the new fluid is forced upto the reservoir. You continue to do this until the reservoir is containing clear fluid only.
Procedure:
- Open bonnet and secure.
- …Remove top of Air Filter housing. 4 x Phillips head screws.
- … Remove Air Filter element and place large rag to cover hole. This is to prevent any objects falling into the piping.
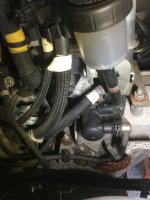
- …Locate the Clutch bleed nipple. This can be seen looking down onto the bellhousing. NOTE: The nipple is not a screwed fitment like a brake cylinder. It is more like a tap where a simple ¼ turn opens and closes the valve. It can be done by hand. (See image)
- … Remove rubber cap from bleeding nipple.
- ,,, Locate the clutch fluid reservoir. This is a small round container located behind where the air filter was, and behind an electrical plug covered in a grey foam.
- … Remove the reservoir cap.
- … Insert a clear plastic tube connected to a syringe into the reservoir, and draw out the old fluid. I suggest you have an old container ready to store the old extracted fluid.
- … Using a separate syringe and tubing, connect it to the bleeding nipple and loosen the nipple by turning with your fingers. It should not be that tight.
- … Fill the syringe with new DOT4 fluid and remove the air from the tubing. This can be done by holding the line upright and allowing the fluid to drain into the tubing from the syringe. NOTE: Do not allow air to be pushed into the hydraulic line.
- …Slowly inject into the nipple. Watch the top reservoir, which should now begin to fill. Do not allow to overflow.
- … When the reservoir is near full, repeat step 8. And then steps 9 and 10, until the fluid in the reservoir is nice and clean.
- … Tighten the bleed nipple by hand and remove the tubing.
- … Replace the cap onto the reservoir. I recommend you firstly remove the rubber seal from the inside of the cap and wipe off any moisture underneath it before reassembling. You may find some water condensation, then replace the seal and fit the cap
- …Replace rubber cap on bleed nipple., and cleanup any spilt fluid.
- …Start engine and check that gears are selecting normally, by selecting reverse, and drive a few times.
- …Replace air cleaner element and cover.
- …Job completed.