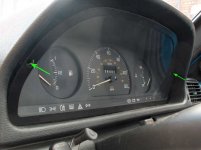
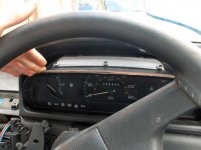
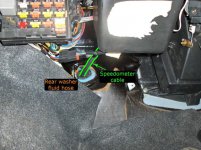
The speedometer cable runs from the back of the clocks (speedo/odometer/tachometer etc.) unit inside the car, out to the engine where it is attached to the gearbox. Access to each end is easy enough, if a little awkward! The clocks unit end is slightly easier to reach, so I'll start with that. Ensure that the car battery is disconnected, to avoid risking electric shock from any connectors.
To take out the clocks unit, unscrew the two retaining screws. You'll need a Torx 15 screwdriver, unless you can find a flathead or Allen key to fit.
Pull the top lip of the unit forwards and downwards, and once it has been rotated far enough it should pull straight out. There will be some resistance to pulling: the main source of this is the speedometer cable itself. If you can't pull the unit far enough out to see behind it, you may need to reach in and feel for the cable.
The cable attaches to the back of the unit via a plastic cover, which can be clicked into and out of place. Slide the cover back along the cable to disengage it, then it will be possible to pull the cable off the back of the clocks unit.
The clocks unit can now be shifted to one side if you want to see the cable better. In some Unos, the cable can now be removed directly from its sheath, but it should come out easily. If the cable doesn't come out with a simple pull, then most likely it is of the other type of cable, which can only be removed from the engine end. I must stress that you don't pull too hard! This will probably damage the cable and potentially break it (I should know ). I recommend waiting until you've inspected the other end of the cable before pulling anyway.
If you feel around inside the bay behind the clocks unit, you'll notice the cable disappearing off to the left (this is in RHD cars -- in LHD I imagine the cable goes directly out into the engine bay). If you take a look in the passenger side footwell, behind the fusebox, you'll find the continuation of the cable exiting the cab through the bulkhead, via a large oval-shaped rubber grommet. This also houses the hose for the rear window washer.
To take out the clocks unit, unscrew the two retaining screws. You'll need a Torx 15 screwdriver, unless you can find a flathead or Allen key to fit.
Pull the top lip of the unit forwards and downwards, and once it has been rotated far enough it should pull straight out. There will be some resistance to pulling: the main source of this is the speedometer cable itself. If you can't pull the unit far enough out to see behind it, you may need to reach in and feel for the cable.
The cable attaches to the back of the unit via a plastic cover, which can be clicked into and out of place. Slide the cover back along the cable to disengage it, then it will be possible to pull the cable off the back of the clocks unit.
The clocks unit can now be shifted to one side if you want to see the cable better. In some Unos, the cable can now be removed directly from its sheath, but it should come out easily. If the cable doesn't come out with a simple pull, then most likely it is of the other type of cable, which can only be removed from the engine end. I must stress that you don't pull too hard! This will probably damage the cable and potentially break it (I should know
If you feel around inside the bay behind the clocks unit, you'll notice the cable disappearing off to the left (this is in RHD cars -- in LHD I imagine the cable goes directly out into the engine bay). If you take a look in the passenger side footwell, behind the fusebox, you'll find the continuation of the cable exiting the cab through the bulkhead, via a large oval-shaped rubber grommet. This also houses the hose for the rear window washer.
Inside the engine bay: the gearbox end of the cable
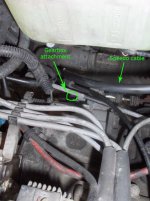
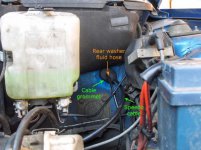
With the bonnet up, the speedometer cable is easy to find, appearing from the bulkhead on the right-hand-side of the engine bay as you look at it. Here we see the other side of the grommet, with the continuation of both the cable and the rear washer fluid hose:
NB: Note that in the picture I've removed the washer hose from the fluid reservoir -- there is no need to do this if you are only accessing the cable; it's only required if you are removing the entire cable assembly (which you don't want to do if you can avoid it
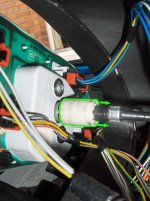
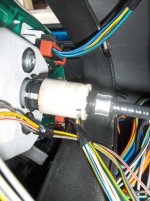
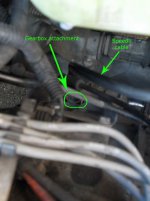
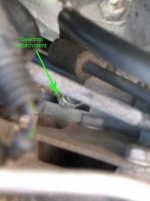
Follow the cable down to the back of the engine, and you'll find where it attaches to the back of the gearbox. This set of images zooms in on the connector as seen through the HT leads etc.:
The connector can be unscrewed (somewhat awkwardly) just by reaching down behind the engine. It will most likely be too tight to turn by hand though, so a small mole grip (Vise-Grip) or a short 15mm spanner will probably be required. I've also previously encountered a cable connection where the outer "bolt-like" screwed cap mechanism had welded itself onto the outer sheath of the cable over time, so that each unscrewing turn of the connector twisted the whole cable assembly gradually tighter, and consequently I was fighting against the sprung force of the rubber cable for the last few turns! Basically, expect this to be really awkward, and hopefully it will turn out to be a doddle.
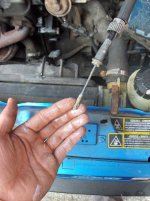
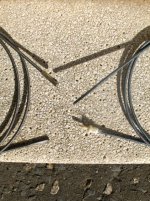
Once you have removed the cable from the gearbox, you'll be able to inspect its connector. If you find it to be just the bare cable, flattened to a thin square in shape, then you should be able to remove it from inside the cab. If however, you find it to be like mine as pictured, with a ~5mm circular metal "key" attached to the end, then the cable should be easy to remove from the engine bay end.
If you find that the cable cannot be removed from either end (as according to its connector) then chances are you have a snagged cable, which could potentially be removed with some serious lubrication sprayed in at either end, but will most likely mean replacement of the full cable/sheath/grommet assembly. If you don't see the end of the cable poking out at all, and it's not just because you've already pulled it partially through at the other end, then the cable has most likely snapped -- you might find the other end still poking out of the gearbox.
Maintaining the cable
Assuming your cable is still intact, remove the remaining cable from its sheath. Check along the length of the cable for kinks and patches of dryness; kinks can be carefully "helped" back into better shape and dry patches will need extra attention when greasing the cable. It would also be worthwhile following the sheath in the car to where these kinks or dry patches occur, in case there are obvious points where the sheath itself needs some additional attention.
Clean the cable using a penetrating lubricant/cleaner such as WD40, from one end to the other and back again. I found it best to do this with bare hands so that I could detect any grit that had been picked up and remove it.
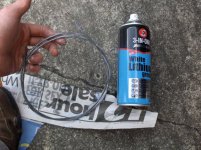
Then apply a generous amount of grease to the cable -- I only had a spray version of lithium grease, which made things a little more difficult; a standard tub of grease would be easier to apply. MoS2-based lubricants have been suggested as particularly good for this application. A useful thing with the spray-can however is the ability to spray more grease into the sheath before putting the cable back in.
Finally, reinsert the cable and reconnect each end, and easy peasy -- a fully maintained speedometer cable!
Replacing the cable/sheath
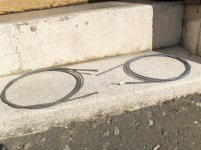
As mentioned earlier, there are at least two main types of speedometer cable for the Uno, or at least two that I have encountered. Below are some pictures to compare them:
If your car requires the right-hand cable, i.e. with identically squared-off ends, then Fiat still stock this brand new, as a full assembly including cable and sheath, with the large grommet in position on the sheath. It comes ready greased, although I'd still recommend taking it out and applying grease yourself, to ensure that it is definitely well lubricated.
Unfortunately, if like mine your car requires the other "key"-ended type of cable, then this is no longer available from Fiat, and your best bet is to find an Uno at a local scrappy and remove the cable yourself. To be honest, whichever cable you need, it's probably better to check your scrapyard first anyway, as for £25 inc. VAT from Fiat (at time of writing), you could probably do a bit better for your pocket by looking for a second hand one... I got mine for £3.
Of course, when picking up a used cable, inspect it to make sure that it is the correct type, and also make sure it's in good condition. You may find that you can simply take a used cable and put it back into your car's original sheath, but it's worthwhile picking up the whole assembly from the scrapyard while you're there, because we all know what it's like to get home and discover that you need to go back for the rest!
Removing/refitting cable/sheath assembly:
If there's no avoiding the replacement of the full sheath assembly, then again, it's not really a difficult task, just awkward.
- Disconnect both ends of the cable as per the instructions on the previous pages.
- Disconnect the rear washer fluid hose from the washer fluid reservoir in the engine bay. The tap on the tank can be plugged with blue-tac or similar. Remove the one-way valve (if fitted) from the hose, to ensure that the hose can be pulled out through the grommet later without any resistance.
- From inside the passenger side footwell (driver's side in LHD cars), unclip the hard outer shell of the grommet from the bulkhead surround.
- (*In RHD cars) From the same position, begin to pull the speedometer end of the cable through from behind the dashboard/heater matrix. Surplus cable can then be pushed through the bulkhead into the engine bay. Coax the cable through behind the dashboard; you may need to push from the bay behind the speedometer clocks.
- Once the cable is free inside the car, simply pull the remainder out from the engine bay. In doing so, remove the grommet from the end of the rear washer fluid hose.
Also remember to push the washer fluid hose through the grommet again as you put the grommet back in place. On brand new assemblies a hole must be punched in the rubber, through which to thread the hose.
When refitting the cable to the gearbox, pull the cable out a little way first to ensure it sits well in the top of the gearbox. Then slide down the outer metal rim of the sheath, followed finally by the threaded cap. This ensures a good connection and avoids twisting the cable at its end.
Good luck!


