i used a haynes that told me exactly how to get the trim off, basically first thing you wanna do is use allen key and take off door opener thing.. and theres a bolt behind that that needs undoing (no pics for this bit im affraid!) then theres the 3 down the right side of the door... some underneath..
for electric windows, use a flat head screwdriver, and a cloth to protect the trim and leaver the switch panel off, disconnect and put to one side.
its a pain in the bum to get the trim off after you've taken all the bolts out.. and its more than likely you WILL crack the plastic at the lock pin i know i did.
needs a firm but gentle tug and pull and wiggle to get the whole thing off, but once you have.. you can go onto the next stage!
for electric windows, use a flat head screwdriver, and a cloth to protect the trim and leaver the switch panel off, disconnect and put to one side.
its a pain in the bum to get the trim off after you've taken all the bolts out.. and its more than likely you WILL crack the plastic at the lock pin
i know i did.needs a firm but gentle tug and pull and wiggle to get the whole thing off, but once you have.. you can go onto the next stage!
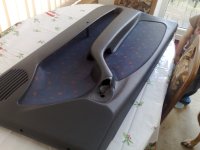
Removing the cloth card
now you've got the trim off.. hijack your parents dining table and prepare for the worst bit
this is what you should be faced with!

the cloth door card is held on in a very weird way.. its like.. the card has holes in it.. the plastic trim has spikes.. the spikes go through the hole, and then had the top melted so its like a T up and through the card.... if that makes ANY sense

after uhming and ahhing for awhile.. i thought right, ill cut the tops off the little things with some sort of saw.. nope, didnt work.
i then thought ah ha! :idea: and ran to the shed (well.. walked) go get this gas soldering iron my dad has.. that has a little attachment that is a knife! a heated knife! hurrah! i also got myself something to pry the card off with.. so a chisel had to do

so i started by trying to cut the tops off the little weird things that hold the card onto the plastic, that worked for a while, but then realised if i dug into the middle bit.. that worked just as well.. basically just melt away the plastic blobs on the wood bit... but dont set it on fire like i did a few times

once you've melted away enough, on all the pegs, using a cloth as a form of extra leverage and protection.. use your prying up devise to seperate the card from the plastic trim, trying not to crack the plastic!! seriously... be careful!

TA DAAAAA!!!

attaching the leather
this bit is really hard.. the only proper points are the plastic pegs.. but the leather has holes in it where it was removed from the HGT plastic trim.. i just covered each peg in adhesive, and then found anything i could that was heavy to push the leather down. at this point i had to take it outside cos my parents wanted to use the table..

its quite hard to get the leather attached, so try anything you can.. i tried to get some silicone to try and make more pins like the orignals.. which you can see in the picture.
ive not reattached the trim yet... cos its dark.. but it should look good! it comes away abit from the trim but when its pushed back on, the points behind the leather should push it up against the trim more.
so there we have it! i managed to get the trim and the card off the trim, in under an hour
good luck!!!
:slayer: