This guide will show you how to install reversing sensors in your Punto Mk2. I imagine the process will be broadly similar for other Puntos, but everything in this guide relates to my 1.2L 8V Punto Active Mk2.
What You're Going to Need:


Heads up warning - throughout this guide, be prepared for over-zealous use of cable ties, and excessive red arrows in images")
What You're Going to Need:
- Reversing sensors kit
I got this one: http://www.ebay.co.uk/itm/190322960277?ssPageName=STRK:MEWNX:IT&_trksid=p3984.m1497.l2649 - It was less than £15 delivered and they have a huge range of colours (note: "Reflex/Essence Silver" is a perfect match for a standard grey Punto) - The tools from your spare wheel kit
- 8mm socket + wrench/handle
- T30 Torx screwdriver/wrench
- Pliers/snippers
- Cable ties
- Soldering stuff
(optional, but recommended) - Electrical tape
- Drill
(the kit linked above includes the right drill bit) - About 3-4 hours and a boat load of patience
Heads up warning - throughout this guide, be prepared for over-zealous use of cable ties, and excessive red arrows in images
Getting Started & Bumper Removal
Right, let's get started. The first thing to do is remove the cluster that has the white reversing light in it (passenger side in UK models). This is done by unscrewing the two bolts in the boot highlighted in the image below. You need to use the grey plastic tool included in the spare wheel kit to do this.

Once you've done this, you need to find out which of the cables you just exposed are for the reversing light (the devices uses this as a power source so that it's only turned on when you're in reverse).
To do this, turn the ignition on, put the car in reverse and use a multimeter to look for a pair that give something close to 12V. Or look at the picture below and see that it's the black and white wires. Your choice.

While you're working around this area, keep an eye open for a good place to hide the device. I found that the flap pictured below works perfectly.

Now that you know what you're doing with the power, it's time to remove the bumper. It's held on by 10 screws (8x T30 torx screws, 2x 8mm bolt-style screws), at least a few of which are guaranteed to be set solid. The first 4 screws are T30 and line the top of the bumper:

It's a good idea to loosen the end screws but don't remove them - it makes the next stage easier.
Now you're going to need to jack up the back end of the car to get to the remaining 3 on each side. I found it was a lot easier once I'd taken the wheel off too, but this isn't 100% necessary. The first T30 screw is on the bracket below, with the head of the screw facing the floor:

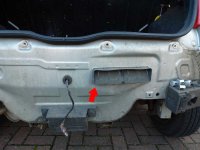
The 8mm bolt-screw is right on the edge of the bumper, and the last T30 is about 8 inches down the same ridge. It's behind the lighter colour metal sheet in this photo:

Repeat on the other side, and your bumper is now free - almost! Remember those two you loosened but didn't remove earlier: if you'd took them out first, the whole thing would fall off and twist when you undid the last 3 on one side. Now instead you can support the bumper with something (e.g. you knees), unscrew those last two, and lift the bumper cleanly away. Don't forget to unclip the number plate light! It just twists out:


Routing All the Wiring
Now that you've got the bumper off, you need to route all the cables for the sensors. First of all, unscrew each of the sensors from the cables and put them to one side. It's a good idea to take the rubber washers off and put them to one side - quite easy to lose them if you don't.
Now, where to run the wires? The grommet for the number plate light cable seems like a good choice, but there's not enough room to fit 4 more cables in there, so the air vent next to it will have to do! Run all 4 cables through, making sure the length left hanging out is appropriate to where they need to reach along the bumper (note that the cables are labelled A, B, C and D - make sure the sensors on the boot are in this order!).

Once you've pulled the ends inside the boot, you'll be left with a messy tangle of cables...

If you're planning to mount the box where I did (see previous image), I found that a cable pully tool thing and a length of string were invaluable in pulling the cables up behind the carpets:

The cables now come in behind the panel I'm using the hide the box - perfect:

Wiring in the Power
Time to wire in the power connection. Go back to the wires you exposed earlier, remove the tape and pull the wires out of the black casing. Separate the black and white wires we're going to be using:

Now, carefully strip a little bit (half an inch or so) of insulation from the black and white wires. Do this at different point in the wire to minimise the odds of a short developing:

Strip the ends of the red and black power cable that came in the kit and twist it into the copper wiring you just exposed. (Black to black, red to white).

This is optional, but soldering the connections will make them far more sturdy and reliable:

Now go mad with the electrical tape to seal it all up. Make sure you tape the two exposed sections separately first, then wrap it all up together using the black trunking that you opened earlier.

Run the red and black cable back into the boot and through the hole that the sensor cables are going through already:


Installing the Alarm Buzzer
The buzzer has enough cable to reach from where the box is to near the dash board, but this is completely unnecessary. This thing is loud. I put mine in the spare wheel well, and even with the boot carpet, parcel shelf and my music I can hear it clear as day.
Run the cable behind the carpets again and up to where the rest are:

Note: from here onwards, daylight started to fade - please excuse the poor photos!
Drilling the Bumper & Installing Sensors
This is the scary bit - time to drill holes in the unblemished plastic of your Punto's bumper!
The instructions (which are not that useful!) say that the sensors should be 50-68cm off the ground, and spaced 30-40cm apart. The thin strip of plastic above the back bump strip is 60cm off the ground, and the holes from the 4 screws holding the bumper on are about 31cm apart - ideal, huh?
Measure very carefully down from each hole and mark in the centre of the plastic strip. When you're feeling brave... fit the 21mm hole drill bit that came in the kit... and drill away slowly!


This plastic slants upwards, so I used the brackets to adjust it to align them more vertically. Plug the sensor into the hole, stand back, and admire your handy work.

Wash, rinse and repeat three times...


Putting the Bumper Back On
Line the bumper back up, and connect the 4 cables you left there earlier. Make sure you match the first one to the 'A' cable, the second to 'B'... you get the idea. Also, if you took the rubber washers off earlier, put them back on now.

Cable tie the wires together, and use the two screws you left in earlier to hold the bumper in place.

Plug in all the cables into the box, turn the ignition on, stick 'er in reverse and test the sensors...

If everything is working it will beep once when you put it into reverse, and then beep more if you get close to them. Feel free to go for a drive to test it out, but...
a) don't forget your bumper is held on with 2 screws, not the 10 Fiat designed it with
b) get someone to watch you backing up to whatever you test with; things might not be working properly, and you don't want to end up in a wall!
It it's all working, go back through the earlier steps in reverse to put your bumper back on.
Tidying Up
Now you should be left with everything outside looking great, working sensors, and a tangled mess of wires in your boot.
Enter copious cable ties!

Stuff it all behind the panel you've been routing cables to, use the sticky pad to secure the box, and get ready to hide it all completely:

Et voila!

Hopefully this guide was helpful to someone - if anyone has any questions, comment below or PM me
Note: I wrote this at about midnight whilst also watching TV... please excuse any spelling errors!