Socket removal and refitting
[/FONT]
Removal is as follows (please read and understand it all before starting):
This, as they say, is the reverse of the removal process. However, you may want to tighten up the fit of the tube in the plastic. To do this, you can bend the two tongues on the tube like this...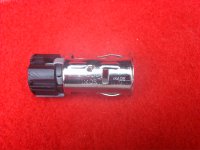 . Check that they will still clip the heating element tip in place when you push it home. Once you've got the green bit in, you need to align the metal socket correctly.
This pic...
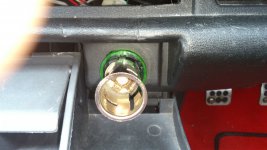
...shows that the long metal contact for the bulbholder should be aligned with a small cutout in the green plastic surround. Then push the metal tube straight in, and the tabs will click into place.
The rest is easy!
[/FONT]
Removal is as follows (please read and understand it all before starting):
- Pull out the lighter element
- Take out and unplug your stereo unit
- Reach inside the stereo aperture and unplug the lighter's electrical connector. There's a sprung plastic catch on the side, press it against the connector to release.
- Unclip the black plastic light shield (see previous section)
- You can leave the bulbholder in place, or remove it as per the previous section
- You need to be able to turn the socket in the dashboard hole. To do this, reach inside the stereo aperture with one hand, and get a grip of the body of the socket, using the light unit 'lump' to get some leverage
- Turn the socket a few degrees clockwise, then you should be able to feel that you can pull it towards you a bit. This is because there's a cutout in the dashboard hole...
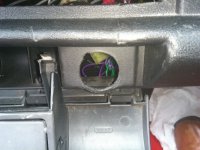 ...which mates with a tab on the green plastic surround. Then you should be able to turn the whole thing more easily.
 - BUT you can't pull the whole unit out while the metal socket is inside the green plastic. You have to separate the two, by unclipping the 2 tabs I referred to on p2 from the slots in the socket.
- To do this you need to slide a steel blade (either a stiff knife or a fine screwdriver blade) between the front edge of the steel socket and the plastic surround, like this...
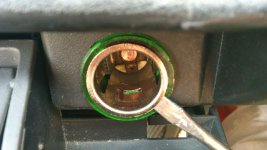 ...and twist gently to disengage the tabs and pull the steel part towards you.
 - Note that the profile of the plastic tabs is designed to be a tight fit in the slots. So the back edge of the slots may catch too hard on the tabs when you twist the blade. If you feel (as I did) that you risk breaking off a bit of the plastic front edge with too much force, use the edge of a screwdriver blade (for instance) to grind away a little of the 'sharpness' of the plastic tabs, so that they slip more easily out of the slots. Preferably, do this just a little, as the more you take off, the looser it will be when you reassemble...
- Once the tabs are detached, the tube will slide out, leaving the green surround still in the hole. Now if you pull the surround towards you, and then pivot it around the 'elbow' of the lighting 'lump', like this...
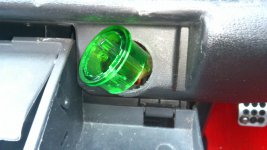 ...it pulls out easily
This, as they say, is the reverse of the removal process. However, you may want to tighten up the fit of the tube in the plastic. To do this, you can bend the two tongues on the tube like this...
 . Check that they will still clip the heating element tip in place when you push it home. Once you've got the green bit in, you need to align the metal socket correctly.
 This pic...

...shows that the long metal contact for the bulbholder should be aligned with a small cutout in the green plastic surround. Then push the metal tube straight in, and the tabs will click into place.
The rest is easy!
[/FONT]

