Note if you want to just change your battery - skip to the next page.
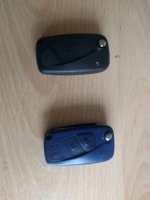
OK, so I like to fiddle and I like little details. As you'll see in my pictures, my original 3 button flip remote is looking a bit grubby and tired. It's also blue. My Abarth isnt blue. My Abarth is black. This simply will not do!
So for about £4 off good old eBay you can have yourself a new key fob case. You can get the normal blue or, because I wanted black to match the car, I ordered a black one. It makes it easier to see what's going on in the pics too.
So what you're going to need:
Your current / existing key
A new key case
A small phillips screw driver
A small flat point screw driver
Optional:
New key fob battery (may as well whilst you're at it?)
Guitar pick or similar soft plastic tool / credit card
Some form of glue or double sided tape
Tweezers
Disclaimer - there is a risk your key drops it's coding when the battery is removed. Never happened to me but there are threads reporting this in Stilo section. To help you out in this eventuality, before you start, unlock the car via the remote and open and close the drivers door - to stop re locking. You can then always use the key as opposed to remote if needed.
OK - lets go....
Removing / Changing Battery
So if you just want to change the battery you've got it easy.
Open the key blade out.
Take a look at the standard blue key and you'll see it has a little flat point screw made out with an arrow pattern on top.
On the key fob itself it's marked with a locked and unlocked padlock symbol. Rotate the screw 45 deg to the unlocked padlock. Don't force it to go further or turn the wrong way!
Place your screw driver under the end of the battery holder just next to the screw and lever against the blade to pop the end of the battery tray up.
Then it's a simple case of sliding the old battery out of the tray with your finger nail and popping in the new one.
If you're changing fob case go to next page.
To replace - hook the non-screw end into the fob and then push down on the screw end. Obviously return the screw to locked position.

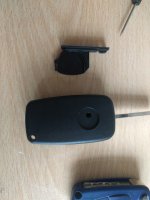
Breaking Down Keys
OK, so the key fob is actually only held together with one screw (assuming you just removed the battery tray).
This screw is hidden behind the Fiat badge on your key. You should be able to prize this out very gently with a small flat point screw driver. If you get a stubborn one apply a little heat with hair dryer. They typically remove easily though.
Mine was missing - replacement badges are available on eBay too. i've gone for Abarth badges as it's Abarth car.
After the badge is removed undo the screw that this reveals.
take note in your current key, clipped inside the back (non-button) side of the shell is a small grain of rice sized microchip. This is the immobiliser chip - take great care that it doesn't fall out. If you lose it, you're in a world of pain.
So to split the casing you can just prize it apart with your fingers, it just clips in around the rim. I used a little guitar pick tool as I don't have any finger nails just to pry apart. Be aware the blade is on a spring which may ping if you're not expecting it too.


Switching the insides
Now the real transplant begins.
You'll see on the non-button side there is a silver contact strip. Lift this out and replace. It'll lift up with a light pry from screwdriver or tweezers. Be careful not to distort it as it's fairly delicate. You need to make sure the contact strip sticks out fair enough from the rim of the key to touch the battery when inserted. You can test fit to make sure. Give it a tweek if necessary.
Next swap the little grain of rice immobiliser chip out. It sits in it's own little clip in the top corner as pictured. It should knock out into your palm. Replace in new key but be careful as it'll potentially be loose and you dont want to drop it.
Put the circuit board in place. It just sits in place, it's not clipped or screwed in, so it sits loose.
Now the fiddly bit - key blade.
Sit the spring in place, so that the spring's little leg sits in about the six oclock position - as you're going to tighten it anti-clockwise to give the key it's flip. There is a cut out slot in the key for this leg to sit in.
Now put the button on top of the spring. Note that the button is keyed with 2 little legs off it.
Put the old key blade over the button so that the key is in the open pointing outwards position. Make sure the key locates onto the legs of the button. Return the blade to the open position.
Apply some downward pressure on the blade (to stop it pinging away) and rotate anti-clock to load up the spring. The standard key spring needs 1 turn, the new key spring needed 2 turns, to give it the tension required.
Once it's got those two full turns it should still be in the open position. Push the blade right down onto the housing so that it's clicked into open position. Keep it held down.
Now with the other hand take the second half of the key and mate it to the first. It's a bit fiddly, making sure nothing moves and the blade doesn't ping off, so prepare to be patient but it's not too hard.
Keep the unit pinched shut between your fingers whilst you re-insert the small screw that sits behind the key badge.


Assemble Battery Tray
The battery tray on my new case is screw in, rather than the lock unlock screw on factory key, so I have to do this - you can check see whether you need to or not. If compatible there is no reason why you cant re-use your old battery tray.
There are two bits you need to change over to the new battery tray. The first is the obvious contact clip - the other is the little black weather seal around the base of it.
The contact clip is held in place by 3 x little barbed tangs, you should be able to convince these out with a tiny flat point screw driver. Again care needed not to bend it too much. Work out out at a time.
Clip it into the new battery tray. One of my clips wouldnt hold but it isn't vital as it'll squeeze between the circuit board and battery to make suitable contact anyway.
Insert battery - the battery is negative side up - so the contact clip hits negative. Nice and easy.
The weather seal is basically a rubber band. Be gentle on it as it may be brittle and stretch. I gently pried mine out with screw driver and slide it over the short end. Refitting is straight forward but make sure it pushes into the channel for it properly on new key, else it will pinch when trying to fit the tray.
Then install the tray into the key. Clip the non-screw end into the key first at an angle, then put the screw end down into the key. Insert screw to complete.


Testing and Finishing
Now your key is assembled, press one of the buttons on it to observe the red light flash in the LED window. If it doesn't you need to check your battery contacts.
If it flashes take the key to the vehicle and try the buttons to ensure functionality. Key coding may be an issue if LED is observed but functionality isn't.
Now all is well re-apply the key badge. The glue on it should be enough but you may need a small dab of something if it's getting a bit tired.