Technical Blower motor

Currently reading:
Technical Blower motor

Joined
Feb 21, 2010
Messages
188
Points
59
Location
Carlisle
My blower motor decided to give up the ghost today and when searching around on the forums it is either a:

Blower Motor
Resistor Pack
Wiring/Connector

Well unfortunately I have the worst out of all three and that's the wiring. I pulled the black connector off from what I believe connects to the resistor pack and checked the pins - holy s*** it's bad. Two brown wires have burn marks on them followed by the melting of the connector block where these two wires sit happily (therefore those wires aren't connecting to the resistor pack).

What can I do about this? The third year dealer warranty runs out in January and it's looking like a bloody expensive job to repair. I need my blowers to work especially with the winter coming up... :cry:
 
I think I'm fairly confident at having a go at it myself, however I'd like to know whether I can get away with removing the two terminals and putting new ones on (I'll most likely need a new connecting block). Or will I need to snip the two brown wires at certain points and solder on new ones and add the terminals at the end as necessary?

Trying to find the terminals and connecting block on ePER is a PITA.
 
I believe they are only available as a loom assembly

Ive done a few forklifts where they "dealers" want £££'s for a loom when all it needs is a new terminal block

ive literately cropped off the plug (after making careful note of how and where the wires sit in relation to what ever they plug into

then used

eg


$(KGrHqF,!nUE63Tf4qzkBO2iC2NyL!~~60_35.JPG

$(KGrHqR,!lYE9Iz2wCD)BPYIG06gv!~~60_35.JPG

$(KGrHqQOKiQE4TYI2PcPBOObwQn!+Q~~0_35.JPG

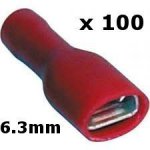
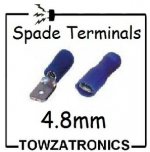
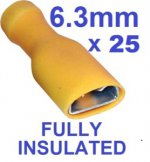
there are loads of different sizes in terms of wire gauge and terminal size the trick will be matching them up thin wires use red medium blue thicker wires use yellow generally the mm rating is the terminal width we have a bloody great box at work with all sorts in going upto about 35mm cable cross section


Silverline PL55 Ratchet Crimping Pliers: Amazon.co.uk: DIY & Tools


then made sure no one can pull on the wires and pull them out leaving a mass of un terminated wires looking for a home obviously its not a proper repair but if done properly i cant see there been an issue
 
Last edited:
From what I've gathered you snip off the wires at the plug and crimp a spade connector onto each wire and carefully reconnect them to the terminals on the resistor pack?

How would I guarantee the security of those terminals?

There's an auto electrical shop on the industrial estate near me that I'll be able to get the connectors off, and if I'm not too sure I can always show them the wires and they'll be able to get me the right size spades.

One thing I have noticed is the fact that you need to be a gymnast in order to get a good view of underneath the footwell.
 
Last edited:
From what I've gathered you snip off the wires at the plug and crimp a spade connector onto each wire and carefully reconnect them to the terminals on the resistor pack?

How would I guarantee the security of those terminals?

yep thats what ive done in the past (diesel pump for one where heat and oils had rotted the plastic plug and it crumbled)


Obviously the original plug cant have been secure if its heated up that much.. normally the spades hold on nice and tight but ......FWIW once you are sure it no longer gets hot a small amount of Hot melt glue gun glue (from a glue gun obviously ) is what i have used to secure them in... its secure enough to hold the wires but relatively easy to break out should you need to ever do any remedial work
 
Thanks for the information. :) I'll make sure to take a picture of the block connected to the pack in order for me to remember which wire goes to which terminal.
When I've finished the job I'll upload a photo of the offending connecting block.
 
That has already crossed my mind. If done right there shouldn't be a risk of fire should there?

I think it might be a good idea to touch each wire when the blower motor is on to see how hot they really get.
 
thats what i would be doing...

the reason the plug is getting hot is due to a bad connection as long as all the wires are nice and secure in the crimps and the spades make god contact i cant see any issues

the relay pack will get warm in use especially on lower speeds but as its in the air duct its self cooling
 
In terms of 'applying' the glue would it be best to drag it across each wire and bundle them together in a neat line or inject the glue into the socket area where the terminals will sit? (after terminals are properly seated and tested).

I'll try and illustrate with a diagram.
 
I'd certainly 'bundle' the wires so that if one gets pulled the load is spread between all the pins. I tend to opt for a zip tie pulled nice and thight (and because I'm a bit ocd, I trim the loose end back flush).
 
I have managed to extract some useful information from the local dealer about the problem:

Fiat have modified the wiring harness and removed one of the wires/pins so now it's only a 4 pin connector and not a 5. The dealer offered to perform the proper diagnosis on it and submit for warranty (which would get rejected I'm told), but then he would resubmit the claim via the customer services route. They've replaced about 3 harnesses and 3 resistor packs this week and they reckon Fiat has a 90% chance of contributing towards the cost of the repair (and in some cases they've paid all of the labour towards it and the customer is left to pay for the parts).

It seems they have figured out the cause of the fault and therefore removed one of the wires from the harness, although it seems to be dirty business practice to not issue a recall because of it. I guess that working with Mercedes cars they are a bit more pedantic about vehicle quality and customer care (ex Merc warranty employee).
 
I've managed to find the modified wiring loom on eBay for £59, but does anyone know how to fit it? I'm looking on eLearn but it's not being much help at the moment! One of the descriptions says you need to remove steering wheel airbag etc (basically the entire dash), but that doesn't sound right for a small loom.

At the minute I'm gathering my options here but I'll keep searching on eLearn.
 
Update: We decided to go via the Fiat warranty route because my dad wasn't too sure about doing a Heath Robinson on the wiring loom.
 
Another update:

Went via the warranty route and apparently I have to pay £170 ish for the repair. The resistor is the part that has failed and it looks like it has taken the wiring with it, however shouldn't that be covered under the warranty anyway as it has been damaged due to the resistor failing?!

Fiat warranty are covering the resistor, Fiat Goodwill in Italy are paying something towards the costs and the dealer is chipping in £60. I'm no thickheed and it seems Fiat Italy are trying to shaft me.
 
I've managed to find the modified wiring loom on eBay for £59, but does anyone know how to fit it? I'm looking on eLearn but it's not being much help at the moment! One of the descriptions says you need to remove steering wheel airbag etc (basically the entire dash), but that doesn't sound right for a small loom.

At the minute I'm gathering my options here but I'll keep searching on eLearn.

Takes me an hour. Even if you want complete dashboard removed that's only hour and half. When you say elearn you mean on disc, if so they are outdated and techs don't use them any more haven't for years.(if it has auto climate control dash needs to come out)
 
Last edited:
Back
Top