

I've written this to help those who, for whatever reason, have decided they want to do their own servicing. Please don't turn this into a debate about the pros & cons of this - I'm happy to continue that discussion in another thread. It's based on a job I did last week at home on my own 12 month old car. It's the first time I've written anything like this, so comments on how you think it could be improved, particularly by those who have actually done the job themselves, are most welcome.
Changing the engine oil in a 1.2 petrol 500 is simple and straightforward. On a scale of 1 to 5 (where 1 is topping up the screenwash & 5 is replacing the baulk rings in a gearbox), I'd rate this as a 2. However be warned that, although simple, this job offers limitless opportunities to spill used engine oil & leave a dirty, slimy mess. Like blood, a little goes a long way & the stains can be impossible to remove.
To avoid confusing our LHD cousins, I've used the terms "right" and "left" to describe which side of the car is being worked on - these directions assume you're sitting in the driving seat facing forwards.
If you are working outside, pick a nice day - you will have to lie on your back under the car & it won't be much fun in pissing rain. Also avoid windy days - the gusts will whip up the oil as it's draining & blow it all over the place.
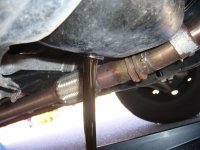
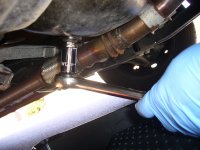
Access to both the drain plug and the filter is from under the car. The oil drain plug is centrally located on the rear of the sump and requires a 12mm hexagonal key or key socket for removal. The oil filter is of the usual spin-off disposable type and is located low down on the front of the engine block, on the right hand side. Removal using a strap wrench socket is straightforward.
This job would be a doddle if you could put the car on a lift, but most DIY types won't have this luxury and access is still reasonable using a trolley jack.
For safety's sake, it's best if you only jack up the car on a level surface. If you do have to work on a slight slope (like a gently sloping driveway), position the car so that it faces uphill. The drain plug is located on the rear of the sump and this will give you a slightly better drain. Working under a car on a more significant slope is dangerous - please don't do it.
Used engine oil is thougt to be carcinogenic & I'd recommend wearing gloves - nitrile gloves are best as they have good oil resistance. Avoid latex as they will literally dissolve on your hands as you work.
You'll need a suitable tray to catch the old oil - the bigger the better. It must have sufficient capacity to hold just under 3 litres. I used a paint tray I bought at Wickes; it worked perfectly.
You'll also need a new filter & some oil. I'd strongly recommend using a genuine FIAT filter, whatever the age/warranty status of the car; the filter is mounted horizontally, which means it's vital the anti-drainback valves operate correctly to protect the engine on startup. (For interest's sake, vertically mounted filters are less critical as the oil doesn't naturally want to drain out when you stop the engine). Chris@Souls provides an excellent "order by post" service & he is particularly diligent in checking part numbers to ensure you get the correct filter for your car - I have used his services & recommend him highly.
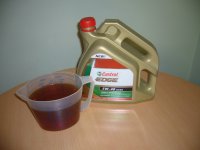
Choice of oil has been debated elsewhere; I'll just suggest you follow the manufacturer's recommendation & use a fully synthetic 5W-40 oil to specification ACEA C3. I used Castrol Edge 5W40 as it happened to be on special offer at COSTCO at the time.
Now to the job itself.
Chock the rear wheel on the left side of the car and jack up the right hand front wheel, placing an axle stand under the car for safety. Raising the car until the front tyre is almost clear of the ground gives sufficient clearance. Removing the front wheel is neither helpful nor necessary. Slide under the right hand side of the car, entering from the front, and both drain plug & filter should be clearly visible.
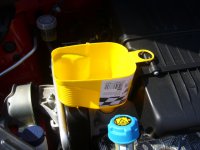
Open the bonnet, remove the oil filler cap & lift the dipstick so that it rests just above the dipstick hole. If you miss out these two steps, you'll get a partial vacuum in the engine when you remove the drain plug & the oil won't drain freely.
Working under the car, position your collection tray under and behind the sump. Clean the oil drain plug to prevent any contamination from getting into the sump - I used a water washable degreaser & an old toothbrush for this. Remove the drain plug - I used a 1/2" drive ratchet bar & 12mm allen key socket and it came out easily. I just used the ratchet bar to loosen the plug, unscrewing the last bit by hand with the socket - it makes less mess that way. Clean the drain plug & put it to one side.
Once the bulk of the oil has drained - it takes only seconds - reposition yourself & the collection tray & remove the oil filter. I used a 1/2" drive strap wrench socket & ratchet bar, but there appears to be enough clearance to permit other removal tools if you've already got something else suitable. Use a clean rag to Wipe the old oil off the mating face on the engine block.
Now you'll need to wait a few minutes for the oil to drain out completely & this is a good opportunity to go and enjoy a cup of tea.
After your tea break, start by replacing the drain plug. It's a self-sealing tapered thread, so no sump plug washer is required. I couldn't find any torque wrench settings for this, so just tightened it firmly using the 12" ratchet bar.
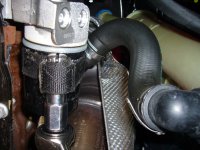
Now you need to oil both sides of the rubber "O" ring on the new oil filter - I used a little of the new oil on a cotton bud. Spin on the new filter, taking care not to cross the threads. DO NOT USE ANY TOOLS FOR THIS - if you are lying on your back under the car, tightening it as firmly as you can by hand will work just fine.
Measure out 2.6 litres of new oil & pour it into the oil filler hole (you will add a further 300ml once the engine has been started & the oil filter has filled). This is much easier than continually checking the dipstick & trying to judge when to stop filling - modern oils are thin & flow very easily & when new can be surprisingly hard to read on the dipstick. Using a clean funnel minimises the chances of pouring oil over the engine.
Now check & replace the dipstick - it should be on or close to the "MAX" mark. Replace the oil filler cap - it incorporates a ratchet (just like the fuel cap), so just keep turning until it clicks.
Start the engine without pressing the accelerator. The red oil warning symbol should go out within 2-3 seconds - in the unlikely event that it doesn't, turn the engine off immediately. Let the engine idle for a minute or two, then switch off and add a further 300ml of oil to replace the oil that goes into the filter once the engine is started. Remove the axle stand & jack, make a final check of the dipstick & the job is all over bar the clearing up.
Please be kind to the environment & dispose of the used oil responsibly.
If you're still reading this - thanks for keeping going! Also thanks to Chris@Souls for supplying the oil filter, & to 306maxi for the link to COSTCO for some seriously good value oil.
BTW, when I looked last week, Castrol Edge 5W40 was on the shelves of my local ASDA priced @ £30. You can get it for a shade less at COSTCO if you have, or know of someone, with a membership card.
Changing the engine oil in a 1.2 petrol 500 is simple and straightforward. On a scale of 1 to 5 (where 1 is topping up the screenwash & 5 is replacing the baulk rings in a gearbox), I'd rate this as a 2. However be warned that, although simple, this job offers limitless opportunities to spill used engine oil & leave a dirty, slimy mess. Like blood, a little goes a long way & the stains can be impossible to remove.
To avoid confusing our LHD cousins, I've used the terms "right" and "left" to describe which side of the car is being worked on - these directions assume you're sitting in the driving seat facing forwards.
If you are working outside, pick a nice day - you will have to lie on your back under the car & it won't be much fun in pissing rain. Also avoid windy days - the gusts will whip up the oil as it's draining & blow it all over the place.
Access to both the drain plug and the filter is from under the car. The oil drain plug is centrally located on the rear of the sump and requires a 12mm hexagonal key or key socket for removal. The oil filter is of the usual spin-off disposable type and is located low down on the front of the engine block, on the right hand side. Removal using a strap wrench socket is straightforward.
This job would be a doddle if you could put the car on a lift, but most DIY types won't have this luxury and access is still reasonable using a trolley jack.
For safety's sake, it's best if you only jack up the car on a level surface. If you do have to work on a slight slope (like a gently sloping driveway), position the car so that it faces uphill. The drain plug is located on the rear of the sump and this will give you a slightly better drain. Working under a car on a more significant slope is dangerous - please don't do it.
Used engine oil is thougt to be carcinogenic & I'd recommend wearing gloves - nitrile gloves are best as they have good oil resistance. Avoid latex as they will literally dissolve on your hands as you work.
You'll need a suitable tray to catch the old oil - the bigger the better. It must have sufficient capacity to hold just under 3 litres. I used a paint tray I bought at Wickes; it worked perfectly.
You'll also need a new filter & some oil. I'd strongly recommend using a genuine FIAT filter, whatever the age/warranty status of the car; the filter is mounted horizontally, which means it's vital the anti-drainback valves operate correctly to protect the engine on startup. (For interest's sake, vertically mounted filters are less critical as the oil doesn't naturally want to drain out when you stop the engine). Chris@Souls provides an excellent "order by post" service & he is particularly diligent in checking part numbers to ensure you get the correct filter for your car - I have used his services & recommend him highly.
Choice of oil has been debated elsewhere; I'll just suggest you follow the manufacturer's recommendation & use a fully synthetic 5W-40 oil to specification ACEA C3. I used Castrol Edge 5W40 as it happened to be on special offer at COSTCO at the time.
Now to the job itself.
Chock the rear wheel on the left side of the car and jack up the right hand front wheel, placing an axle stand under the car for safety. Raising the car until the front tyre is almost clear of the ground gives sufficient clearance. Removing the front wheel is neither helpful nor necessary. Slide under the right hand side of the car, entering from the front, and both drain plug & filter should be clearly visible.
Open the bonnet, remove the oil filler cap & lift the dipstick so that it rests just above the dipstick hole. If you miss out these two steps, you'll get a partial vacuum in the engine when you remove the drain plug & the oil won't drain freely.
Working under the car, position your collection tray under and behind the sump. Clean the oil drain plug to prevent any contamination from getting into the sump - I used a water washable degreaser & an old toothbrush for this. Remove the drain plug - I used a 1/2" drive ratchet bar & 12mm allen key socket and it came out easily. I just used the ratchet bar to loosen the plug, unscrewing the last bit by hand with the socket - it makes less mess that way. Clean the drain plug & put it to one side.
Once the bulk of the oil has drained - it takes only seconds - reposition yourself & the collection tray & remove the oil filter. I used a 1/2" drive strap wrench socket & ratchet bar, but there appears to be enough clearance to permit other removal tools if you've already got something else suitable. Use a clean rag to Wipe the old oil off the mating face on the engine block.
Now you'll need to wait a few minutes for the oil to drain out completely & this is a good opportunity to go and enjoy a cup of tea.
After your tea break, start by replacing the drain plug. It's a self-sealing tapered thread, so no sump plug washer is required. I couldn't find any torque wrench settings for this, so just tightened it firmly using the 12" ratchet bar.
Now you need to oil both sides of the rubber "O" ring on the new oil filter - I used a little of the new oil on a cotton bud. Spin on the new filter, taking care not to cross the threads. DO NOT USE ANY TOOLS FOR THIS - if you are lying on your back under the car, tightening it as firmly as you can by hand will work just fine.
Measure out 2.6 litres of new oil & pour it into the oil filler hole (you will add a further 300ml once the engine has been started & the oil filter has filled). This is much easier than continually checking the dipstick & trying to judge when to stop filling - modern oils are thin & flow very easily & when new can be surprisingly hard to read on the dipstick. Using a clean funnel minimises the chances of pouring oil over the engine.
Now check & replace the dipstick - it should be on or close to the "MAX" mark. Replace the oil filler cap - it incorporates a ratchet (just like the fuel cap), so just keep turning until it clicks.
Start the engine without pressing the accelerator. The red oil warning symbol should go out within 2-3 seconds - in the unlikely event that it doesn't, turn the engine off immediately. Let the engine idle for a minute or two, then switch off and add a further 300ml of oil to replace the oil that goes into the filter once the engine is started. Remove the axle stand & jack, make a final check of the dipstick & the job is all over bar the clearing up.
Please be kind to the environment & dispose of the used oil responsibly.
If you're still reading this - thanks for keeping going! Also thanks to Chris@Souls for supplying the oil filter, & to 306maxi for the link to COSTCO for some seriously good value oil.
BTW, when I looked last week, Castrol Edge 5W40 was on the shelves of my local ASDA priced @ £30. You can get it for a shade less at COSTCO if you have, or know of someone, with a membership card.
Attachments
Last edited:
") so I wouldn't get the oil 'up' my arm and it also helps if the oil is a bit hot
so I wouldn't get the oil 'up' my arm and it also helps if the oil is a bit hot