Technical Removing headlamp rings

Currently reading:
Technical Removing headlamp rings

Joined
Dec 30, 2016
Messages
463
Points
106
Location
Sydney, Australia
Just wondering if anyone knows how to remove the headlamp ring from the unit? There look to be some small curved notches in between the chrome ring and the unit but i feel hesitant to use too much force on them and not sure which way to push them.

One of the bolts came out of the back of the unit so I'm trying to fashion a new install somehow!
 

Attachments

  • IMG_3506.JPG
    IMG_3506.JPG
    1.3 MB · Views: 29
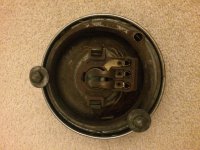
they may be the wire clips you are looking at....
take a few photos and draw a diagram showing the orientation when you take one out....
sure you will remember how to put them back in a week or two :)
or you may just post on here asking how they fit....
or do one at a time...
I use long nosed pliers to hold the clip and a screwdriver to lever one out as the first one does tend to "ping" around the room, just tricky to hold teh light and the clip and lever the clip with the screwdriver

you could try the alternative way as I did.. which was to smash a lens as you can hold the assembly very easily... then spend months finding a RHD one to match.... (not a good idea)

the clips are often rusty and loose their spring so you may need new ones...
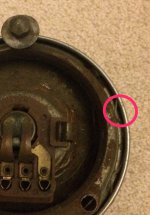
Also look carefully the 3 bolt backing mount has a notch that corresponds with a raised lip on the headlamp to locate them when they are back in the car and don't turn in the mounting... some repro headlights don't have this lip...
I had a pair that didn't, I carefully worked out the correct position they should fit in the mount and filed a bit of metal on the rim and put a bit of solder there and filed that to correspond with the notch on the mount.

Ohh I believe a D should have alloy rims not chrome...
 
you could try the alternative way as I did.. which was to smash a lens as you can hold the assembly very easily... then spend months finding a RHD one to match.... (not a good idea)

Ahaha oh dear that sounds like something I might do :) :) :)

Thanks, these are the clips circled.

Do I just nudge them outwards towards the outer edge of the rim and then it pops off?
 

Attachments

  • IMG_3506.JPG
    IMG_3506.JPG
    489.7 KB · Views: 23
The springs (I think that there either 3 or 4 per rim) can be removed by holding one 'arm' of the spring with a long-nosed plier, gently pushing the arm down and towards the centre of the light---this will pull it away from under the lip of the headlamp trim-ring. With one 'arm' free, the rest of the spring will follow. I would suggest that you do it on a work-bench, with the headlamp sitting on something soft (thick lump of foam, old cushion etc.). For what they cost, I would fit new clips, and keep the best of the old ones as spares. As Peter (Bigvtwin996) mentioned, they can 'ping' across the workshop, so keep a hold on the clip until it is free and no longer under tension. (y):)
 
Tom (Hobbler)...
I think we are all letting Bambino off too easy.. he needs to learn the hard way.... no cushion, Smash the lens then spend months looking for another..

Peter (fiat 500)
again let him get a clip in the eye.. you only need to do it once.. never again..
or even one embedded in your skin...

then when the clip has pinged round the dining room (hey what else is a dining room table for) he can spend hours looking for a clip that matches the colour of the flooring..

he is down under where there seem to be lots of RHD cars so presumably lots of RHD lights....

he can order his alloy rims at the same time as his clips... I guess it may be 2-3 weeks deliver time from Europe...
at the same time order all those accessories he needs to fill his boot with..

(but credit where it's due he is learning and has an early car that he is driving, and he knows what "banter" is)
 
Haha love it.
I'm the first ever person to try and fix something and make it worse, so stay tuned for my post from hospital with one clip in the eye and the other flown out the window into the bushes.
Or hopefully not following this good Advice well taken :)

I'll see how I go tidying these ones up, hopefully a bit of a clean and a nut and washer is all I need
 
Back
Top