Tuning Project Seicilindri

Currently reading:
Tuning Project Seicilindri

Tipo4

Paul T
Joined
Nov 20, 2010
Messages
61
Points
13
Location
Hamilton, New Zealand
This is my Tipo V6 Project that I now call "Project Seicilindri" (Thanks Hellcat)

I thought I would start a fresh new thread for this project and update most of the the things I've done so far so far. It's been getting along slowly weekend by weekend, but I hope to finish it this year:eek:

For those who don't know, I am swapping my standard 1.6 carby lump from my Tipo for a 2.5 V6 from an Alfa 155.

Here are the first set of pics. More Coming soon

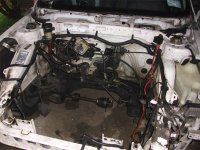
My Tipo Before the project
Untitled-01 copy.jpg Untitled-02 copy.jpg Untitled-03 copy.jpg Untitled-04 copy.jpg


My Alfa Donor Vehicle:D Bought from Mal at Dino Enterprises. It only had a damged fuel pump. I made up a dodgy one from a Toyota Supra and it drove like a dream.
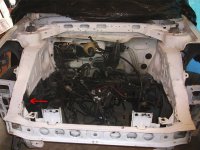
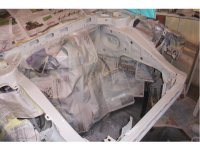
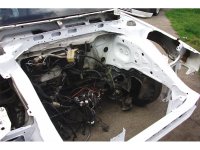
Untitled-08 copy.jpg Untitled-09 copy.jpg Untitled-10 copy.jpg


Tipo Strip Down
Untitled-11 copy.jpg Untitled-12 copy.jpg Untitled-13 copy.jpg

Untitled-14 copy.jpg Untitled-15 copy.jpg Untitled-16 copy.jpg

Bush mechanic repair job I found for the wiper mechanism. A block of wood hot glued to the body for support and a putty repair job for a ball joint connection:ROFLMAO:
Untitled-18 copy.jpg Untitled-19 copy.jpg
 
This is the engine bay tidy up and paint job I did a while back. I didn't paint the firewall because I a lot more to do on it (swapping firewall plate, changing pipes and cables etc.) plus it's going to be covered by the Alfa firewall cover anyway which I think Alfa only used to cover up the Fiat logo stamps :rumour:
In the second pic I've pointed out the weld repair job that I got done on the chassis where it had been cracked. Anyone know if this is common? :confused:

Not bad for my first engine bay paint job in my opinion:D
 

Attachments

  • Untitled-20 copy.jpg
    Untitled-20 copy.jpg
    165.2 KB · Views: 100
  • Untitled-21 copy.jpg
    Untitled-21 copy.jpg
    143.8 KB · Views: 87
  • Untitled-22 copy.jpg
    Untitled-22 copy.jpg
    157 KB · Views: 85
  • Untitled-23 copy.jpg
    Untitled-23 copy.jpg
    141.9 KB · Views: 85
  • Untitled-24 copy.jpg
    Untitled-24 copy.jpg
    163.5 KB · Views: 84
  • Untitled-25 copy.jpg
    Untitled-25 copy.jpg
    152.6 KB · Views: 81
Last edited:
Alfa strip down

Untitled-26 copy.jpg Untitled-28 copy.jpg
My supervisor:D
Untitled-29 copy.jpg Untitled-30 copy.jpg

Untitled-31 copy.jpg Untitled-32 copy.jpg


Alfa 155 front brake compared to old Tipo one. Nice and meaty :yum:
Untitled-33 copy.jpg Untitled-34 copy.jpg


Arrow in first pic pointing to wear a cam gear has damaged its cover :cry:
Untitled-35 copy.jpg Untitled-36 copy.jpg


I got bord one day when I was broke so I decided to to put these parts on the Tipo. In my opinion the Alfa side skirt looks good (y). The front bumper, not so much (n)
Untitled-37 copy.jpg Untitled-38 copy.jpg
 
This is the suspension part of project Seicilindri. First of all I had to swap the front Tipo Subframe for the 155 one to install the cable gear shifter from the 155. The alfa subframe was also in poor condition so I had to repair it a little and gave it a coat of Holden Rocket Red for kicks :D
The shifter has to go with the Alfa handbrake as well which I think looks better that the old Tipo one.
In the second pic I've pointed out the studs on the new shifter where it has to bolt on to the subframe (pointed out in the third pic)
I also had to swap the front struts to fit the larger hubs which meant I had to get the top hats swapped. Cost me 2 hours work at the local garage!!:mad: I also noticed that the Alfa has one more coil on the front springs than the Tipo. For extra weight I'm guessing???:confused:


Untitled-40 copy.jpg Untitled-42 copy.jpg

Untitled-43 copy.jpg Untitled-44 copy.jpg

Untitled-45 copy.jpg Untitled-46 copy.jpg

Untitled-47 copy.jpg


This is the rear subframe from the 155. A nice and easy bolt-in rear disc brake conversion :) complete with a nice thick anti-roll bar. The Alfa had obviously been sitting for a long time before I got it which meant I had to do a little rust and paint work
Untitled-51 copy.jpg Untitled-52 copy.jpg

Now a lot of 155 owners have told me that a strut brace made a big difference to their vehicle handling and that you can't use an aftermarket Tipo one because it doesn't clear the ABS pump. So I managed to score this custom one which is based for the 155. But I then learned that the top hat bolts were different (arrow indicating):cry: No biggie though. I can always cut a section out but any other ideas are welcome.
Untitled-53 copy.jpg
 
Okay so after all my old pics I finally have my up to date post.
Now that I have some money, project Seicidilindi has been getting some momentum and I've been busy doing several things at once (all by myself :( waaa waa)

This is the firewall plate which must be changed to install the hydraulic clutch from the Alfa and is a "Basically In The Clear Homey" of a job to do. It is sealed in with black silicone and takes a lot of prying, damaging and cussing to do. Tools needed: Screw driver, a big hammer and a crow bar :ROFLMAO:
After I removed the old plate off I straightened the firewall back to normal, then sanded, primered and painted, ready for the new one (which also needed the same)
Untitled-48 copy.jpg Untitled-49 copy.jpg

Untitled-50 copy.jpg
I have not yet sealed it back in just case I don't need to yet. If someone knows an easier way please tell me:p


I'm also currently changing the cam belt on the V6 which is not exactly one of the simplest ones to do. The reason being that Alfa 12v V6's have hydraulic de-tensioners which are very poor and are prone to leaking just like the one I previously had on.
So what you can do is convert it to a thermo mechanical type de-tensioner which costs a good $462.78NZD :eek: which is roughly half of that in british pounds. You also need to tap and thread the oil return hole (2nd pic marked A) and a special stepped stud to block the oil feed hole (marked B) and for the de-tensioner to pivot on. I could go on but heres a link that explains how if you want to know
http://www.alfapro.com/html/tensioner_install.html
Untitled-55 copy.jpg Untitled-56 copy.jpg
Here in NZ you can't buy the special stepped stud so you have to get one made, or do it yourself if you have access to a lathe. I'm still waiting for mine to be made at an engineering shop. It's been 3 working days now :mad:


As I said at the start, the Alfa had a damaged fuel pump, so I got round to buying this one from Dino Enterprises which I think came off a Tempra. I've already swapped the fuel lines when I did the brakes.
The top with the green coil is the Alfa one and the other the Tempra. As you can see the two fuel line connections are different, so a little swap was needed and...
Untitled-57 copy.jpg Untitled-58 copy.jpg

...Tada! Figjam! (y)
Plus I installed the breather hole port from the 155 near the filler cap
Untitled-60 copy.jpg Untitled-59 copy.jpg


Well thats everything up to date now.
Untitled-61 copy.jpg
Off to my little workshop to do more to the lil trolley:D
 
Haha thanks mate. Thats not a bad idea.
Luckily for me I bought the car with those plates, because over here it costs $840 for a basic personalised plate and I bought the car for $1200
Is that your Tipo on your avatar? It looks awesome.
 
Please excuse the thread hijack but I have a question for the Thread Starter.

I have a Fiat Tipo 1.4ie sat outside my house doing nothing and an Alfa GTV V6 24v doing norhing....would the V6 from the GTV fit in the Tipo? :D
 
yes it will same floorpan. Hubs, shafts uprights are different take the full set up from the alfa.
 
Thanks for the reply.

I understand that the floorpan from the Tipo was used for several Alfas including the GTV and the Fiat Coupe but I would have assumed that it would have been modified for those cars.

So it's essentially a straight fit, especially if we kept the front subframe from the GTV?
 
Engine doesn't mount on the subframe so it doesn't matter if you have it or not (only the gearbox mount and that always in the same place), only the rear end was modified on the GTV from the tipo floor pan - that term extends to the engine bay.
 
I've never really thought about a GTV swap to be honest, but it does sound like an interesting idea.
I only used the 155 subframe because it has tabs for the 155 cable shifter to bolt on to and I didn't want/couldn't be bothered to modify the Tipo one :D. Apart from that they are exactly the same. I would imagine the GTV would be similar

The project is still going btw. Sorry it has been taking so long. I'm always waiting on this and that as you do :eek:. I've got so many new and shiney parts sitting in my shed waiting to be installed :D.
 
Don't know if this thread is still live but, if so, interested in your experience with stripping out the engine bay.
Looking into the engine bay from the front you have removed a panel from the left hand side of the firewall. Part of this panel is made up of a bracket which supports the swivels for the bonnet release/throttle/clutch cables. Is this bracket an integral part of the fire wall panel which you removed or is it bolted to it? The clutch cable support on my bracket has fractured and hence needs to be removed for a weld repair.
Have started to strip out the engine bay and footwell but as yet not absolutely clear on what I need to do. Any input would be appreciated.

Thanks
 
Back
Top