IMAG0048.jpg

Cinquecento Vitorio's 350 buck headgasket special

Introduction

Well guys, i figure with all the questions and advice that i've been badgering you guys about, i'd make a thread about my cinq.

Last year after getting settled in the new house (which has a massive garage), i started looking for something to put in that garage, after getting rid of my old and somewhat failed hobby project, an alfa 33. The reason i didnt do much on the alfa, besides not having a garage for most of the time i had it, was also that i just couldnt think of any fun things to do with it, i briefly entertained the notion of a supercharger, but quickly realized that would be about thirty-three times more advanced than what i could handle.

So after some looking around i decided that a cinq would be a good starter project to cut my teeth on some actual tinkering, since a cinq is relatively simple in terms of technology, and practically every part on it can be upgraded with cheap performance upgrades, up to complete engine swaps.

So after looking at various cinqs and dealing with some rather unscrupulous salesmen, i found this gem:

IMAG0048.jpg


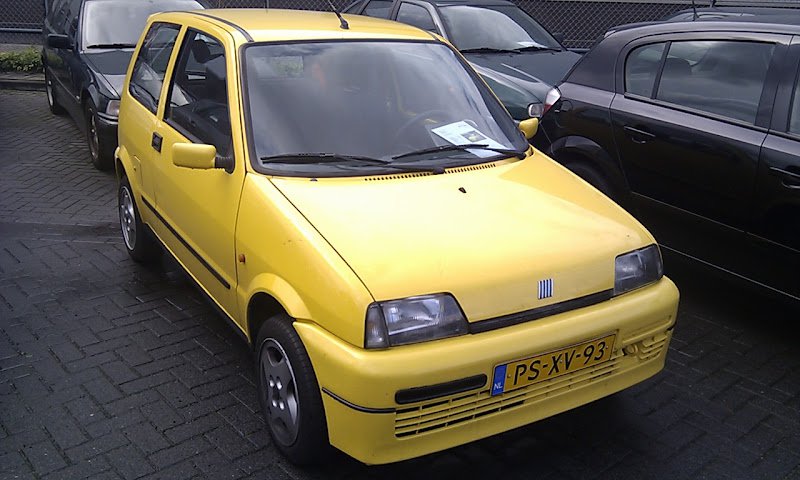
a '96 sporting with approximately 95K miles on the clock, looking good, save for a blown headgasket. The colourfull floormats with embroided bees on the were a clear tip-off that it had been on shoppig cart duty for its last few years. I had a good look around and found very little rust, just the read bumper support and the back box which had completely lost the end-pipe.

I shook the mans hand for 350 euros (quite a steal i think, since with a fixed head gasket it would have been easily 750 i think), and five days later it was dropped off at my doorstep, so i could put it in the garage.

My plans for the cinq are to make it as close to a racer as i can, while having it road-legal, and usable on the road (so no extremely low drops or slick tires).

My plans:
- replace back box (done)
- strip out interior + rear seats (done)
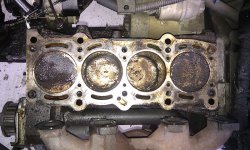
- repair head gasket (doing)
- fit 38 mm TB (on the shelf ready when the head goes back on)
- fit 866 Cam (in the mail as we speak)
- fit open air filter (got a pipercross on the shelf)
- Chip the ecu
- inspect brakes for MOT and if need be replace with upgrades, otherwise upgrades later on
- drop it 30/40 mm, replace shocks as well
- front strut brace
- rear brace between seat mountings (perhaps?)

So that should keep me occupied for a nice while, once i get all that done and my wallet has had time to recover, i have plenty of new plans involving 14" OZ rims, punto GT brakes and engine swapping, but that is all at least a year off currently, first priority is to get it going again and pass MOT, and enjoy the pepped up 1108 over the summer.

I'll leave you guys with a pic of how it is sitting right now:

IMAG0238.jpg
Really, the measuring of the clearances is the easy bit (all you need is feeler guages). But (of course) you do this with the cam in, and just turn the cam so that you're doing the measurement at base circle (the opposite to the lobe, or pointy end) for each cam in turn.

The discipline is in writing everything down. It's a bit easier than Ducatis, which have 2 shims per valve and much closer tolerances.

Pretty much what i had in mind, will be trying it this weekend

Vittorio -- get the valves re-cut before you do the measurements, or everything will be out!

Spoke to the bloke at the fiat garage, he said it pretty much wasnt needed, they do a lot of these heads, so i figure i'll be OK for now.
 
Small update,

Picked up the head and all the needed parts from the fiat dealer yesterday, spent a good 200 euros on parts and junk (remind me to just order online next time). I spent some time yesterday and today cleaning the head a bit and sanding the gasket surfaces for the intake/outlet/thermostat. Tonight i also put the 866 cam in and measured the valve clearances, all valves are about .2 mm to high, so tomorrow i'll take the shims back out and swap em on tuesday for the right ones.

Small tip for the guys going to try shimming for the first time, just take all the seperate gauges from your feeler gauge, it is tons easier to slide a single feeler in there without all the rest attached.

EDIT: small addendum, while checking the valve clearances, i noticed that the 866 does give a lot of valve lift, you do need to have the head off of a surface, since the valves come out of the reces on the head, i think that a normal head gasket will just about give enough clearance so the valves wont hit the pistons if the cambelt goes off, but it wouldnt remind me if they would just hit.
 
Last edited:
Small tip for the guys going to try shimming for the first time, just take all the seperate gauges from your feeler gauge, it is tons easier to slide a single feeler in there without all the rest attached.

I don't understand. Maybe the feeler guages here are different. They have multiple blades, but you can fold them back into the handle. And in order to measure an intermediate gap, you may need 2 or 3 blades at the same time.
 
This post contains affiliate links which may earn a commission at no additional cost to you.
I have a set of blades in a handle as well, but my blades cover every thickness between .05 and 1.00 mm with .05 mm intervals, so i never need multiple blades to measure. I tried measuring the first gap with the blades in the handle, but because the shims are lower than the cam cover level, you have to slide the whole handle in the space between the cam/shims and the head-wall, which is a bit cramped.

Removing all the blades from the handle and using them one by one is much easier
 
Well, had some free time tonight (Girlfriend took the baby swimming, so i ate way too much meat and got my hands dirty), so i made some progress on the cinq, building the head back up.

IMAG0246.jpg


Fitted my new shims, they're all nice and clean.

IMAG0248.jpg


Valve lift from the 866 cam, as you can see the valves clear the mating surface of the head, and depending on how thick your gasket is, there will be little to no clearance to the piston should something go wrong with the timing belt, better be carefull with that then :)

IMAG0249.jpg


Measuring the valve clearance, dont be alarmed by the missing oil-spray bar, i'll be taking the cam back out for fitting the head, since i dinged the oil-spray bar trying to get the headbolts loose, not making that mistake again.

All valves are within the correct range, some are a bit loose or tight, but they are withing spec, so i'll go for it (they didnt have 100% matching shims at the dealer anyway), if the engine ends up tappety, well, then i have some experience in fixing that by now.

IMAG0251.jpg


Fitted a "new" thermostat. I took it off my spare engine, since the one i had looked rather mangy. Sanded down both mating surfaces to get all the old gasket gunk off, rinsed it off and fitted it with a new gasket. Next time i might just go for a new one, but replacing this one if it is broken isnt a big problem, so i just went for it.

IMAG0252.jpg


Fitted four new plugs, havent torqued them up yet, but i figured winding them in without crossthreading any would be easier with the head on the bench.

IMAG0253.jpg


And finally, fitted the inlet mani again. Sanded down both mating surfaces, cleaned the gunk out of the ports best i could, and put a new gasket in there. Torqued the nuts/bolt up to spec, and called it a day.

Next up is giving the exhaust manifold mating surfaces a good clean/sand, cleaning/sanding (sanding just the bottom end) the head mating surfaces, and fitting the head back in.

Looking at my workbench i am really noticing progress, and i'm pleased as punch. If i manage to crack on for a full day, i'm confident i can have a running engine. Pretty sure i wont have the time for that over the weekend, but one can hope :) My goal is to at the very least have the head back on, cam fitted and all.
 
Mate, re. collision/interference, remember there is still the HG to give some more clerance, not sure if your engine has grooved pistons though. All in all it might still be safe.
 
Mate, re. collision/interference, remember there is still the HG to give some more clerance, not sure if your engine has grooved pistons though. All in all it might still be safe.

I know, there is still the HG and the pistons have very small recesses in them right where the valves are, so it might still be safe after all, but it is going to be a fraction of a millimeter.

Not that fussed about it though, if the timing belt goes off (which i dont think it will), that'll just be another excuse for an engineswap :cool:
 
Well, it's been a while since i had any progress to report, due to various other things that claimed my time, and more importantly, space in the garage.

Yesterday though, was quite a productive day. I put my cilinderhead back on, and mounted the P75 cam. Bolted back my exhaust manifold (sheared a bolt in the process, so had to do it all over again) However when i went to put the cambelt back on, i noticed the idiots at the fiat dealer had supplied me a kit with a 125 tooth belt, rather then the 104 tooth belt that i need (n)

So i spent some more time on mounting the throttlebody back, sanding/polishing my cam cover and putting the ignition coil pack back on. Now i have to wait till tomorrow to try and find a 104 tooth belt (today's a holiday here in holland) before i can continue, i dont want to put my radiator back in place before i got my cambelt in.

So all in all i mad some good progress yesterday, only to be let down by my parts supply, i did as much as i could, now it is waiting for the right parts before i can get stuck back in.

Should be about two more hours of work tops, before i can fire it up again!
 
Well, acquired the proper belt on tuesday, and just used a spare 5 minutes to pop it on, quite easy once you get the proper kit :)

So saturday afternoon will be spent put the cooling system back together so i can fire up the engine again and see if anything blows up in my face.
 
And it's alive!

Put all the bits back on, cambelt covers, alternator belt, radiator, coolant tank, poored a good gallon of coolant into the system, and fired her up. At first it was running very very poorly, juddering all over the place. An hour of fiddling with spark plugs and leads later i discovered that my number 4 plug lead was bad... DOH

Anyway, not it sounds like it is running OK, if still a bit rough, but that might have to do with the fact that i'm not used to hearing an engine without any air filter being fired up indoors :). Further i'll need to adjust the idle, as it sounds best running idle around 1200 rpm, but that is not how it should be.

Next up is going round the DIY store for a measuring caliper and some black hammerite, so i can measure up the front discs and get rid of a few rusty spots.

I do anticipate some tuning work will need to be done by the dealer come MOT time, and there are some bits and bobs for me to take care of before then, but i really feel like i'm on the home stretch now :)
 
For the weird running, you have the 866 cam on the SPI ECU, it will need to readjust a little bit. 1200 idle is certainly too much (when warm), but if have taken apart the TB, check there that all the gaskets are still holding tight. Apart from Fingers' advice, it can also be the throttle plate adjusting screw.

Oh, and congrats on putting it back together (y)
 
For the fast idle, look for an air leak on the inlet side (especially common on SPI cars) first (or a hose in the wrong position on the TB).

When i said it idles best at 1200rpm, i mean after me fidgetting with the throttle cable to get it to sound right :) If i completely slack the cable it idles at 900-1000 rpm, but it sounds a bit rough, like it occasionally misses a beat.

Will be fidgetting with it tonight again, this time with the air filter on, that should also limit the amount of fuel spray-back produced :p
 
Should ber plenty of free play on the cable.

Back spray (with a fairly mild cam) might indicate the valve timing a tooth or two out.

Yeah, i'll set the cable back, i was just faffing about with it, trying to get it to run smooth. As for the back spray, i was only starting/idling, so the injector was just spraying right onto the butterfly valve, without any sort of airfilter/housing this caused some spray.
 
Back
Top