

Hi all,
I bought my 2009 Panda back in Febuary (First car) and i'm loving it so far! Deffo looking into a Panda 4x4 for next year!
One of the first things for me to do was to upgrade the sound system which was easy enough, i've installed new speakers throughout (4 woofers 4 tweeters) as well as an active Sub in the boot which was a bit of a pain to begin, but was easy enough once I worked it out.
Headunit Install
With my car being the Active model, it came with a single din headunit, so i'll be using that as my example.
The first day I got the car I added the new headunit so I could connect my phone and have DAB radio. This is a seriously easy upgrade and takes about 10 minutes. To start you need a set of radio removal keys, simply push these both into the holes on the Blaupukt headunit and pull, it should simply pull straight out. Once you've got the stock unit out, unplug all the wires making sure not to lose any into the abyss. Once you've done this it should make sense, connect the ISO adaptor to the 2 bigger connectors (should only go one way) then connect the FM adaptor to your stereo and plug it all into the back of the new headunit (I have a coloured connector but I haven't plugged this in)
then simply insert the stereos cage, pushing some pins out to hold it in place and insert the new headunit until it clicks into place and thats it, any questions feel free to ask :idea:
Speaker Install
So, the speakers were the second job on the list. At the time of the upgrade Halfords happened to have some speakers on sale, and they're decent in my opinion.. especially for the price (I paid £35 at the time).
Installing speakers is easy enough, to remove the door panel you simply remove 2 Phillips screws from the bottom of the door, as well as an 6mm Hex bolt just under the handle. Once these screws/bolts are removed I pulled the cover from the bottom towards myself and it popped out, rather than unhooking the locking stuff I just rested the cover on the door itself.
The speakers themselves are held in by 4 screws, and connected with a plug. I was unable to find an adaptor for this plug so I cut the original fiat wire and stripped it back so I could crimp it to the new speaker wire (red to red.. black to black..) then simply screw your new speakers in using the adaptors and hay-presto, new speakers!
oh yeah, to put the door panel back on just line up the clips and push then add the screws back in.
Tweeters
If you are installing separate tweeters then i'd recommend getting the tweeter fittings listen below for a stock look. To remove the standard tweeter covers which don't hold tweeters I used a small flat head to lever them off as they're held in by 3 clips. Next simply put the tweeter in the fitting, I had to use some electrical tape as the tweeters were too big for the fitting, however its a solid fit with no rattles. Then clip the tweeter cover back into the door and job done.
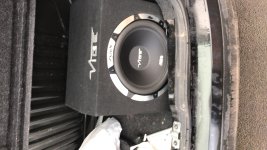
SUB Installation
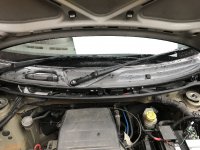
When installing the sub i struggled to find the firewall gromet but after some research I found that it was under the black trim with the washer jets and wipers on, this was held on by a few screws (4 i think?) and a load of clips, this pulled straight off (after removing wipers) to reveal the firewall grommet, I just cut a hole in this and pushed the power wire through for the sub which I then pulled from inside (You can see the grommet from the hole behind the glovebox), from here it was really easy, ran the power cable to the boot pushing it under the trims. For the ground in the boot i've used the rear seat (I think this was a 15mm bolt - Same as wheel nuts)
The rest of the sub install was simple, I ran the 12V power cable from the battery along the left hand side of the car, and I ran the RCA and Remote cable down the right plugging into the back of the head unit in the appropriate places.
Overall, its sounding amazing now! even though I only have half a boot its worth it!
Here are the parts that I used within this upgrade if anyone is interested (wont let me add links yet):
Sub woofer - Vibe slick SLR 12
Speakers - FLi FI6 Comp-F3 Component Speakers
Headunit - Sony DSX-A300DAB
Headunit removal keys - PC5-83
ISO Adaptor - PC2-36-4 , just search this on ebay/ Halfords
FM Aerial adaptor - PC5-27 , As above
Tweeter covers / Fittings - Ebay item number is 252135220139, also on Amazon as 2 X Speakers grille protection Tweeter HP FIAT Panda 2002 - 2012
Speaker adaptors Front - Ebay item number is 262993759743
Speaker adaptors Rear - Ebay item number is 263356958997
I bought my 2009 Panda back in Febuary (First car) and i'm loving it so far! Deffo looking into a Panda 4x4 for next year!
One of the first things for me to do was to upgrade the sound system which was easy enough, i've installed new speakers throughout (4 woofers 4 tweeters) as well as an active Sub in the boot which was a bit of a pain to begin, but was easy enough once I worked it out.
Headunit Install
With my car being the Active model, it came with a single din headunit, so i'll be using that as my example.
The first day I got the car I added the new headunit so I could connect my phone and have DAB radio. This is a seriously easy upgrade and takes about 10 minutes. To start you need a set of radio removal keys, simply push these both into the holes on the Blaupukt headunit and pull, it should simply pull straight out. Once you've got the stock unit out, unplug all the wires making sure not to lose any into the abyss. Once you've done this it should make sense, connect the ISO adaptor to the 2 bigger connectors (should only go one way) then connect the FM adaptor to your stereo and plug it all into the back of the new headunit (I have a coloured connector but I haven't plugged this in)
then simply insert the stereos cage, pushing some pins out to hold it in place and insert the new headunit until it clicks into place and thats it, any questions feel free to ask :idea:
Speaker Install
So, the speakers were the second job on the list. At the time of the upgrade Halfords happened to have some speakers on sale, and they're decent in my opinion.. especially for the price (I paid £35 at the time).
Installing speakers is easy enough, to remove the door panel you simply remove 2 Phillips screws from the bottom of the door, as well as an 6mm Hex bolt just under the handle. Once these screws/bolts are removed I pulled the cover from the bottom towards myself and it popped out, rather than unhooking the locking stuff I just rested the cover on the door itself.
The speakers themselves are held in by 4 screws, and connected with a plug. I was unable to find an adaptor for this plug so I cut the original fiat wire and stripped it back so I could crimp it to the new speaker wire (red to red.. black to black..) then simply screw your new speakers in using the adaptors and hay-presto, new speakers!
oh yeah, to put the door panel back on just line up the clips and push then add the screws back in.
Tweeters
If you are installing separate tweeters then i'd recommend getting the tweeter fittings listen below for a stock look. To remove the standard tweeter covers which don't hold tweeters I used a small flat head to lever them off as they're held in by 3 clips. Next simply put the tweeter in the fitting, I had to use some electrical tape as the tweeters were too big for the fitting, however its a solid fit with no rattles. Then clip the tweeter cover back into the door and job done.
SUB Installation
When installing the sub i struggled to find the firewall gromet but after some research I found that it was under the black trim with the washer jets and wipers on, this was held on by a few screws (4 i think?) and a load of clips, this pulled straight off (after removing wipers) to reveal the firewall grommet, I just cut a hole in this and pushed the power wire through for the sub which I then pulled from inside (You can see the grommet from the hole behind the glovebox), from here it was really easy, ran the power cable to the boot pushing it under the trims. For the ground in the boot i've used the rear seat (I think this was a 15mm bolt - Same as wheel nuts)
The rest of the sub install was simple, I ran the 12V power cable from the battery along the left hand side of the car, and I ran the RCA and Remote cable down the right plugging into the back of the head unit in the appropriate places.
Overall, its sounding amazing now! even though I only have half a boot its worth it!
Here are the parts that I used within this upgrade if anyone is interested (wont let me add links yet):
Sub woofer - Vibe slick SLR 12
Speakers - FLi FI6 Comp-F3 Component Speakers
Headunit - Sony DSX-A300DAB
Headunit removal keys - PC5-83
ISO Adaptor - PC2-36-4 , just search this on ebay/ Halfords
FM Aerial adaptor - PC5-27 , As above
Tweeter covers / Fittings - Ebay item number is 252135220139, also on Amazon as 2 X Speakers grille protection Tweeter HP FIAT Panda 2002 - 2012
Speaker adaptors Front - Ebay item number is 262993759743
Speaker adaptors Rear - Ebay item number is 263356958997
Attachments
Last edited: