Technical Screenwash soaking rear footwell (splitting pipes a known issue?)

Currently reading:
Technical Screenwash soaking rear footwell (splitting pipes a known issue?)

WhizzBang

New member
Joined
May 5, 2013
Messages
2
Points
1
I have a 2.5 year old 500 Twinair - I bought it 10 months ago. At the time, the salesman told me Fiat only give a 2 year warranty, so convinced me I needed to pay extra for one of their warranties as well.

Only problems I had initially were the car wasn't valeted when I collected it, and one of the front windscreen washer nozzles was missing. I did report it to the dealer, but bought another nozzle online and just cleaned it myself. I read online that the nozzles can pop out, it's quite common and the replacement was cheap.

The car has always seemed to go through screenwash quite quickly - now we know why. The rear passenger footwell is soaking wet and smelling of screenwash. The rear seats are rarely used, so we hadn't spotted this before.

I rang the local branch of the dealer to see if this was covered by the additional warranty I'd bought. They told me the car is covered by the 3rd year dealer warranty, and told me to call their Fiat dealer in another town.

The Fiat dealer's service department told me that splitting washer pipes are a known issue with the 500, but warned me that Fiat may or may not contribute to the cost of repair as a goodwill gesture. First thing to do is diagnose the issue.

Except diagnosis involves so much work - removing seats and carpet and rear bumper, etc. - that it could easily cost over £400 just to take it to pieces. And there is no guarantee that Fiat will contribute a penny. On top of that fixing it and putting it all back together could easily cost more than that on top.

So apparently, I could be facing a bill of over £800 to repair this. ("Or even more than that," said the service dept.)

I'm shocked that if I want what's apparently a known issue repaired, I may have to end up paying a small fortune. For a car that's less than 3 years old, is covered by the 3rd year of the warranty and has a warranty purchased from the dealer on top.

The branch that sold me the car have given me the number of Fiat customer service, and I'm going to call them, but I'm now seeing stories online of how useless and generally unhelpful they are - are they really this bad? Are they likely to help?

Can we simply disconnect the rear washer pump?

Is it really so costly to fix?

And is there any risk that the bottom of the car body has been damaged by the soaking carpet?

Any advice would be much appreciated.
 
The branch that sold me the car have given me the number of Fiat customer service, and I'm going to call them, but I'm now seeing stories online of how useless and generally unhelpful they are - are they really this bad?

Some have found Fiat Customer Services helpful, others have had a less positive experience.

The more cynical might suggest FCS exists to protect Fiat and its dealers from their customers.
Are they likely to help?
You'll never know unless you try.
Can we simply disconnect the rear washer pump?
You can, but it probably won't fix your problem as fluid will still seep through the cracked pipework.

The front washers share the reservoir & the front washers are a requirement if the car is to be roadworthy.
Is it really so costly to fix?
Yes if you insist on using the main dealer network. An Independent garage should be a lot cheaper. If you do it yourself, you can replace the flexible pipes with better for peanuts. There is an excellent guide on fitting additional sound insulation which contains everything you need to know to take that part of the car apart.
And is there any risk that the bottom of the car body has been damaged by the soaking carpet?
If left untreated, the floorpan may rust out from the inside. The additional humidity in the car could also cause problems with any fitted electrical or electronic equipment. Mould on the seats, carpets & headlining are also possibilities and in time your car will end up smelling like a pond.

You need to get this fixed.
Any advice would be much appreciated.
Forget trying to get any kind of compensation from FIAT or the supplying dealer - your energy would be better spent on finding a solution. Either get an independent garage to replace the affected pipework or, better, do it yourself.

If you choose the latter approach, we will help you every step of the way - just come back with any questions.
 
Last edited:
:cry: :cry: :cry: :cry:

Yes, my 11 plate 500A presented me with a soggy carpet in the rear passenger footwell!!

To say this is a pig of a job is a massive understatement!!! You need lots of time, tea and patience....the hourly rate at a garage would be mental!!!!

As there is lots of trim to remove (used the Haynes manual, and the sound deadening article on the 500 forum), I decided to do it myself as opposed to taking it back to the abarth dealer in York, it is still under warranty, as I haven't had it long.

I can spend more time and take it slow. Can't imagine a mechanic who is under pressure from the workshop manager taking too much time and care, broken clips, greasy trim etc - no offence Mr Technician!! :)

Found the split pipe to be near the rear speaker in the passenger side.

Took the rear screen jet with me when I bought 7 metres of flexi clear pipe - 3mm from B&Q was too wide, but found some a bit smaller at an independent local DIY shop (Pease of Garforth).

I had intended changing it all...but as the pipe seems to come inside the car behind the centre of the dash, I decided to just plumb it in to the old pipe near the passenger door, - downstream of the leak!


Tip for when you change the pipe at the tailgate end:

Carefully unseal the rubber conduit tube that comes out of the top of the rear wing and into the tailgate.

Remove the trim on the hatch, and label the wires (eg number plate light, heated rear window etc etc), and undo them, along with the harness clips that hold the wires in place. I did this because some wires go down to the boot solenoid etc, and the brake light and washer pipe to the top, gives more room when undoing the felt loom tape at the rubber conduit where it comes into the tailgate.

Pull the old washer pipe off the washer jet, and DONT let it vanish into the void. Likewise with the wires from the high level brake light.

I then fastened a good length of string to the brake light wires.

I then taped the length of new pipe to the old pipe at the washer jet end, and hooped my string to the rear headrest.

I then carefully pulled the brake light wire and old washer pipe out of the tailgate at the top of the rear wing as the wire and wash pipe are taped together with fabric loom tape. This made it easier to get it all out, and you have pulled the new length of pipe through to the rubber conduit.
You can then gently pull the brake light wires back.

I then fed the new screenwash pipe into the car, all the way to where the passenger door is.

As I had a small pipe connector, I cut my new pipe, and the stupid original pipe.

I made another cup of tea, and also brought another cup of hot water for softening the pipe ends when putting the connector in. new pipe was easy peasy, and yes you are right, it then goes wrong!

because the factory pipe is ribbed (ha ha, that's the only funny bit of this whole rubbish episode!!!) hard plastic it doesn't really soften, and was very difficult to get onto the joint.

After much grief, the two are now joined...but it's not perfect.

My options are to:
A) Try and find another pipe joint - will try the DIY shop, a remote control model shop (fuel pipe), and garden centre (micro irrigation)

B) Burn the car!

C) do the whole length, which I don't fancy!!

D) Burn the car!

E) Do without the rear wash!

F) Burn the car!


So far it's B, D and F that appeal most!!!

To be continued!!!!!
 
As there is lots of trim to remove (used the Haynes manual, and the sound deadening article on the 500 forum), I decided to do it myself as opposed to taking it back to the abarth dealer in York, it is still under warranty, as I haven't had it long.

I can spend more time and take it slow. Can't imagine a mechanic who is under pressure from the workshop manager taking too much time and care, broken clips, greasy trim etc - no offence Mr Technician!! :)

Well, I'd be doing the same thing in your situation, for much the same reasons.

Personally I'd look to the model aircraft/boat/car fraternity for a workable solution - those kind of specialist shops have all manner of tubing and connectors in the right kind of sizes.

For larger jobs, I've found ship's chandlers to be a bit of an Alladin's cave - particularly if you're looking for stainless steel clips, nuts, bolts & washers.
 
  • Like
Reactions: UFI
What a pain for a penn'orth of pipe!
An alternative is to find a length of oversize pipe that will slide snugly onto the existing, cut the offending pipe, slide on and tighten the oversize pipe using cable ties and silicon.
Sounds complicated but it's not.
I have actually used this crude method on my Merc to repair a split plastic fuel pipe that was letting air into the diesel line and causing real starting problems. The plastic had gone brittle with heat and age, and was impossible to remove without major work. It became a permanent fix and has never given trouble.
 
Like it! So simple, but sounds so effective. Might not burn the car now - ha ha!!
If I can't find suitable items in the remote control car shop, I will do this!

Note to self...don't come out of the shop with a new remote control car!!!!!
 
I've just hit this issue on my 500. Was vaccuming the inside and noticed that the carpet behind the passenger seat was soaking. The windscreen was getting water on the inside too (and frost in colder weather!).

I found this helpful thread and did a bit of diagnosis:

The water didn't smell particularly of screenwash so I wondered if it was the door seal that was the problem, although it looked well sealed and dry. Or maybe the sunroof - maybe blocked drain tubes? But when I popped open the sunroof I didn't see anywhere water would be getting in, and it seemed strange that the floor would be wet and not the headlining etc. I also foolishly imagined that as the screenwash pipe goes to the top of the tailgate the pipe would go along the roof under the headlining as it has in every other car I've owned. Not so...

I put a water trap in to try to dry the carpet out and it did stay dry for a while. Then I noticed the other week that the carpet was soaking again after a journey in the rain where I'd also used the rear washer a lot. While we were washing the other half's car we put the pressure washer on the door edges with no issues, so I started suspecting the screenwash again.

Last weekend once the carpet had dried out again I tucked a piece of dry paper under the edge of the sill trim and operated the washer a couple of times. Once I prodded the paper with my finger water was wicking through it, and this time it did smell of screenwash. And so on Saturday while the weather was nice I decided to print out this thread and the sound deadening thread and go and dismantle my car in the sunshine.

I started by removing the front sill kick trim. Only a screwdriver and a bit of brute force was needed to unhook the clips. I have had bad experiences in the past with brittle trim clips so had a trim clip removal tool which I used to initially prise the trim away before finding that a firm tug worked just as well.

Next I took out the rear seat - first the base (two 16mm bolts at the front) and then the top (four 16mm bolts and the torx bolt over the pivot - mine are the split folding rear seats). The two seat backs come apart with a bit of a tug which saves wrestling a mated pair of seat backs and carrying them to safety.

I then removed the two upper trim panels where the seatbelts mount. This was the point things went a bit wrong in my case. Unbolting the lower rear seatbelt proved tricky to say the least. The bolt moved to start with but then tightened up, moving only a couple of mm at a time... and eventually sheared. It doesn't look like a particularly great quality thing to be honest. Removing the sheared stud took me giving up, the other half having a go with the molegrips and giving up, then the guys at the garage down the road trying their special magic tools and molegrips... and also giving up, before the other half got it glowing red hot with the blowtorch and finally got it out with the molegrips. Your experience may vary!

Removing the trim is the usual screw-and-tug (ooo-er) process. So is the B pillar seatbelt cover. As stated in the sound deadening thread, although it has "AIRBAG" written ominously on it, there's nothing actually behind it.

Once all the little bits of trim and seats are removed, the rear trim panel is finally accessible and can be undone, but not entirely removed because the seatbelt goes through it.

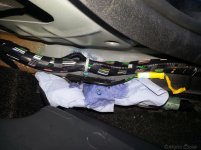
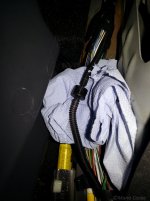
Naturally it's behind the one panel that DOESN'T remove that I found the split! The pipe seemed to have a kink in it where it was a little too long for the gap between ties/clips (if that makes sense) and had split.

Having finally found the split it was a matter of deciding on the best method of repair. The hard plastic pipe Fiat use isn't great but faffing about replacing whole lengths on a short time frame in the open air didn't appeal, so I decided to just repair the broken section.

We happened to be at a Land Rover parts place on Saturday morning so while I was there I picked up some replacement screenwash pipe and although they didn't have any connectors, they did offer some one-way valves so I bought a couple. Having cut out the split area of pipe a one-way valve fit into the pipe, but is a pretty chunky thing. So I decided to see if the motor factors (attached to the MOT place with the helpful guys with their magic tools) at the end of the road had anything smaller. They had connectors marked "Ford/Vauxhall" but the guy reckoned they should fit, so I picked one up as an alternative. They also had slimmer one-way valves which I might have gone for if I didn't already have the Land Rover valve.

Once I got home I tried warming the pipe up in a cup of water (not easy in the confined space behind the tilted panel!) and sliding it onto the connector. With a bit of pushing, it did fit, but I could see the tell-tale pale colour of stretched plastic so decided in the end to opt for the one-way valve as it did fit OK behind the trim. with a little help from the other half's stronger fingers we got the valve in place and got a test washer activation without any leaks.

So it was then a case of putting everything back together, which turns out to be far more annoying than taking it apart because you have to line the trim clips up blind and then give them a good whack to hopefully get everything to snap back into place. Bolting the seats back in is easy.

So now I just have the problem of the seatbelt mount to sort, but I think tapping the thread back out with a tap and die set and getting a replacement bolt that isn't made from cheese from the local engineering shop should do it :)

As a pleasant side effect, with the one-way valve in place the rear screenwash comes through almost immediately without waiting a few seconds for the water to appear (y)

Attached pics:

1) To quote Mythbusters: "There's ya problem!!"
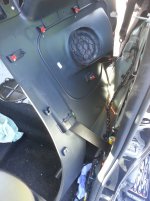
2) Naturally, the leak is in the most awkward place to reach.
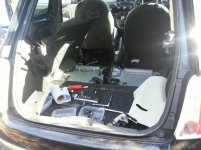
3) "I accidentally my whole car! :eek:"
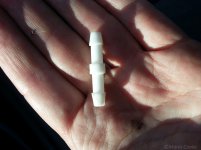
4) The slightly-too-large Ford/Vauxhall connector. The only one the local factors had, but I'm sure other factors/Halfords etc would have different sizes.
5) One-way valve in place and working :)
 

Attachments

  • 20150307_131448.jpg
    20150307_131448.jpg
    508.6 KB · Views: 229
  • 20150307_131501.jpg
    20150307_131501.jpg
    529.2 KB · Views: 175
  • 20150307_131511.jpg
    20150307_131511.jpg
    464.5 KB · Views: 160
  • 20150307_134553.jpg
    20150307_134553.jpg
    478.9 KB · Views: 146
  • 20150307_141217.jpg
    20150307_141217.jpg
    475.4 KB · Views: 173
Mine seems to have split on my 500 colour therapy and is leaking into the passenger footwell. Any idea how to remove the inner sill panel?

I can see there are 2 screws, but it still seems fixed in place.

Thanks

Emma
 
It's brute force once you've taken the 2 screws out. A bit of leverage helps. If you get your fingers under it at the screws end and yank sharply up it will come free. No need to take it right off. Don't loosen the rubber seal too much as its a pain to get back on.

If you can don't undo the rear seatbelt bolt. You can access the pipe by just bending the panel back. Those seatbelt bolts do have a habit of dethreading.
 
I would like to revive this old thread.
Today I tackled this job to fix water ingress into the rear passenger footwell.
It is not nearly as bad as people say, just take your time and be methodical. For most people, you don't need to dismantle the interior rear quarter panels because the leak is most likely to come from the area along the door. I would suggest starting here. You can just remove a couple of screws near the base of the seatbelt and one more under the glovebox. Gently pull up the plastic trim along the door. Chance are you will find your water leak here.
For some insane reason Fiat decided to run the water pipe for the rear washer along the same channel as the car electrics. They also used brittle corrugated tubing instead of thick pvc tubing or similar. My suggestion would be, find the leak, cut the corrugated tube and rejoin with a smaller diameter tube inside and an oversized piece of tubing on the outside. Hold together with very tight zip ties or clamps if you have them. Not too scary a job.
By far the greatest cause of this failure is incorrect dilution ratio of screen wash in winter, or more likely plain water in the screen wash bottle.
I recommend 20% in winter so 1L and 4L of water in mixing container using a -15c stated concentrate, which is possibly a bit over the top or normal Halfords concentrated wash
 
I reckon you are right but also the quality of the fiat corrugated tubing is pretty poor. I can only imagine in horror what a dealer would charge to replace the whole washer tubing from front to rear.
 
Back
Top