Technical Rusty rear cross member

Currently reading:
Technical Rusty rear cross member

nitro_warrior

Established member
Joined
Feb 12, 2008
Messages
780
Points
194
Location
Edinburgh
So i'm wandering out to the shed today to do some work on a trailer when I notice the exhaust is hanging a bit low.
Seems the rear most bracket has come off... So I stick my head under the bumper and discover the whole rear cross member is completely rotton along the floor of the boot. *sigh* I've got enough to do thank you mr panda.

Not worth bodging as the MOT is up at the end of April, so out with the tools, wire wheel on the drill, and angle grinder...

imgp1584medium.jpg


ewwww rust :yuck:
imgp1586medium.jpg


imgp1588medium.jpg


So I finished to day with all the metal cut away ready for new stuff to be welded in.

imgp1594medium.jpg


imgp1596medium.jpg


imgp1592medium.jpg


Unfortunatly I need a new swan neck for my Mig before I can start the welding. Tempted to cut the whole crossmember off and replace it with some box section, but i'll think about that whilst I wait for my swan neck.

Talk about an unwanted extra job to do! :rolleyes:

On the plus side I noticed a puddle of petrol and found a hole in the hard fuel line just behind the coil. So I patched it with some flexi hose, fingers crossed that will solve the fuel draining back to the tank problem i've been suffering from...
 
Well it's taken a while, been away catching the last of the snow in the Alps, but I finished the work on Monday here are some pics of the work.

The holes on the back panel filled and welds ground smooth.
imgp1653large.jpg


Not the prettiest welding on the floor, I couldn't be arsed grinding it smooth as the carpet hides it.
imgp1654large.jpg


Whilst the bumper was off I sorted out the problem brackets that hold the captive bolts, but always wind up allowing the bolt to spin, making them a pain to remove. This Job requires 3M DP805, this glue is the absolute bomb, bonds ferousiously to almost anything, is gloopy enough to build up in a support, really awesome. Hard to get hold of though.
imgp1661large.jpg


So time for painting. I'm not bothered it's not smooth as it's hidden behind the bumper. Mainly practising my spraying technique. So under the watchful eye of Barack Obama I laid down some primer.
imgp1657large.jpg


Chassis painted the underneath. The welds are messy but the penetration was good. Excuse the slightly wonky centre chassis rail! It's thicker gauge than the original and fully welded rather than spot so it should be plenty strong enough. I didn't bother refitting the bracket for mounting a Tow bar. If I need to I will at a later date.
imgp1665large.jpg


Cleaned and painted the rear axle whilst I was under there it was looking pretty flakey
imgp1666large.jpg


Then I laid down the paint. Think I have my technique nailed for when I do more cosmetic jobs. Unfortunatly the colour match isn't quite spot on.
imgp1664large.jpg


imgp1663large.jpg


Finally I cavity sealed it, (treating the cobbles in the process) That's when I found my next job...
imgp1672large.jpg


That sill sure crept up on me. It was just a small hole I spotted and I could of bodged it for the imenent MOT but thought I would spend the time to do it properly.
 
Looks like my Y10's sills.

Would be interested to see how you approach this. I have been putting it off as there are a few other jobs to sort

Cheers

Dave
 
Good work, cheers for the pics... I've got loads of this sort of stuff to do on Agnes and the more pics I see the clearer it is in my head how to go about it...

Good luck with the sills, hope to see more great pictures soon... Luke. (y)
 
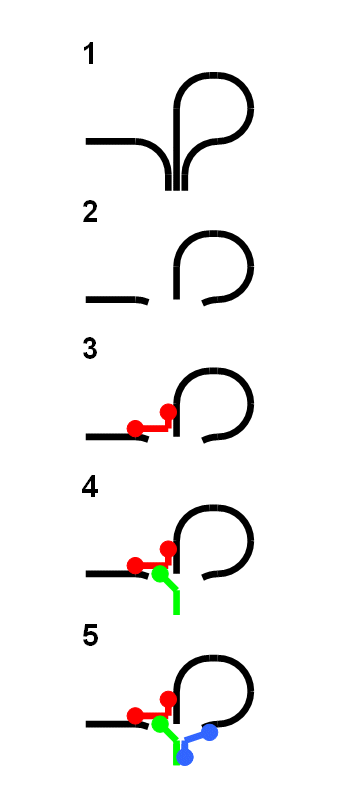
OK, i'm about half way through the repair. As there are others in a similar boat, thought it might be helpful if I posted a cut-away diagram of what the sills (should) look like and how i'm going about the repair.

1. The floor, inner sill, and outer sill all meet at the bottom where they are spot welded together.
The corner between floor and the inner sill is filled with seam sealant.

2. After cutting away the rust (and the spot welded seam) you'll be left with three unconnected panels.

3. Weld the floor to the inner sill. RED

4. Form a new lower inner sill GREEN BIT and weld the top edge to the floor.

5. Finally complete the sill by welding a final piece BLUE BIT to the lower outer sill and to the new lower inner sill GREEN BIT

Sill_repair_diagram.gif


Towards the rear of the sill (behind the door and next to the rear seat) it's a bit more tricky. Not sure what it's like on 2wd cars but the leaf spring mounts restrict access. You will need to weld the "floor section" repair from underneath the car. Here's a figure to show the original sill and how my repair will be done.

Sill_rear_repair_diagram.gif


As I say I'm half way through my repairs at step 4, with one more bit to fit in. I'll put some pics up shortly.
 
Last edited:
The pics of my sill progress so far.

First was to cut and clean back all the rot. This included the entire length of the sill save 20cm at the front, two chassis rails, and part of the wheel arch.

This makes it the biggest hole i've ever cut in car!!! Was a bit worried about the car warping with all the structure cut out but it seems ok...

Front to Rear
imgp1681large.jpg


Rear to front
imgp1683large.jpg


From the inside
imgp1684large.jpg
http://img401.imageshack.us/img401/2360/imgp1684large.jpg

From the outside. I was planning on doing the arch but a temporary repair gave way when I was hammering off rust. I'll do the rusty bit at the top of the arch whilst i'm at it and have the fuel tank out.
imgp1679large.jpg


That's a BIG hole... No point moping about though time to start filling the gaps. So here's the new floor, step 3 in my diagrams.
imgp1687large.jpg


Step 4, the new inner sill welded onto the floor.
imgp1689large.jpg


This is the tricky rear part of the sill, you can see there's not much room on the left to weld the "floor" section in. This part of the sill is like lots of other cars that have a middle web to the sill.
imgp1688large.jpg


You'll notice I have cut big chunks of the chassis out riggers away too, namely the jacking point. Didn't fancy ever having to use it in an emergency in it's present, state so will tidy that up too.

Unfortunatly I don't think i'll get any time to work on it until next week so stay tuned!
 
The way you're going you'll have replaced the entire floor by next week! I have to say, excellent work. Most people would have scrapped a car as badly rusted as that. I wish I could weld but welding machines frighten me for some reason.
 
Fancy a trip through to Glasgow to sort mine out too!!! Only joking

Your diagrams above are spot on and I will certainly be using your method for both my sills.

My car has been off the road since 2000 so the rust isn't as savage as yours but I will still need to cut a dirty big hole.

Cheers

Dave
 
The orange drill, it's an old Black and Decker isn't it? I've got one of those and it's built like a tank! I think they're designed to withstand WW3 :p

It certainly is an old B&D drill. I use it for wire brushing these days. But stop press it's broken!!! A loose connection in the trigger, easily fixed I hope!

Cheers for the encouragement, hopefully those diagrams will be of use to some of you, and for those who can't weld, get a MIG and practice! As soon as your at the stage of needing a wee patch here and there it will pay for itself in no time.
I had a blacksmith fix some bits on my old Lada, and all though his welds were much nicer than mine, he only patched over holes. Doing it on your own you can take your time, cut out all the rust and do a job that will (fingers crossed) last some time.

Anyway, i'm away for the weekend so updates will be next week, I just need to do "step 5" then rebuild the arch which should be fun!...
 
So much for an update "next week"!

It's actually pretty much finished, filled, painted, even finished the fuel tank, just need to reassemble it. These pictures are from when the welding was finished though a couple of weeks ago.

First of all I finshed the final outer edge of the sill (step 5) that was the relatively easy bit. Now it's on to the arch

As I wasn't using a replacement panel and wasn't (don't have the skill to) panel beat my own I was going for a close shape and using filler to finish it. So using the plastic trim as a guiding shape and lots's of templates using cereal boxes I started at the bottom to give me something to build onto.
imgp1691large.jpg


In the past I have lap jointed my repairs but I find that leaves the middle of the joint unprotected and I don't want to have to come back to this again soon, so I butt jointed all this work. Next I put one more piece to fill the rest of the gap.
imgp1694large.jpg


As the arch is double skinned I had to close off the inner skin. Tricky to photograph, but I did it in a couple of small sections.
imgp1700large.jpg


Next I replaced a rotton bit at the top of the sill. That just took one piece of metal folded bashed and bent to shape. Singed the 4x4 graphics a little! :(
Note: you can see how quickly surface rust appears on the 1st bit of the arch repair after only a couple of days.
imgp1698large.jpg


Finally I needed to rebuild the ends of the chassis rails, I did this with slightly thicker metal, and then I welded the jacking point back on. (Will be nice to have the confidence to use this in an emergency without the sill collapsing as it would have before!) As the jacking point isn't structural (The chassis repair is fully welded above it) I only welded it in each corner.
imgp1703large.jpg


WOOO all the welding done. As i'm in no hurry to do that again time to paint it. First of all I took all the surface rust off that had developed over the weeks with a wire brush on the drill. Once it was nice and shiney, out came the Galvafroid, a good zinc primer.
imgp1704large.jpg


imgp1707large.jpg


Since thean I have sealed the welds, slapped on the filler to get the shape, and painted it, just needs reassembled. I'll be sure to take some pics and show you the results. I'm also going to fix one of the front bumper mounts which has long been wanting attention whilst the poor wee car is in in surgery.
 
Congratulations!! Good work, I've been outside this evening looking at my rustbucket of a Sisley and this last post may be the kick in the arse I need to get started!!;):eek:

Thanks again, Luke. (y)

Glad I can be of some help!

Today I have been reassembling. Interior back in, fuel tank and wheel arches fitted. Not too many left over pieces either!!

But no sooner had I done that it was time to jack the front up and remove the front bumper, in preperation for doing that bumper mount. There's also a few rusty bits at the front I may as well tidy up whilst i'm at it.

Before we get to that though, as promised pictures of the finished repair so far. I should of taken some pictures of underneath but it looks largely the same, just all black with nice fresh underseal.

imgp1717large.jpg


It's not perfect, I had couple of areas where the cellulose undercoat was reacting to paint from an old repair. I skimmed the areas with filler to cover over it but rushed it a little and there's a slight lump. The curves arn't spot on either, but i'm not bothered you have to get pretty close to notice. What's more once the trims back on it will be hidden!

A bit of a before and after from the same-ish angle.
imgp1679large.jpg

imgp1719large.jpg


No time to admire the handy work! On to the final stage of the repair. Off with the bumper!!
imgp1727large.jpg


The broken bumper bracket.
imgp1720large.jpg


Other rusty bits that need attention
imgp1725large.jpg

imgp1726large.jpg


An early start to tomorrow and hopefully i'll be on top of it.

Then off for an MOT, though worryingly I could feel a slight knock when I pulled the wheel on the nearside. Strut? ball-joint?.... the fun doesn't end! :D:(
 
Back
Top