I'm sure all of you love your Stilos. You love them so much that you carefully clean every single part of it and take pride in the way it looks and performs. You know you have a nice car in front of your house, but you keep looking at the ugly key each time you aren't there.
Either you are one of the above or just looking to have a functional key and in need for a repair, this is the guide for you.
Yes, you can fix your own key. And while you're at it, why not make it unique in just 10 easy steps?
Materials needed:
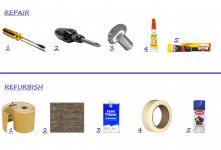
For the repair:
1. Flat Screwdriver - to remove to battery compartment and the FIAT logo
2. Philips screwdriver - to disassemble the key
3. Small screw - to repair the click on the key
4. Super Glue - to add resistance to the inserted screw
5. Moment Universal Glue - or anything not very tight to put the Logo back after you're done so you can remove it easily in case of any later repairs
For the refurbish, in addition to the above:
1. Finest sandpaper - 200 or above, to sand down the plastic cover
2. Rough Cloth - to further finish the sanding and polish the surface of any sharp edges
3. Paint Thinner - to act as a primer on the plastic cover
4. Masking Paper Tape - to mask the parts we don't want to spray
5. Desired Spray Paint -to actually paint everything
Step 1: Battery removal:
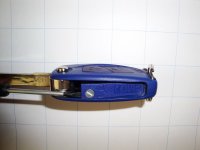
Use a flathead screwdriver to remove the battery and turn the locking bolt to the "unlocked" position. The gently pull out the casing like suggested in the picture below.
Step 2: Badge removal:
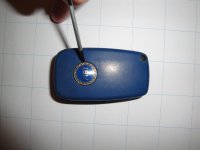
Gently remove the FIAT badge on the side. (mine was superglued on so I ended up damaging the sidewalls a little bit, so that's a risk you'd have to live with it).
Please note I used an even smaller screwdriver, pictures are for demonstration purposes.
Step 3: Casing disassemble:
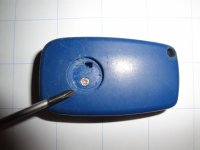
Use a Philips screwdriver and unscrew the bolt that's keeping the key together. As you unscrew you may feel that the plastic parts are becoming undone with it. That's normal, just make sure you try to keep them together until you get the screw out because the spring that moves the key forward when pressing the release button may come off flying.
If they stick together, start pulling it apart from the battery compartment, and you would cause less visible damage to the plastic casing. In any case, DO NOT pull them apart applying pressure on the main board.
Step 4: Components removal:
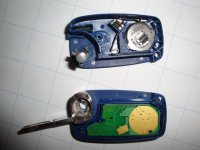
You now have access to the main board, buttons and transponder. Gently remove all of them. The transponder is held by a plastic secure clip that is part of the plastic cover. Use a screw driver and pull it out.
You will notice my battery is still there. I still suggest removing it before you open the key.
Step 5: Buttons removal:
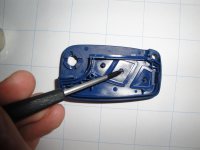
Use a screwdriver to gently push the buttons out from the inside. Preferably, use something plastic that would cause as little damage as possible. If you do it right, you can't mess anything up.
Please also remove the plastic transparent knob that sits on top of the LED in the same way.
Step 6: Cleaning:
Thoroughly clean the plastic bits as good as possible. If you have deep cuts, use the finest sand paper (200) to clear them, as they will cause imperfections to the casing. Then rub it against a rough cloth or something to further remove the imperfections. The general idea is to make the casing as clean and smooth as possible. The color will fade, the casing will look pretty ugly after this process, there's no turning back now.
Step 7: Casing repair:
There may be several things wrong with the key. In my case, the knob wouldn't stand upright, but to the right. This is because of wear and tear. The zone you need to fix is located in the picture below:
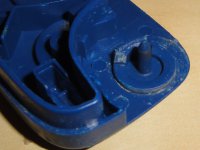
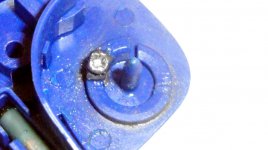
What I did was to cut the worn part to an even block and then inserted a screw in so everything would stand right. I initially used a solid plastic bar but the job was meticulous and it broke 1 week later.
You may need to take some of the edges off the screw to make it fit. This is the hardest part by far. The length of the screw is about 3 mm. I made the hole in the casing using a heated needle, then gently inserted it while looking at the back end to make sure it doesn't pop out. If you see it trying to but stop in time, no damage is done. Remove the screw, cut it, put it back. After all is complete, put some superglue on the edges of the screw.
The final result:
Step 8: Preparing for the paint job:
Put some duck tape where the buttons were. Make sure it is put right, because a lot of layers will cause the part to shrink and cause problems on the assembly.
Apply paint thinner on the plastic covers. This is a very important process, because it acts like a primer. We cannot use primer because we would make the paint too thick and ruin everything. Let the paint thinner dry. Afterward, gently spray the plastic bits.
If you are using metallic paint, you will notice that the job is uneven. No panic. Use more layers. I used 5. In any case to not smudge the paint all over the place. You need several good layers to get it to look good.
The battery cover should be done in the same way, but with less layers of paint. Remember to mask the important parts of it to keep them away from the paint.
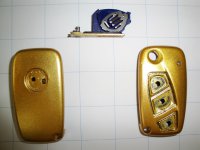
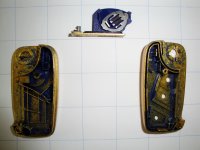
Paint spray dries partially in about half an hour. After all the layers, remove the duck tape from where the buttons were. If you see that the paint is uneven, apply another layer with it removed. Afterwards, use cotton buds to wipe out the excess paint. Final results are the following:
Step 9: Assembly:
After the parts gave completely dried (1 day the least), it's time to put them together. Reinsert the buttons, and all the accessories as they came out. This is all pretty straight forward. Only place where one can encounter problems is the key release mechanism.
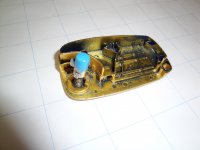
What you need to do is to put the spring in the release bolt and then put the bolt on the main board with the key on top as below:
This picture contains only the bolt and spring just to see where you need to put them:
Now, after this is done, gently pull the spring in the direction of the arrow and in the upright position, as shown in the below picture:
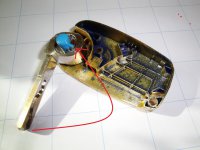
After this is complete, you need to keep it pressed with your finger while putting the casing together. Please make sure everything is in place before doing so.
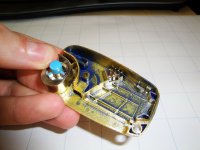
After this is done, tighten the screw and stick the Fiat badge on. Don't use Super Glue, you may need to open it again. Use Moment Universal, the type of glue used to stick the sole of shoes. This is elastic and will not cause damage if you want to open it. Alternately, just use silicone.
Step 10: Enjoy your results.
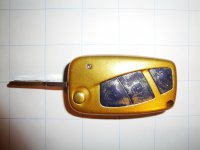
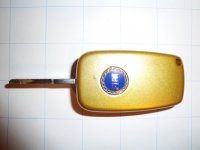
Post your results and comments below.
Either you are one of the above or just looking to have a functional key and in need for a repair, this is the guide for you.
Yes, you can fix your own key. And while you're at it, why not make it unique in just 10 easy steps?
Materials needed:
For the repair:
1. Flat Screwdriver - to remove to battery compartment and the FIAT logo
2. Philips screwdriver - to disassemble the key
3. Small screw - to repair the click on the key
4. Super Glue - to add resistance to the inserted screw
5. Moment Universal Glue - or anything not very tight to put the Logo back after you're done so you can remove it easily in case of any later repairs
For the refurbish, in addition to the above:
1. Finest sandpaper - 200 or above, to sand down the plastic cover
2. Rough Cloth - to further finish the sanding and polish the surface of any sharp edges
3. Paint Thinner - to act as a primer on the plastic cover
4. Masking Paper Tape - to mask the parts we don't want to spray
5. Desired Spray Paint -to actually paint everything

Step 1: Battery removal:
Use a flathead screwdriver to remove the battery and turn the locking bolt to the "unlocked" position. The gently pull out the casing like suggested in the picture below.

Step 2: Badge removal:
Gently remove the FIAT badge on the side. (mine was superglued on so I ended up damaging the sidewalls a little bit, so that's a risk you'd have to live with it).
Please note I used an even smaller screwdriver, pictures are for demonstration purposes.

Step 3: Casing disassemble:
Use a Philips screwdriver and unscrew the bolt that's keeping the key together. As you unscrew you may feel that the plastic parts are becoming undone with it. That's normal, just make sure you try to keep them together until you get the screw out because the spring that moves the key forward when pressing the release button may come off flying.
If they stick together, start pulling it apart from the battery compartment, and you would cause less visible damage to the plastic casing. In any case, DO NOT pull them apart applying pressure on the main board.

Step 4: Components removal:
You now have access to the main board, buttons and transponder. Gently remove all of them. The transponder is held by a plastic secure clip that is part of the plastic cover. Use a screw driver and pull it out.
You will notice my battery is still there. I still suggest removing it before you open the key.

Step 5: Buttons removal:
Use a screwdriver to gently push the buttons out from the inside. Preferably, use something plastic that would cause as little damage as possible. If you do it right, you can't mess anything up.
Please also remove the plastic transparent knob that sits on top of the LED in the same way.

Step 6: Cleaning:
Thoroughly clean the plastic bits as good as possible. If you have deep cuts, use the finest sand paper (200) to clear them, as they will cause imperfections to the casing. Then rub it against a rough cloth or something to further remove the imperfections. The general idea is to make the casing as clean and smooth as possible. The color will fade, the casing will look pretty ugly after this process, there's no turning back now.
Step 7: Casing repair:
There may be several things wrong with the key. In my case, the knob wouldn't stand upright, but to the right. This is because of wear and tear. The zone you need to fix is located in the picture below:

What I did was to cut the worn part to an even block and then inserted a screw in so everything would stand right. I initially used a solid plastic bar but the job was meticulous and it broke 1 week later.
You may need to take some of the edges off the screw to make it fit. This is the hardest part by far. The length of the screw is about 3 mm. I made the hole in the casing using a heated needle, then gently inserted it while looking at the back end to make sure it doesn't pop out. If you see it trying to but stop in time, no damage is done. Remove the screw, cut it, put it back. After all is complete, put some superglue on the edges of the screw.
The final result:

Step 8: Preparing for the paint job:
Put some duck tape where the buttons were. Make sure it is put right, because a lot of layers will cause the part to shrink and cause problems on the assembly.
Apply paint thinner on the plastic covers. This is a very important process, because it acts like a primer. We cannot use primer because we would make the paint too thick and ruin everything. Let the paint thinner dry. Afterward, gently spray the plastic bits.
If you are using metallic paint, you will notice that the job is uneven. No panic. Use more layers. I used 5. In any case to not smudge the paint all over the place. You need several good layers to get it to look good.
The battery cover should be done in the same way, but with less layers of paint. Remember to mask the important parts of it to keep them away from the paint.
Paint spray dries partially in about half an hour. After all the layers, remove the duck tape from where the buttons were. If you see that the paint is uneven, apply another layer with it removed. Afterwards, use cotton buds to wipe out the excess paint. Final results are the following:


Step 9: Assembly:
After the parts gave completely dried (1 day the least), it's time to put them together. Reinsert the buttons, and all the accessories as they came out. This is all pretty straight forward. Only place where one can encounter problems is the key release mechanism.
What you need to do is to put the spring in the release bolt and then put the bolt on the main board with the key on top as below:
This picture contains only the bolt and spring just to see where you need to put them:

Now, after this is done, gently pull the spring in the direction of the arrow and in the upright position, as shown in the below picture:

After this is complete, you need to keep it pressed with your finger while putting the casing together. Please make sure everything is in place before doing so.

After this is done, tighten the screw and stick the Fiat badge on. Don't use Super Glue, you may need to open it again. Use Moment Universal, the type of glue used to stick the sole of shoes. This is elastic and will not cause damage if you want to open it. Alternately, just use silicone.
Step 10: Enjoy your results.


Post your results and comments below.

