Technical Punto Mk2b headlamp replacement confusion.

Currently reading:
Technical Punto Mk2b headlamp replacement confusion.

Ajay123

New member
Joined
Oct 3, 2019
Messages
9
Points
2
Location
West London
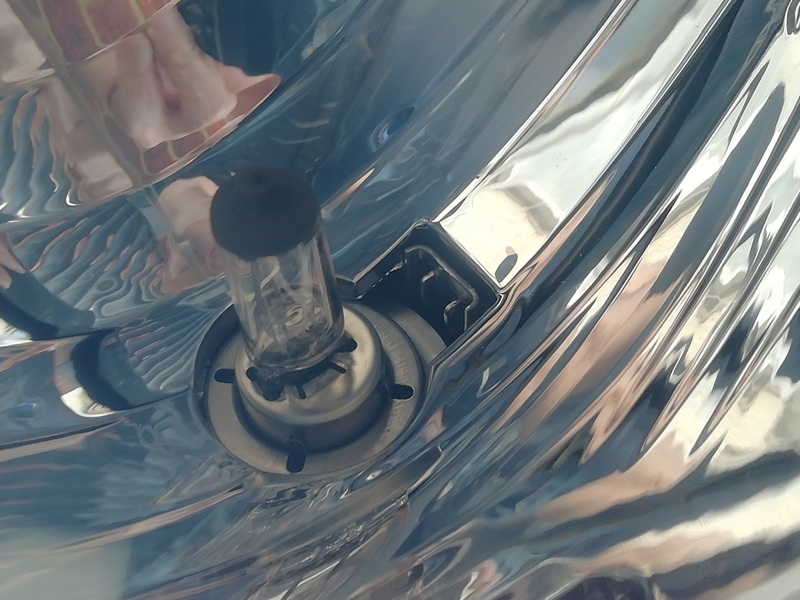
My Fiat Punto 2004 left hand headlight is discoloured an I'm torn between buying a new one or clean/polish/seal the existing one again.

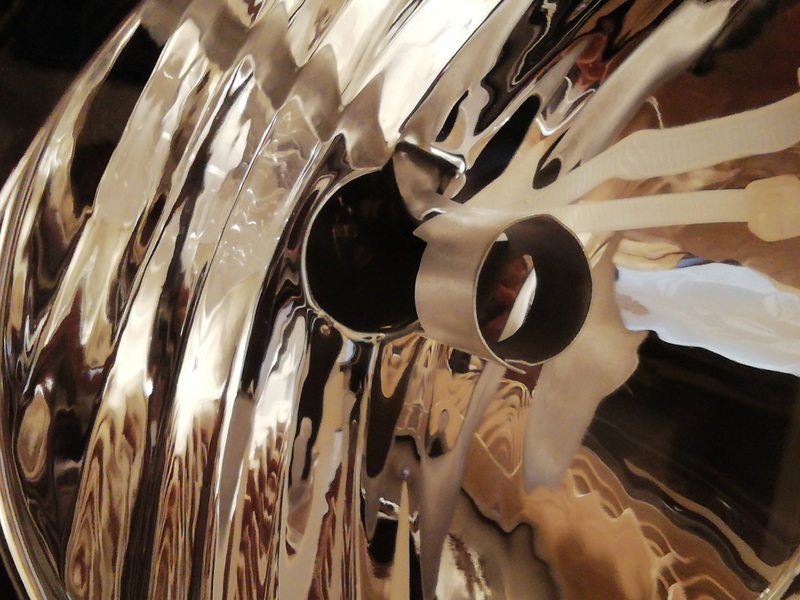
I have looked at new ones and they have a grey metal cylinder mounted in the headlamp unit which surrounds the end of the full beam bulb.

On one site this is referred to as an 'obscurer' - something I can't find referenced anywhere.

Both my existing headlamps do not have this.


Questions.

1. Are there different versions of the headlamp and I should try and find one without this obscurer?

2. Get one with this obscurer and remove it from the fitting?
3. Get a new one and leave the obscurer in place? (Will the light pattern behave differently from the side without)

4. Are there different versions of the bulbs depending on whether you have this obscurer or not.
5. Or do I have to replace both sides with the version with an obscurer - expensive option.


I don't want to affect the beam alignment by getting the wrong headlamp / doing the wrong thing.


Thanks for any guidance.

John.
 
Hmm, never noticed that. Do you have a photo of the difference? It may be that the cloudiness of your lenses or the motorised beam aim position thingy is making the internals look different to a new unit.

Personally, I'd first polish them using a restoration kit. Pretty cheap. Autoglym offers a great headlight restoration kit for around £20 on Amazon, Halfords etc. Beats having to pull the bumper off and replace the headlights which is long, pricy and needs realignment and all.
 
This post contains affiliate links which may earn a commission at no additional cost to you.
Hmm, never noticed that. Do you have a photo of the difference? It may be that the cloudiness of your lenses or the motorised beam aim position thingy is making the internals look different to a new unit.

Personally, I'd first polish them using a restoration kit. Pretty cheap. Autoglym offers a great headlight restoration kit for around £20 on Amazon, Halfords etc. Beats having to pull the bumper off and replace the headlights which is long, pricy and needs realignment and all.

The first photo shows the existing headlamp with the bulb in situ (no obscurer). You can see to the right and above the bulb there is a small metal bracket with two prongs.

The second photo shows a new headlamp with a matt grey metallic tube attached to this bracket and facing forward into the headlamp. If the bulb were in place, the tip would be contained within the tube.


I bit the bullet and bought a replacement only because a 'well known' online car parts supplier were selling some (Nearside only which is the one I wanted) at a VERY reduced price for some reason (perhaps end of line)

However, when it arrived the box had been opened and the headlamp was broken - one of the mounting lugs was broken off - so I will be returning for credit.

I had previously done the 'toothpaste' fix and it didn't last. However, I decided the broken replacement was a sign that the universe did not want me to replace the headlamp.
On closely examining the lens it did not actually seem too bad so I decided to try the Turtle Wax 2-in-1 restorer/sealer. It did a much better job . I wouldn't say it was good as new but the lens is now clear with no signs of yellowing.

The car is due its MOT in a month so will have to see what transpires. I think it is good enough to pass.

If I do end up having to replace - I have now gotten pretty quick at removing the headlamp by only unbolting half the bumper and leaving it in situ.

The top photo is actually the original headlamp back on the car. It doesn't do it justice because of the the refelction of my shirt in it giving it a blue tinge. Looks much better in reality.

I also contacted Valeo the makers of the original headlamps as their catalog lists headlamp with obturator and headlamp without obturator for my vehicle model - another weird word for this metal cylinder.
Their reply says
"[FONT=&quot]The "obturator" or"[/FONT][FONT=&quot] bulb" shield is provided to displace a peripheral region around the bulb in order to prevent glare from exiting the head lamp into oncoming traffic (it avoids dazzling oncoming drivers with direct direct light/beam rays). [/FONT][FONT=&quot] [/FONT]
[FONT=&quot]In some cases it also satisfies certain photometric regulations. These regulations apply to motor vehicle headlamps emitting a symmetrical passing beam and/or[/FONT]
driving beam, which may incorporate lenses of glass or plastic material and which are equipped with[FONT=&quot] [/FONT]replaceable filament lamps[FONT=&quot].[/FONT]
[FONT=&quot]The obturator also[/FONT][FONT=&quot] reduces temperature on the lens, acting as a barrier to heat and absorbing it.[/FONT]
[FONT=&quot] [/FONT]
[FONT=&quot]If a headlamp for your vehicle has been supplied at factory level with the obturator included, a like for like replacement will be necessary."[/FONT][FONT=&quot][/FONT]


IMG_WITHOUT_OBSCURER.jpg
IMG_WITH_OBSCURER.jpg
 
https://www.ebay.co.uk/itm/173899331643?fits=Car+Make%3AFiat&epid=249156192&hash=item287d35383b:g:g04AAOSwFOlduMGE

Left hand drive headlight

https://www.varaosahaku.fi/fi-en/Se...nt-details/Head-light/Left-Front/ID-32612737/

Parts are expensive in Finland so if I can get one where for 60 Euro it must be possible to find the correct one in the UK?

Thank you for the links. As you can see from my other post I have now gone for the lens restoration option as the headlamp was still physically in a good state.
 
This post contains affiliate links which may earn a commission at no additional cost to you.
I had previously done the 'toothpaste' fix and it didn't last

Try 'T cut' rather than toothpaste.
Local garage suggested t-cut, so spent a while with the stuff, did several goes at it, and surprised how much difference it makes. Helps if you have a buffing machine, though to be honest I just used a cordless drill with a lambswool buffing pad on it. comes up a real treat, if you do it properly.
Use the 'real T-cut though, other brands don't seem to do the job properly??

Also used the same technique on my multipla's front door side windows by the mirrors which are polycarbonate, and went a bit hazed. brought them back to life as well.
 
For a pleasant restoration, you’d ideally want to sand the oxidised plastic and polish and seal it to a crystal clear finish. Plenty of guides and videos available. Below is a great video on how to restore a clouded lens to pretty much new. All the best!

https://youtu.be/rHfOo8Nc7bM
 
I had a 1.3 diesel late 2004 (December registered) that did not have the shield around the bulbs and I had an earlier 1.9 diesel HGT (not sure exactly when registered but an 04 so between March and September 2004) which did have the shield around the bulb.

I have no idea why it was removed on the later car, compared to the earlier one, but what I can say is the headlights where a lot lot better without the shield
 
Back
Top