Technical performing cambelt change.

Currently reading:
Technical performing cambelt change.

Joined
Feb 10, 2019
Messages
227
Points
136
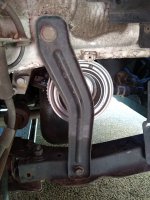
I am tackling a cambelt and water pump swap on my panda 1.2. There is a support bar in front of the crankshaft pulley and I am wondering if it is neccessary or wise to romove it. I am concerned as it provides support between the sub frame and body of the car. Advice appreciated thank you.
 

Attachments

  • IMG_20210609_115220928.jpg
    IMG_20210609_115220928.jpg
    3.8 MB · Views: 156
I shouldn't have thought it would be a problem, if you're that concerned, pop a jack under it to pick up the weight.

The subframe will have much more substantial fixings.
 
Yup, that bar needs to come off. The Haynes manual most perfunctorily simply says "undo the bolts and remove the support bar" No mention of support being needed for anything. Of course you'll need a jack (with protection for the head - I just use a small sheet of thick ply) under the sump when you undo the engine mount or a "posh" engine support bar. I actually prefer the jack method as you need to raise and lower the engine to get access to the bolts and this is easier and quicker with a trolley jack. Be careful not to strain anything when doing this. There is a very recent post where someone may have sheared an exhaust manifold stud by jacking the engine up too high?

PS. If you don't mind please do keep us informed as to how it all goes?
 
Last edited:
Yup, that bar needs to come off. The Haynes manual most perfunctorily simply says "undo the bolts and remove the support bar" No mention of support being needed for anything. Of course you'll need a jack (with protection for the head - I just use a small sheet of thick ply) under the sump when you undo the engine mount or a "posh" engine support bar. I actually prefer the jack method as you need to raise and lower the engine to get access to the bolts and this is easier and quicker with a trolley jack. Be careful not to strain anything when doing this. There is a very recent post where someone may have sheared an exhaust manifold stud by jacking the engine up too high?

PS. If you don't mind please do keep us informed as to how it all goes?

ok I might take some pics as well. I just got the bottom plastic cover off and fitted the crankshaft locking tool. Not sure how to get the top plastic off but having a break and a coffee now. Taking my time with this job, no real hurry to get it done.
 
Hi.
You shouldn't have any issues with the job. I've done this twice on these engines. The subframe won't fall off and I actually don't see what this strap is actually doing. I didn't use crank or camshaft locking tools but did mark both very accurately.
The water pump is fiddly and the cement must be removed carefully and the block face thoroughly cleaned. I used a good quality sealer for reassembly. Tensioning the belt too can be a little fiddly and use a new locking nut but NOT a nylock type as they are for positions that do not get hot. A little locktite will do on the threads if you cannot obtain a new nut once tensioned turn the engine over two complete revolutions of the crank to check the tension marks and that timing is correct.
On assembly remember there is a coolant bleed screw on the radiator.
You will need to re learn the relative positions between cam and crank, called phonic wheel learning, you need MES or AlfaObd to do this and don't be put off revving the engine to 5000 rpm.
Sorry if you know the procedure anyway. Might be use for others.

PS fit a new tensioner as well as the water pump. My advice is to use a genuine pump, tensioner and belt although my first choice for belts are Gates.
 
Last edited:
ok I might take some pics as well. I just got the bottom plastic cover off and fitted the crankshaft locking tool. Not sure how to get the top plastic off but having a break and a coffee now. Taking my time with this job, no real hurry to get it done.

Have you got the engine mount and it's mounting block dismantled from the front of the engine yet? (of which the bottom 2 bolts are quite hard to access). The top belt cover comes off real easy with them out of the way - there is a bolt "hiding" down a hole on the front of the cover and you often don't know it's there because they put a bar coded sticker over the hole! nice wee joke Fiat!

Have you read Andy Monty's guide? It's the definitive work on here about doing 8 valve cam belt changes. He's even done an add on dealing with how to handle the VVT pulley on the 69Hp engines (and my boy's 1.4 8 valve) Here's a link: https://www.fiatforum.com/grande-punto-guides/237966-1-2-8v-evo-2-engine-cam-belt-replacement.html

Yes do take your time, makes it all so much more enjoyable doesn't it!
Thanks Jock. I found the bolt behind the sticker:rolleyes: and that the plastic is held

by the engine mount. I have stopped work till tomorrow now. I don't want to risk having to leave the engine on the hydraulic jack overnight. So tomorrow it's engine mount off, mark up camshaft pulley, remove tensioner and cambelt, swap water pump. Then refit everything else...

Thanks for the link.
 
PS to the above. This thing about a "Phonic Wheel Relearn" really quite frightened me when I did my first one as I didn't really know what it was or how to do it.

It only applies to engines which have a crankshaft and camshaft sensor - so that's effectively most of the cars, with 8 valve FIRE engines currently running around. Our old 1992 999cc Panda Parade didn't have the cam sensor so didn't require this procedure but our 2010 Panda 1.2 (60Hp) and my boy's 2012 1.4 Punto (with VVT) both have the sensors.

Because I didn't understand what this was all about, but knew that I needed Multiecuscan (MES) to do it, I bought a licensed copy from Gendan and I've never regretted it.

On the other hand, being a retired motor mechanic (definitely old school) I had a very good understanding of what cam timing is all about and many related aspects - I've built up a small number of high performance engines where accurate cam timing was achieved by the use of offset keys. I've always been a keen advocate of letting "sleeping dogs" lie, so I wondered if you really need to undo the cam sprocket securing bolt. I did a lot of research and reading up on what it's all about and then related this to the older engines I'd worked on. Older engines commonly have both the crankshaft and camshaft sprockets keyed or doweled to their shafts so timing up is very simple, just line the marks up and fit the belt (or chain). The timing will be roughly right but checking if it's spot on is difficult and trying to adjust to get it spot on is even more difficult (and probably of minimal benefit to these older engines)

Now a days though, super accurate cam timing (and ignition) is needed to give minimal emissions and good fuel consumption (other "stuff" too) So the manufacturers make their engines so this cam/crank phasing (timing) can be set very accurately. They achieve this on our FIRE engines by omitting the cam sprocket dowel/key which allows the cam sprocket to rotate freely on the end of the camshaft once it's retaining bolt is slackened. This allows the crankshaft and camshaft to be locked in perfect relation to one another using the locking tools and the belt mounted on the sprockets and tensioned WITH THE CAM SPROCKET BOLT STILL SLACK (by the way it only needs to be half a turn slack at most - if the sprocket can turn freely on the end of the camshaft that'll do nicely.) When you now tighten the cam sprocket bolt this locks cam and crank in their correct timed positions in relation to each other. (By the way, on VVT engines this locking bolt is behind the blanking plug on the front face of the pulley which is full of oil so a nice big rag is needed when you remove the plug!)

What I was thinking was "That cam bolt is reputed to be very tight and anyway I'd really rather let this "dog" lie if possible. Surely, as long as you buy a quality product, the cam belts are microscopically accurately made? so, as long as you refit the new belt in exactly the same relationship as the old one all will be well? So I set out to explore this. I bought the timing tools and set the engine up with the crank locking tool installed then tried the cam locking tool and it slid perfectly into place. This confirms that the timing is correct (which didn't surprise me as I'm about 95% certain it was it's first change - overdue at some 60.000 miles and around 8 years !).

Then I tippex marked the old belt and sprockets before removing it. Transferred the marks, very carefully, to the new belt and fitted it to the engine, removed the timing tools and tensioned the tensioner. Turned the engine through two revs very slowly and carefully. Lined up and installed the crank locking tool and tried the cam locking tool, It slid into place as nice as you please thus confirming the timing to be correct. I repeated the exercise on my boy's Punto 1,4 (with VVT sprocket. my Panda has a solid sprocket) and the outcome was the same. The Punto was much lower mileage, only 40 something thousand so definitely it's first change (the relevance of that being that with both cars the timing was last set up at the factory, so surely correct.) Now I know this may be controversial, but, the conclusion I reached as a result is that, as long as the timing is correct before you start, you do not need to slacken the cam sprocket bolt. Of course you must buy/borrow the tools to check this but if you are going to keep the car long term, as we do, on subsequent belt changes you can do the change using tippex marks alone confident your timing will be correct (makes it much quicker as you don't need to remove the cam cover). If the cam timing tool can't be inserted after locking up the crank then you will have to slacken the cam sprocket bolt and do the while bit with the timing tools.

So what's all this about Phonic Wheels? I hear you muttering. The phonic wheel in question here is the segmented pulley on the crankshaft which the crank sensor uses to monitor crankshaft angular displacement and send it's signals to the ECU. The cam sensor is also sending a signal to this ECU and the ECU knows that it should recieve a signal from the cam at a certain angular displacement of the crankshaft. It uses these signals to calculate which plugs to fire and exactly when to fire them. If the cam sprocket bolt has been tightened when the camshaft is not exactly in the right place as dictated by the timing tools then the ECU will receive a signal from the cam sensor at a crankshaft angle it's not expecting and, after a wee while, it'll light up the check engine light and post a Diagnostic Trouble Code (DTC) which you can read out with your MES. Unfortunately the ECU often doesn't recognize something is amiss until you are bowling along at a good speed - dual carriageway/motorway - so you don't relate it to a cam timing problem and when you interrogate for the code people on here have reported it's not unusual to find it comes up as a miss fire code which has, in the past, sent people off on an expensive trail replacing HT leads, coil packs, spark plugs etc without getting rid of the code. The difference in angle only needs to be very small and I have a bit of a theory that simply the action of slackening that sprocket bolt and retightening it can introduce enough angular displacement between the cam sprocket and the camshaft itself to "upset" the ECU. The answer of course is to perform a Phonic Wheel Relearn and MES leads you by the nose through the process. Neither of our cars has flashed up a code or needed reset despite not slackening the cam sprocket bolt. However it's very useful to be aware that if you've recently done a cam belt and shortly afterwards, maybe after some running at sustained higher engine rpm, the CEL lights up it's an odds on bet you need to do a phonic wheel relearn - especially if the cam sprocket bolt was slackened and retightened during the process.

Having said all that, I'm in the fortunate position of having quite an in depth understanding of what's going on with all this. If you are unsure you are much much safer to simply follow the manufacturer's instructions and use the timing tools appropriately.

I'm now getting a bit "lost" in my own confused thoughts so I'm going to stop here - but I'd love for others to comment and perhaps tear me, and my ideas, to pieces. However I will say in my defence that all the small garages - except one - that I know do these belts by the tippex method and report never having CELs lit or having to do relearns.
 
Last edited:
Thanks Jock


Very interesting and thank you for taking the time to write such very informative and lengthy piece. Tippex is more useful than I ever thought.
 
Hi.
I've read through Jocks explanation of the phonic wheel relearn.
Many engines now don't have a woodruff key to align the camshaft and have a conical tapered end that grips very tightly onto the camshaft sprocket when the through bolt is torqued up.
We know that you mustn't try and turn the camshaft with a spanner as that can cause all sorts of issues and ideally it should be locked in place with a simple home made locking tool on the sprocket. The thing though is if you do undo the through bolt and the cam position is then very slightly out there is no way Phonic Wheel Learning will compensate for a mechanical error. On the two I did neither required the Phonic wheel Learning, both were fitted with water pump, tensioner and and a Gates belt, neither had the centre bolt touched.
This was also the case on the Rover KV6 unit that required the special tools, those using the special tools reported many issues after completing the job even those that were trained engineers and most of them used the old tippex method and had no issues.
To me if the manufacturer sets them up properly in the factory leave things alone that can alter settings. Accurate marking is essential and make sure nothing can rotate when fitting the belt, the two slow crankshaft rotations as a final check is really important.
 
I've always been a keen advocate of letting "sleeping dogs" lie,

Thanks,

An interesting read that in my head seems perfectly reasonable in terms of its mechanical logic.

I would have thought that leaving the sprocket/cam connection alone makes perfect sense since I find it difficult to believe that the cam/crank locking tools can be manufactured to any closer tolerance than what can be achieved by the factory set-up. The unknown of course is what or who may have messed with things prior to your ownership if second-hand.

The belts indeed would be from "the same mould" (not literally of course) but will be essentially identical bar any wear of the surfaces and (negligible) stretch or creep and I find it unlikely to think that you could make any mechanical adjustment to take this out, I have a dim recollection of vernier adjusters being available on some (tuning) pulleys/sprockets - perhaps you can comment here?

Anyway thanks for sharing an in-depth view.
 
Last edited:
Just having a tea break:) . The job is going well. New pump fitted, new coolant going in next. Then the new cambelt.Take time to do it right :confused:.
Sorry to play devils advocate, but "new pump fitted, new coolant going in next"? Personally I like to give the sealant a minimum of 12 hours (overnight usually) to cure before putting coolant in. Anyone else got an opinion?
 
I have a dim recollection of vernier adjusters being available on some (tuning) pulleys/sprockets - perhaps you can comment here?

Like this? https://www.burtonpower.com/vernier-set-simplex-chain-x-flow-not-fiesta-fp318k.html

I used offset woodruff keys when I built my "fast road" Cooper S back in the '60s. Like this: https://www.moss-europe.co.uk/offset-keys.html

If anyone wants to see what's involved google "Dialing in a cam", or, as our friends over the "pond" call it "Degreeing a cam"
 
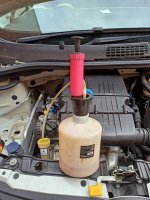
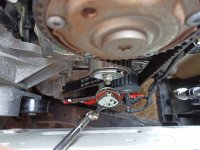
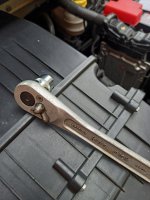
OK. Job finished I hope :rolleyes:. Engine started no problems. It can have a test drive tomorrow. I used a vacuum pump to remove the coolant. A lot easier than draining into a bucket. And a "dentist" mirror to see the tensioner setting easily. The slim ratchet tool was handy for removing the mounting bolts in the engine bracket (with a bit of extra leverage)
 

Attachments

  • IMG20210610133627.jpg
    IMG20210610133627.jpg
    3.9 MB · Views: 54
  • IMG20210610153238.jpg
    IMG20210610153238.jpg
    3.2 MB · Views: 65
  • IMG20210610123903.jpg
    IMG20210610123903.jpg
    3.6 MB · Views: 53
Back
Top