Panda (Classic) Pandamonium

Currently reading:
Panda (Classic) Pandamonium

Fantasia

Oh crap!

I've just realised.

I've cleaned some bits up, fitted a couple of replacement parts and patched the sill. :confused:

That's a full restoration in Channel Five's book. I'd better weld the sunroofs up and paint the car a different colour to add value to it. ;)
 
Re: Fantasia

Oh crap!

I've just realised.

I've cleaned some bits up, fitted a couple of replacement parts and patched the sill. :confused:

That's a full restoration in Channel Five's book. I'd better weld the sunroofs up and paint the car a different colour to add value to it. ;)

No no, you haven't got this at all. You have completely failed to reverse into a randomly placed engine to destroy the new paint/bodywork, nor have you thrown a windscreen onto the ground in case it thinks about cutting you, randomly fallen out with everyone in sight, or restored the most unpopular car in the range to achieve a top spec model valuation. Wrong wrong wrong!! :devil:
 
Fantasia

I couldn't find a Panda so here's a Polar Bear instead...

polar-bear-face-palm-thumbnail.jpg


...the wrong brake fluid. Me and my performance car aspirations. ;)
 
Yes and you really don't take enough pride in your painstaking application of filler to the entire vehicle prior to your horrid over glossy inappropriate respray:yuck:..and in the case of a Panda you really need to apply some Sisley badges regardless of your cars original spec as that's the one people are paying top dollar for.
 
Last edited:
Low viscosity Dot 4 stuff basically the equivalent to 4.5 for middle of the range performance stuff.

Anyway. I can't paint the last green Fantasia any other colour. It would be like giving the Mona Lisa a spray tan.
 
Fantasia

A couple of M.O.T jobs remain. Firstly the interior needs putting back together where I took it apart to weld the sills.

Second the horn works to M.O.T standards but it's a bit; "eeeeeeeeppp!"

Knowing how small brightly coloured Fiats are completely invisible to other road users I need a decent horn as a basic matter of survival. This is why when I fitted the driving lamps last year I replaced the standard Road Runner "Meep-meep" horn with a trumpeted Fiat Coupe' "BEEEEEEP!". This has now lost it's edge and sounds as pathetic as the original Road Runner one.

One of the problems all Panda have are the earth hedgehogs getting a layer of cack on them. I remedied this last year when I fitted the new horn and driving lamps but neglected the dash earth near the brake master.

V83PliCn.jpg


So before I get take the front end of the car apart I took the dash earth terminal out...

FH9swy6T.jpg


...cleaned it...

D6o3BQ9s.jpg


...put it back on and tested it. "Eeeeeeeepppp!"

Bugger! :confused:

Time for my usual approach to problem solving...

YM2B3yXz.jpg


...there's no such thing as overkill.

I'll get it mounted properly and loomed in place when the weather decides it wants to be November and not April. ;)
 
I'd been up a couple of hours and was just about to start work on the Panda when I was asked...

"Are you off out to fix the fence?"

...stupid weather. :bang:

Nice to be informed of these things as well.
 
Fantasia

The mystery of the "Eeeeep!" is solved. Even though I fitted the Fiat Coupe' horn trumpet down it still managed to somehow fill with water. My guess would be a combination of puddle splash and condensation. This is probably why the horns are fitted under the bonnet of the Coupe' as they're not British Summer resistant.

So back to the task at hand. I wired up the relay for the air horn and decided a more stealth location would be appropriate. After all the last thing I want is for someone to rip the horns out if I leave the bonnet up for more than ten minutes.

So first off I mounted the pump in the original horn recess on the front valance...

p4VmB2en.jpg


...and the trumpets next to the bumper mount...

TKIMgfd3.jpg


...the only give away are the new flat headed bolts on the inner wing...

KoOuWgJU.jpg


...a dab of green paint when I do the rest of the car will solve that. :)

I'm looking forward to my next encounter with a Womling as my nephew scared himself testing it for me.
 
http://www.ppcmag.co.uk/ppc-p999-challenge.html

July 7th 2013 at Santa Pod. Place you bets now; will my Panda blow up or fall apart? ;)

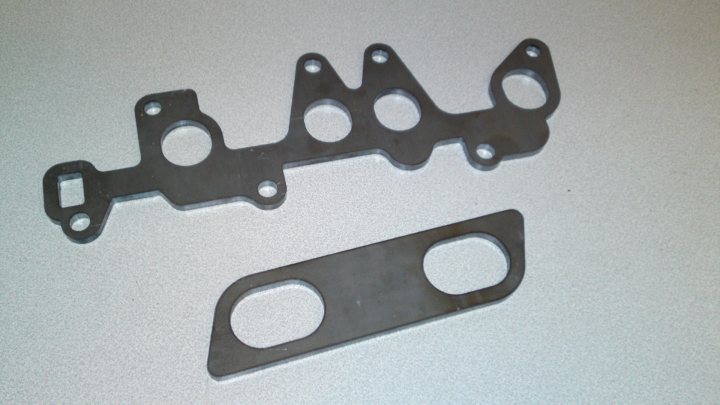
A very big thank you to Optima Stainless Steel today for the Laser cut base plates for my inlet manifold. :)

SIO0Tmni.jpg


A quick spine plate to make the two plates into a mold.

VbDs8e2X.jpg


But first I had to visit Kev' (van of death) to borrow his pillar drill...

GMxRTSH0.jpg


...because the carb' plate didn't have mounting holes (Rob in using right tool for the job shocker). ;)

0brT8R65.jpg


xhFD4ydj.jpg


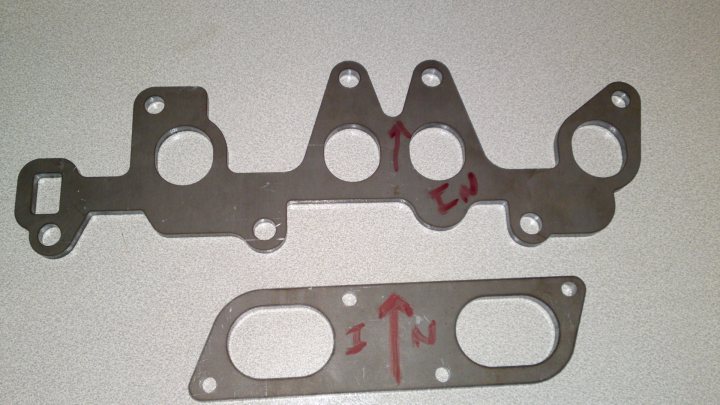
With the base plates ready I tack welded the spine in place.

ikpD9Z0l.jpg


The eagle eyed of you will have noticed the spine isn't straight this is because the carb's sit at an angle on the bike and so the float chambers fill properly they need to sit at an angle in the car as well. I used to race a TDM powered streetfighter in the Straightliner series...

euvJWWJv.jpg


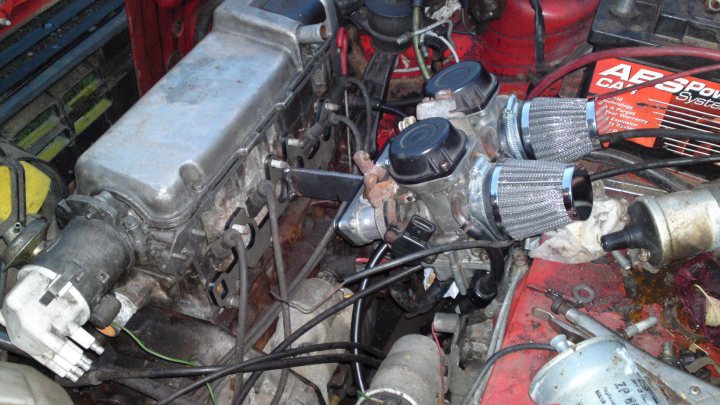
...this is one of the reasons I chose the TDM carb's for this project as unlike a quartet of carb's the larger twin carb's should make the engine less highly strung. I'll sacrifice top end but should have plenty or torque throughout the rev' range (if the engine works at all that is). Also the 3LD carb's have a manual choke making them better suited for normal road use (I'll have to use the car once a fortnight or so to keep the brakes and things healthy). As a bonus most TDM's are either being exported or taken off the road now the newer models use fuel injection and there is a plethora of competition from most manufacturers so carb's and other parts are cheap (a lot cheaper than the quartet carb's now breakers know the kit car boys want them). At the time I was the only one using the TDM in anything other than Paris Dakar pretensions (this was way before Supermoto took off).

So with the spine in place it's just a matter of cutting and shaping the pipes to make two "Y" pieces to eventually weld in place.

zsN2AJYq.jpg


Before I even contemplate doing any of that I need to make sure my measurements are all correct and the carb's fit the newly drilled and spot welded plate...

IJSTPjm5.jpg


..and trial fit the carb's and manifold mold to the engine.

Nx0B5Qq7.jpg


Removing the heater matrix wasn't just for the weight saving you'd think I had a plan...


...but know better. ;)

All that was left to do today was tack weld the bolts in place...

w6APLuwp.jpg


...and the manifold mold is ready.

I am really looking forward to my next day off now. :)
 
http://www.ppcmag.co.uk/ppc-p999-challenge.html

July 7th 2013 at Santa Pod. Place you bets now; will my Panda blow up or fall apart? ;)

:)

Are those the only 2 options??!!

How about a sweep stake for Pinky funds - nearest the terminal (and I use the word advisedly!!) speed wins? (y)

We could also bet on what makes a mess first - your Panda or the driver......... :D

BTW I'm going for 88mph, and your Panda losing the coolant just over the line ;)
 
I couldn't wait for my next day off. Today is my transition day from day to night shift so as I was up and about I thought I'd put my time to good use.

z3xXzpBV.jpg


Used a bit of scrap wood as a template...

iYkz2cfH.jpg


...and cut two of the pieces of pipe to make the "Y".

Z71wJcEe.jpg


Once tacked into place I filled the gaps with small plates and weld and test fitted it to the under side of the base plate to ensure it hadn't distorted.

Trimmed the top edge to meet the carb' plate and welded the "Y" piece in place...

tJNqdera.jpg


...not my best work to date but I'm going for function rather than form. ;)
 

Similar threads

Back
Top