IMG_0692.JPG

Punto (Mk2/2b) my punto mk2b with a few mods :P

Introduction

currently the mods i have are:
-sprayed black door locks
-powerflow exhaust
-rear tinted windows
-blue break Calipers and drums

Modded since posted thread:
-debadge front
-paint boot emblem to union jack
-New Alloys
-air induction kit *k&n*
-Black center console
-lowering springs *FK AK Street Coilovers*
-m3 wing mirrors
-clarion speakers front, back and tweeters
-Parrot asteroid Head unit

Removed from car since posted thread:
-HID conversion kit
-10" sub in boot
-stealth shelf with 6x9s
-sprayed blue centre console
-Carbon sticker on petrol cap
-Sony head unit

future mods:
-Delock
-Colour code door handles, side trim and m3 wing mirrors (not sure)
-clarion speakers front to be connected to a amp
-Abarth side skirts (not sure)

Almost finished :)
nice mods,

i havnt done any major mods on my punto,

i got remote central locking done (after market)

de-locked both sides (dont ask, both doors got broken into)
and fitted an arm rest (which is the best investment i made!)
debadged the boot door

by the way arm rest does not cover the hand brake, i can move it 90 degress up so i get full access to hand break

i was thinking of getting a PUSH START button for engine start, looks cool!

i brought my arm rest from ebay if anyones interested in one (http://www.ebay.co.uk/itm/160785913...m=R40&_nkw=160785913681&_rdc=1#ht_7289wt_1030)

loving the arm rest idea!!! might do that to mine

my car has been broken onto once i had a alarm fitted with central locking, how much did it cost to delock it?
 
This post contains affiliate links which may earn a commission at no additional cost to you.
I took it to my mates garage, delocking was free he welded a plate behind and fillered it then flushed it but painting was £60. Quarter tub of paint cost me £20 I think but thats all you need for a small section, I told him not to spray the whole door just that little area.
 
Car looks good although I also have some issues with legality of your HID's if they are bulbs only they are fine but if its the whole ballast and bulb setup its completely illegal without self levelling and headlight washers, I would take them into a garage and have them take a look

Get over it buddy :bang:
So what if he has them.... alot of ya's on here are like sheep :bang:
 
nice mods,

i havnt done any major mods on my punto,

i got remote central locking done (after market)

de-locked both sides (dont ask, both doors got broken into)
and fitted an arm rest (which is the best investment i made!)
debadged the boot door

by the way arm rest does not cover the hand brake, i can move it 90 degress up so i get full access to hand break

i was thinking of getting a PUSH START button for engine start, looks cool!

i brought my arm rest from ebay if anyones interested in one (http://www.ebay.co.uk/itm/160785913...m=R40&_nkw=160785913681&_rdc=1#ht_7289wt_1030)

Arm rest idea is brilliant (y)
how is it held in place? :yum:
 
This post contains affiliate links which may earn a commission at no additional cost to you.
they are the stock wheels, i sprayed them myself to black but looking at gettin some wolfrace ones but sticking to 15" most likly cus of petrol and things

Please DON'T , Wolfrace alloy's are a big (n)(n)

stick with what you have, there perfect for that car as they look like they came that color even

maybe get a chrome lip or blue lip on the alloys you have (y)

Random pic off the net (blue lip on black alloys)
189708_183968638314386_100001037546722_503358_520195_n.jpg


chrome lip on black alloys
DSC00667.jpg

its cus i sprayed them myself i did a little bit of a rubbish job, on the pics they look fine, but they gone a matt look when i wanted em to keep that glossy fresh look, i have been keeping em clean :(

to spray my wheels i took each wheel off layed em down and sprayed them black and waited for each coat to dry, i did 3 coats on each wheel then lacquer em all with 2 coats of that and put em back on the car, i think the reason for the rubbish finish is cus i didnt bother sanding em down and didnt use a primer :mad:
 
Arm rest idea is brilliant (y)
how is it held in place? :yum:

first i had to adjust my handbrake cable by tighting it (easy to do) so handbrake works on the shortest range without over stressing the cables,

you need to be prepared to drill holes in the centre console plastic.

you can screw it in but i prefer bolting it with nuts alot more stable,

i drill the holes first where the arm rest will sit, then taken the whole plastic console out so i can bolted it from inside aswell,

heres the pics

to take the plastic console off, at the back astray area theres a 10mm nut, underneath the handbrake pop the plastic out and theres 2 10mm bolts, take the gear stick gater out and theres 2 philips screws thats all
 

Attachments

  • IMG_20120616_103733.jpg
    IMG_20120616_103733.jpg
    64.4 KB · Views: 51
  • IMG_20120616_103745.jpg
    IMG_20120616_103745.jpg
    82.3 KB · Views: 42
  • IMG_20120616_103936.jpg
    IMG_20120616_103936.jpg
    94.7 KB · Views: 39
  • IMG_20120616_103657.jpg
    IMG_20120616_103657.jpg
    104.9 KB · Views: 41
first i had to adjust my handbrake cable by tighting it (easy to do) so handbrake works on the shortest range without over stressing the cables,

you need to be prepared to drill holes in the centre console plastic.

you can screw it in but i prefer bolting it with nuts alot more stable,

i drill the holes first where the arm rest will sit, then taken the whole plastic console out so i can bolted it from inside aswell,

heres the pics

to take the plastic console off, at the back astray area theres a 10mm nut, underneath the handbrake pop the plastic out and theres 2 10mm bolts, take the gear stick gater out and theres 2 philips screws thats all

Nice one (y)
thanks for that bud (y)
 
they are the stock wheels, i sprayed them myself to black but looking at gettin some wolfrace ones but sticking to 15" most likly cus of petrol and things

Oh right, well they look like you've done a cracking job lad (y) What dimensions are your tyres/wheels, i swear on my life, someones replaced mine with some daft wheels. (n)
 
[FONT=Arial,Bold][FONT=Arial,Bold]1.7 [/FONT][/FONT][FONT=Arial,Bold][/FONT]
[FONT=Arial,Bold]


[/FONT][FONT=Arial,Bold][FONT=Arial,Bold]Headlamps [/FONT][/FONT]
1.7 - page 1

The M.O.T. Inspection Manual Issue Date 01 January 2012


[FONT=Arial,Bold][/FONT]
[FONT=Arial,Bold][FONT=Arial,Bold]Information Method of Inspection Reason for Rejection[/FONT]


[/FONT]
1. Check the presence, security and operation of

the headlamp switch.

2. Where HID or LED dipped beam headlamps are

fitted, switch on the headlamps and check the

operation of any headlamp levelling and

cleaning devices fitted.

3. Check that the vehicle is securely fitted with

obligatory headlamps, as follows:


a matched pair of main beam headlamps,

and


a matched pair of dipped-beam headlamps
[FONT=Arial,Bold][/FONT]
[FONT=Arial,Bold][FONT=Arial,Bold]Note: [/FONT]


[/FONT][FONT=Arial,Bold][/FONT]
[FONT=Arial,Bold]


[/FONT]Main and dipped-beam functions may be

provided by a single pair of headlamps.

1. A switch missing, insecure or faulty.

2. A headlamp levelling or cleaning device

inoperative or otherwise obviously defective.

3. A missing, insecure or obviously incorrectly

positioned obligatory headlamp.


[FONT=Arial,Bold][/FONT]
[FONT=Arial,Bold][FONT=Arial,Bold]Note: [/FONT]


[/FONT][FONT=Arial,Bold][/FONT]
[FONT=Arial,Bold]


[/FONT]Class 3 vehicles may require only one

headlamp (see Section 9.1).


[FONT=Arial,Bold][/FONT]
[FONT=Arial,Bold][FONT=Arial,Bold]Note: [/FONT]


[/FONT][FONT=Arial,Bold][/FONT]
[FONT=Arial,Bold]


[/FONT]The precise position of headlamps is not

part of the inspection, but check visually that the

lamps are at about the same height and the

same distance from each side of the vehicle.


[FONT=Arial,Bold][/FONT]
[FONT=Arial,Bold][FONT=Arial,Bold]This inspection applies to [/FONT]


[/FONT][FONT=Arial,Bold][/FONT]
[FONT=Arial,Bold]


[/FONT]all obligatory

headlamps fitted.


[FONT=Arial,Bold][/FONT]
[FONT=Arial,Bold][FONT=Arial,Bold]Headlamps are not required to be fitted to[/FONT]


[/FONT]
vehicles used only during the hours of daylight,

which are fitted with neither front nor rear position

lamps, etc. (See 1.1.A).


[FONT=Arial,Bold][/FONT]
[FONT=Arial,Bold][FONT=Arial,Bold]Vehicles equipped with High Intensity Discharge[/FONT]

[FONT=Arial,Bold](HID) or LED [/FONT]


[/FONT][FONT=Arial,Bold][/FONT]
[FONT=Arial,Bold]


[/FONT]dipped beam headlamps may be fitted

with headlamp washers and a suspension or

headlamp self levelling system.

Where such systems are fitted, they must work;

however, it is accepted that it may not be possible

to readily determine the functioning of self levelling

systems. In such cases, the benefit of the doubt

must be given.

Headlamp washers may work in conjunction with

the windscreen washers (when the dipped beam

headlamps are switched on) or by a separate

switch.


[FONT=Arial,Bold][/FONT]
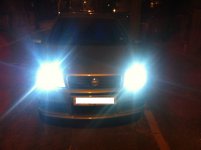
[FONT=Arial,Bold][FONT=Arial,Bold]HID lamps may be identified by:[/FONT]


[/FONT]


taking a few seconds to reach full intensity


having a bluish tinge to the light


having an igniter module/inverter behind the

headlamp


having ‘DCR’ marked on the headlamp lens.
[FONT=Arial,Bold][/FONT]
[FONT=Arial,Bold][FONT=Arial,Bold]HID headlamps use high voltage [/FONT]


[/FONT][FONT=Arial,Bold][/FONT]
[FONT=Arial,Bold]


[/FONT]and extra care

should be taken when inspecting these items.

4. With the headlamps on, switch between dipped

and main beams checking that:

a. each headlamp illuminates immediately it is

switched to either dipped or main beam

b. either:


all main beams are switched off by one

switch (dip switch) leaving a matched

pair of dipped-beams switched on, or


the main beam headlamp reflectors are

deflected by a driver’s control, to make

them dipped beams

c. on vehicles first used on or after 1 April

1986, the ‘tell-tale’ illuminates when main

beam is selected.

4.

a. A headlamp does not operate immediately

when selected on dipped or on main beam

b. operation of the dip switch does not:


extinguish all main beam headlamps,

and leave on at least one pair of dipped beam

headlamps, or


deflect the main beams to make them

dipped beams.

c. the ‘tell-tale’ does not illuminate when main

beam is selected.


[FONT=Arial,Bold][/FONT]
[FONT=Arial,Bold][FONT=Arial,Bold]Cont’d Cont’d Cont’d[/FONT]


[/FONT]
 
Back
Top