Technical Kingpin renewal

Currently reading:
Technical Kingpin renewal

Ok just to confirm.
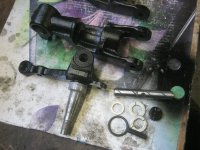
One of the grooved washers goes on top with the rubber o ring around it.
Then the other grooved washer goes on the bottom with a plain washer underneath to pack out the gap.
That's it, that's all that comes in the kit, 3 washers & 1 o ring.
 
I think you should have the two grooved ones up top, with the plastic cover, presuming it all fits. If you think about the setup, all the weight of the car is sitting on that interface. Those are heavy duty, engineering quality and the grooves are needed to let grease in since there is a lot of friction likely in there. The plain, bottom washer should have little or no stress and is there to avoid metal to metal of the steering components and so that the play can be taken up. This is the one that might need shaving a little to fit or where an old washer might fit better.
 
Ah so the 2 grooved washers act as a bearing.
Only trouble is I swear that mine had a grooved washer top & bottom, but there is no guarantee that no one has replaced these before!
 
Here's something I've got Sean which seems to confirm what Peter has said. I can't find what the part numbers are but it says 2 at the top with the seal and 1 at the bottom.

Damian

page51.jpg
 
Oh and a bit off topic but I've got a whole manual off this stuff. If anyone wants it PM me and I'll email it to you
Damian
 
That info looks very haveable Damian; expect a PM.
It's interesting that that bottom washer has a multitude of parts numbers according to thickness needed. Obviously you just get the one random one in the kit.

Also, it looks like in a perfect world the bottom washer might be supposed to have a seal washer around it although I'm not sure it would fit.
 
Last edited:
Checked dimensions of new bushes, they are about 0.008" larger diameter than original and too tight to go into the holes. Therefore they may need turning down a few thou but may try putting them in the freezer overnight, this will shrink them a few thou, whilst heating the upright which may expand holes a few thou.
Trouble being is this may then cause the bushes to be under too much pressure and can cause damage.
Other possibility is to turn the diameter down to fit in the holes & then glue them in with lock tight. Personally I prefer option 1.
Pattern parts! How much more difficult would it have been to make them the correct size first?
 
Sorry to see you're hitting that wall Sean. I have a new policy of buying any and every original mechanical part that I notice at a fair price. I passed by a set of original kingpins a few months ago:bang:

I have read that there are some Polish kingpin setups where you don't even ream the bushes but I think those are made of nylon.

Are you sure the bushes won't press in? I doubt that the housing would fail against the bronze. On my older car the bushes are deliberately a tight fit and that is part of the reasoning behind reaming. Even if the inner dimension was perfect or nearly there, out of the box, the tightness needed means there would always be some distortion as they are pressed in.
 
The old ones were an interference fit, but the new ones just seem a bit too tight, did try to force one in but met too much resistance, so decided not to push it any further.
With a bit of luck my father will machine them down to a slight interference fit and then may not require reaming.
 
Just thought I would update this post with a series of photos showing the process for fitting new kingpins.
Its not a job for the novice, its not actually a nice job at all.
So if you can afford it, go for the replacement or exchange units and save yourself a whole load of hassle.
 

Attachments

  • IMG_8940.JPG
    IMG_8940.JPG
    444.4 KB · Views: 248
  • IMG_8942.JPG
    IMG_8942.JPG
    392.5 KB · Views: 223
  • IMG_8944.JPG
    IMG_8944.JPG
    366.1 KB · Views: 217
  • IMG_8939.JPG
    IMG_8939.JPG
    559.7 KB · Views: 221
  • IMG_8919.JPG
    IMG_8919.JPG
    529.2 KB · Views: 239
  • IMG_9467.JPG
    IMG_9467.JPG
    1.5 MB · Views: 208
  • IMG_9470.JPG
    IMG_9470.JPG
    1.2 MB · Views: 239
  • IMG_9059.JPG
    IMG_9059.JPG
    592.7 KB · Views: 212
  • IMG_9061.JPG
    IMG_9061.JPG
    1.7 MB · Views: 224
  • IMG_9056.JPG
    IMG_9056.JPG
    518 KB · Views: 220
  • IMG_9472.JPG
    IMG_9472.JPG
    1.5 MB · Views: 230
  • IMG_9473.JPG
    IMG_9473.JPG
    1.4 MB · Views: 223
This is my next job Sean. Well stripping them and blasting them at least. Buying new you don't get the satisfaction as you do when you take old ones and make them new. Good job
 
I'm in the throws of doing this now. I looked to buy replacement units but most everyone seems to be out of stock and have been for awhile or their prices are really high.

Next step is to push out the old bushings. Sean, I know you made your own drift pin on the lathe. I'll scrounge around for something similar. Did you heat up the bushing at all to help drive it out?

I like how your caps were threaded on. Mine were spot welded so, I'm guessing I'll have to do the same when I get to that point.
 
The bronze bush is very thin, you can get them out with a drift but you will more than likely damage the bore of the hub. The drift needs to be a good fit inside the bush and then it should tap out quite easily.
Getting them back in also requires a similar tool which fits inside the bush, but with a hole in the middle so you can use a nut and bolt and draw the bush in. If you try tapping it in you will damage the bush.
I haven't come across anyone else with the screw in type cover.
The standard one seems to be just a domed cap which you place in the hole when completed and hit it with a drift/hammer and it will then expand and seal up the hole.
I will probably have to do this on my 500D model I guess.
 
The bottom cover is just like a core-plug and sits up against a ledge at the bottom of the hub-carrier (no, I have never seen a threaded 1 either). The best way is to drill a fairly large hole in the plug prior to knocking it out with the gudgeon-pin. This allows it to distort and come out without doing any damage. The new cover will be fairly heavily 'domed' to allow it to be put in place--hit the centre of firmly it with a wide drift to flatten it out, tension will then hold it in place. I would recommend that a long adjustable reamer is used, after the new bushes are fitted, to align them and obtain the correct clearance---but beware, the difference between 'just right' and 'loose' is very small!
biggrin.gif
 
I've tried to find a proper Fiat reamer in the internet; I am prepared that it might cost the earth. The part number seems to match to some extent with a 16mm Dormer reamer.
I wonder, does anyone know of a source for the correct reamer or a non-adjustable one of the right length?
 
I've tried to find a proper Fiat reamer in the internet; I am prepared that it might cost the earth. The part number seems to match to some extent with a 16mm Dormer reamer.
I wonder, does anyone know of a source for the correct reamer or a non-adjustable one of the right length?

Going by your post, you already know the part no., so just in case it's useful here are the part numbers I could find fir Fiat kingpin tools...
74056 Remover and installer, knuckle pillar and leaf spring bonded rubber bushings
74106 Remover and installer, knuckle pillar bushings
90316 Reamer, knuckle pillar bushings

cheers, Steve
 
Just done this little job, well stripped them anyway. As long as you have the correct drifts you're fine. I work in engineering so was able to jump on a lathe and make my own. If you can't get access to the drifts I would consider just buying reconditioned ones.
Sean - my bottom cap was also screwed in. When fitting the new kit do you have to buy a screw in one or do the domed caps fit to the threads?
 
Back
Top