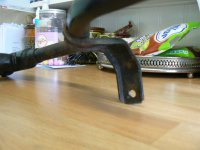
Technical Identifying rusty pipe

Currently reading:
Technical Identifying rusty pipe

Theleman

Member
Joined
Sep 15, 2015
Messages
332
Points
68
When I was looking at the lambda sensors in my Panda Eco 1.1, I took some photos of the area. I have not noticed when I was looking, but after looking at the photos closely, I noticed very rusty pipe crossing the sensor cables.

What could it be? Something to do with coolant? I am guessing, but not sure. I cannot find it in Haynes manual right now.

What is it and should it be replaced? The rusty pipe is in the last photo.

I am going to get wire brush next time, and give clean it to see if it will crumble way or hold solid.

47369467131_50bdf271cf.jpg


46646213024_0070668a37.jpg


47369456391_0e6886b52c.jpg
 
Yes, that's the coolant return pipe running across the front of the engine. Mine was also merrily rusting away. You need to clean it up & protect it from rust as best you can, but access isn't easy. I ended up spraying thinned chainsaw oil over mine, which created a smelly white smoke next time the exhaust got hot, but the pipe looks much happier now.
 
Thank you for your confirmation and info. Yes, I had feeling it could do with coolant.

I shall wire brush it, and spray some WD40. I find WD40 is good for neutralising rust on metal. I have never used chainsaw oil for rust treating before.

Hopefully it is just cosmetic, not structural destruction :)
 
Thanks for your info. Do I not have to drain the whole coolant before taking off the rusty pipe, and then flush and refill after?

And in that linked thread, the posters were cursing at Fiat for using non standard hose clips making awkward undo them. Maybe need to buy special hose clip pliers, no? :)
 
Only if you want to re-use them, cheaper to buy normal worm-drive (jubilee) clips and just pull the old ones off with brute force and ignorance.
Yes, coolant will need to be drained before the removal of the rusty pipe. Easiest way to do this is to remove the bottom hose connection to the radiator. Then install new pipe, then flush, connect bottom hose back to rad, then refill.
 
Hi Eklipze. Broadly I would agree with you that this is at the easier end of the "grand scale of things". I found, when I did Becky's last year, that taking off the exhaust heat shield made things much easier to wiggle it out past the exhaust manifold. (and Theleman looks like he's three quarters of the way there already from his pictures.)

Theleman. You will find there is one small fixing bolt (10mm socket size) which holds the pipe to the engine block, it's easiest to get at from underneath. Once you've removed the hoses, take this bolt out and wiggle the pipe as you pull on it. It's only the fit of the rubber seal which holds it into the back of the pump casing. This little bolt can be a problem. Becky's came out cleanly but on Felicity, our old 1992 Panda, it sheared off in the block. I had to take the grill and radiator out so I could have room to drill out the broken bolt and rethread it. Took ages (and several cups of tea!)

Becky's pipe was weeping at the rubber seal at the back of the water pump and also was "wet" where rust had formed where the bracket for that bolt is welded to the pipe. However it looked visually to be in much better condition than yours so I think you should do yours. I bought a new one from Mick at Shop4parts for considerably less than my local Fiat dealer wanted and it comes with a new rubber seal included. Put a wee smear of rubber lube or silicon grease on the seal before you try to fit it to help it slide into it's hole without damage - A very firm shove is required!
 
Wow great post Jock. Much appreciated for detailed instruction.(y)

Yes, I took out 4 bolts on the top of the manifold, but there was another bolt underneath, and to take that out, I needed the car jacked up either by ramps or axle stands. But time was running out, and weather was not very kind, so called it a day.

Will need to tackle again with new pipe, properly car jacked up and plenty time and kind weather in the near future.
 
A quick look on eBay and it seems brand new hoses are not silly money. If you can't get the old clips off its not a terrible job to replace the lot while you are at it. Make sure you get a new O ring for the water pump end of the pipe.

I would also Hammerite paint the pipe. Also overkill as it will probably outlast the car but it makes me feel better for something known to be rust prone.


Jock's job of removing the rad/rads is not as bad as it sounds. Though a right pain if you are time restricted. The bumper is attached with about eight M6 bolts and some self tappers. The "slam panel" is simply bolted to the front of the car. Headlights come off easily but might even stay on the slam panel - dont forget to unplug them. ;)


You then have clear access to remove the rads/hoses/whatever.

If the M6 bolt comes out then all that would be overkill but on the other hand you get to properly check the stuff that's never normally seen.

Last of all, I like to flush the cooling system. I fill with clean distilled water, bleed and drive the car. Then dump it out while hot. Then add the correct amount of coolant concentrate and top up with distilled water.


Water from a dehumidifier is distilled. It might need filtering through a kitchen towel/tissue.
 
Last edited:
Wow great post Jock. Much appreciated for detailed instruction.(y)

Yes, I took out 4 bolts on the top of the manifold, but there was another bolt underneath, and to take that out, I needed the car jacked up either by ramps or axle stands. But time was running out, and weather was not very kind, so called it a day.

Will need to tackle again with new pipe, properly car jacked up and plenty time and kind weather in the near future.


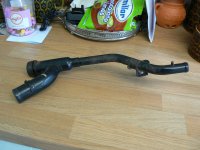
Just realized the pipe I took off Becky is still lying in my garage. Just give me a mo. - Ok, here it is in all it's glory:

P1080303.JPG

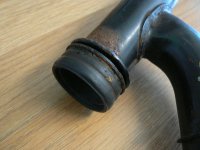
Looks quite a bit better than your's eh? But what's not so obvious is that the rubber seal is really hard (of course rubber goes hard with heat and time - so why use it as a seal in a cooling system?):

P1080304.JPG

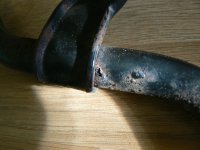
At first I thought that just replacing the seal would be the answer. I already knew that there was a small leak on the pipe which I had spotted whilst the pipe was still on the car. Can you see it?

P1080306.JPG

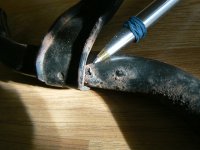
It's the little hole where the end of the pen is pointing:

P1080307.JPG

My plan had been to seal this in some way and fit a new rubber seal. The seal doesn't seem to be stocked on it's own by anyone. Then when I read, on our forum, about all the problems there are with these pipes rusting out, I decided to just buy a new pipe! - which Mick supplies with the seal ready fitted (I think they all come like that though?)

Here's the wee bracket which has the 10mm headed bolt which is the only mechanical fixing holding the pipe on. Take great care removing it - I'd give it a soaking in plus gas for a couple of days before trying it:

P1080305.JPG

The pipe is an awkward shape and you have to twist and turn it around the exhaust manifold as you remove it. Try to remember how you did this as it will help a lot when you are fitting the new one. It does work without removing the manifold though!

PS. I did a wee bit about bleeding out the cooling system on Becky after I changed her pipe. Can't remember what it's called but I would guess it's on page 17 with my entry about her cambelt change. just going to look for it - back in a couple of moments.
 
Last edited:
Yup, there it is on page 18 now. "Becky's Timing Belt - All Done" is the heading and it shows how I went about bleeding her out to eliminate air locks in the cooling system after refilling. Probably you can just fill through the normal filler and let the water pump chase the air out of the heater hose bleed nipple as the engine runs. But my way chases it out with no drama!
 
Jock's job of removing the rad/rads is not as bad as it sounds. Though a right pain if you are time restricted. The bumper is attached with about eight M6 bolts and some self tappers. The "slam panel" is simply bolted to the front of the car. Headlights come off easily but might even stay on the slam panel - dont forget to unplug them. ;)


You then have clear access to remove the rads/hoses/whatever.

If the M6 bolt comes out then all that would be overkill but on the other hand you get to properly check the stuff that's never normally seen.

Even after owning Becky for a year - almost to the day I just realized - I'm still learning something new about her all the time. So thanks very much Dave for the info on that front panel. It'll make working on awkwardly accessed "bits" a lot easier. I'm thinking especially if I have corroded fixings on the Cat.

I did have a lot of trouble with Felicity's coolant pipe securing bolt. In the end I resorted to a right angle drive attachment I have for my drill which is, in it's own right, awkward to use. It didn't occur to me to see if I could remove her front panel. Remember she was a Mk1 model, I thought it was welded in place? Just been having a look in my Haynes to see if I can find an image but there's none and no reference to how to remove it. I'm sitting here rather hoping it wasn't removable because if it was I wasted a lot of unnecessary time faffing about with this bolt!

As always, kindest regards
Jock
 
My "adventure" with the flying deer shattered the front bumper, driver's side headlight and broke the bonnet slam panel into a fair few pieces (it's plastic). The best bit, I could change the whole panel without needing to disconnect the coolant or the air con rads. But if you do disconnect they can all come out together.


It looks like this

Fiat-Panda-Slam-Panel.jpg


https://www.ebay.co.uk/itm/Fiat-Panda-1-2-2003-Rad-Pack-Radiator-and-radiator-surround-Slam-panel-Inc-VAT/173023754416?hash=item284904f8b0:g:s9wAAOSwBt5ZHX37
 
This post contains affiliate links which may earn a commission at no additional cost to you.
Placed order on the coolant hose pipe.

I might have a pack of jublee clip in the shed, but distilled water? Seems very expensive for water.

Does it have to be distilled water? Haynes manual doesn't mention anything about distilled water, and saw Scotty Kilmer flushing his Toyota coolant system with just his outside tap.
 
Back
Top