Technical Has anyone done a sill repair...

Currently reading:
Technical Has anyone done a sill repair...

Joined
Sep 3, 2004
Messages
1,606
Points
545
Location
North London
....guide on the Panda? preferably picture rich.

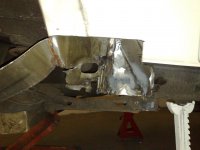
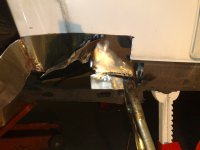
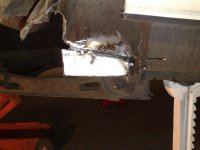
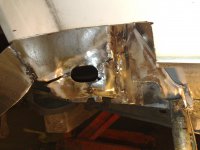
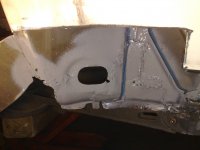
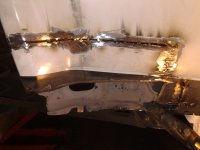
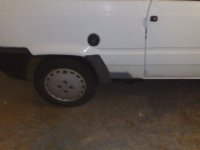
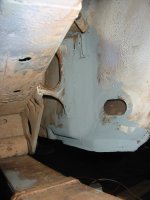
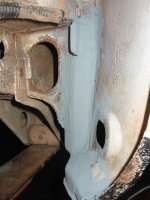
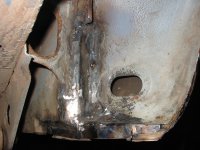
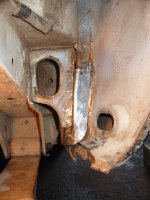
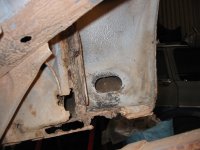
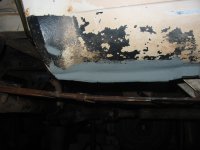
I made a start on mine yesterday, its the only structural rust on the car.

Its gone at the back on the OS sill, but its gone through the inner & outer sill & the bottom of the inner & outer arch.

Its quite a complex combination of shaped panels for such a basic car, more complex than the Uno for example, & I`ve got no pictures to go by. Eper isnt detailed enough. I can obviously see the outer panels on the NS, but not the internal ones!

I did do a search but cant find pics, so I`m hoping someone can point me in the right direction (y)

1. 260320112491.jpg

2.260320112493.jpg

3.260320112494.jpg

4.260320112490.jpg

5.260320112489.jpg


260320112488 1.jpg
 
Last edited:
My Sisley went in the same place on both sides, not quite as bad as that though, unfortunately I didn't take any photos as I was doing it.

Nitro_warrior did a thread on rebuilding the entire O/S sill on his 4x4, it was called 'Rusty Rear Crossmember'.

It is indeed very complex in that area and very hard to get access to weld, although you have cut out a large amount of the outer sill so it should be abit easier and you don't have a leaf spring in the way like on a 4x4.

I found a scrappage scheme Panda in my local breakers so I cut the bits of arch and outer sill I needed out of that, that made it much easier, although i still had to make alot of my own repair panels.
 
Nice one thanks for that, I`ll have a look for it.

There seems to have been a lack of rustproofing wax in that corner which has obviously led to this rust, as I say, the NS is fine (despite the fact it was parked with the NS in a bush for 2 & 1/2 years before I got it).

I did cut a fair bit out of the outer sill for access as you can see in pic 3, but I think I`m going to have to go further to get enough access.. I dont have leafs but the 2WD`s have trailing arms there instead which are thicker than a leaf spring!

I know of a Panda in a scrappy about 25 miles away, I wish I`d have checked the sills when I was there last. I might go up there & cut the whole section out (either side) if its intact, even if its just for reference patterns for the inner panel shapes as I`ve got nothing other than the eper pics below to go on at the moment!
 

Attachments

  • panda sill 1.jpg
    panda sill 1.jpg
    265 KB · Views: 214
Last edited:
There wasnt much muck round there funny enough, its only done 18000 miles, it has had 2 patches welded on in the past, one on the inner sill & 1 on the outer sill next to the trailing arm mount. Both were done very badly, the inner hadnt even been attached at the top, allowing some water in, & the welding process would have burnt off the little paint & wax there was inside.

The only good thing was that there was virtually no rust behind the plastic stone chip shield apart from the bottom 1/2".

I`d like it to be completely invisible, as you can see, I cut below the sill line & up to the first sill drain hole in the hope I could make it so, but time constraints (I have till Tuesday) mean it`ll likely be a patch up job.

I also have to change my Uno gearbox by Wednesday, 15 miles away from the Panda, at the same time.. :eek:
 
Last edited:
Thanks Giacosa, it helps a bit, unfortunately its not a very photogenic area, especially when its rusty!

Does the genuine Fiat bodywork sevice manual (is there such a thing?) show the sill/floor/arch joins & panels in an exploded diagram?

I`ve got a feeling I`m going to have to cut about another 2" above the sill line (where I already cut) & maybe 4" further along it in order to get enough access to weld it properly... possibly going as deep as the floorpan :(

It is a b***ard of an area to fix or photgraph. I remember working on the area was a bit how i imagine keyhole surgery. Panda 1408 got it right when he said you need to tie the ends back together as at the mo they are all hanging loose and frilly. Iv'e never seen any manual or parts catalogue that goes into enough detail to be helpfull. Essentially its case of studying how it goes together, and then reverse engineering it.

Hope that doesnt sound too negative i'm sure you can do it :)
 
Last edited:
Just had a look at my CLX in that area as I've got it up in the air while I paint the underside. I see what you mean about the trailing arm, the mount is actually mounted to the sill, which I didnt realise.

Haven't had a proper poke round there but it looks abit flakey, just hoping I dont find myself in the same situation and its only surface.
 
It all a right arse Giacosa! I`ve been trying to take pictures of my progress, I recon 1 in 5 is usable...

You better get onto it ASAP Panda1408, mine only looked minor till I cut it open!

Well, I`ve been on it again this afternoon, I dont usually have a problem with welding or panel welding, the last one I did was a Jag XJ6, which in comparison to the Panda was easy as far as panel design goes!

I started off by cutting further up into the wing, about 2" above the underseal line, I chose to bend that section back using the inner wing as a pivot in an effort to keep the wing/arch aligned, making reassembly easier & more accurate.

There was alot of too-ing & fro-ing between the car & the workbench while shaping the replacement sections (my backs killing me!), alot of head scratching too...

Then, when I`ve started to weld, I`ve found out my welders feed is playing up, making smooth, even welds impossible...

I`ve basically built up the inner sill by the trailing arm mount, taking it up to solid metal in the inner arch, this took 3 sections & several `weld bomb` leg burns...:bang:

This took a much longer than usual 5 hours today, I`ve had to stop because my back is on the verge of giving out, &, because I left my antibiotics at home (I`ve got bronchitis).

I`ll be on it again tomorrow, heres some pics maybe they`ll help someone, especially the cross section pics... excuse the state of the welds, it aint pretty, but its nice & solid! (y)

I`ll be taking my other welder tomorrow...
 

Attachments

  • 280320112522.jpg
    280320112522.jpg
    773.2 KB · Views: 118
  • 280320112519.jpg
    280320112519.jpg
    659.7 KB · Views: 123
  • 280320112515.jpg
    280320112515.jpg
    714.3 KB · Views: 114
  • 280320112506.jpg
    280320112506.jpg
    604.7 KB · Views: 111
  • 280320112505.jpg
    280320112505.jpg
    705.3 KB · Views: 131
  • 280320112536.jpg
    280320112536.jpg
    806.7 KB · Views: 131
  • 280320112533.jpg
    280320112533.jpg
    689.6 KB · Views: 114
  • 2803201125321.jpg
    2803201125321.jpg
    592.5 KB · Views: 125
  • 280320112524.jpg
    280320112524.jpg
    631.3 KB · Views: 119
  • 280320112523.jpg
    280320112523.jpg
    726.4 KB · Views: 120
Been there done that! Looks like you're cracking on nicely with it all the same.

Have a look at my thread if you want to get a few pictures.

https://www.fiatforum.com/panda-classic/187295-rusty-rear-cross-member.html

Also half way down is a little diagram I did of the sill cross-section and how I went about rebuilding it. Repeated here for speed. Woooosh


OK, i'm about half way through the repair. As there are others in a similar boat, thought it might be helpful if I posted a cut-away diagram of what the sills (should) look like and how i'm going about the repair.

1. The floor, inner sill, and outer sill all meet at the bottom where they are spot welded together.
The corner between floor and the inner sill is filled with seam sealant.

2. After cutting away the rust (and the spot welded seam) you'll be left with three unconnected panels.

3. Weld the floor to the inner sill. RED

4. Form a new lower inner sill GREEN BIT and weld the top edge to the floor.

5. Finally complete the sill by welding a final piece BLUE BIT to the lower outer sill and to the new lower inner sill GREEN BIT

Sill_repair_diagram.gif


Towards the rear of the sill (behind the door and next to the rear seat) it's a bit more tricky. Not sure what it's like on 2wd cars but the leaf spring mounts restrict access. You will need to weld the "floor section" repair from underneath the car. Here's a figure to show the original sill and how my repair will be done.

Sill_rear_repair_diagram.gif


As I say I'm half way through my repairs at step 4, with one more bit to fit in. I'll put some pics up shortly.
 
Nice one Nitro_Warrior! I did check out your thread after Panda1408 said about it, it was helpful, but as I`m sure you realise, its very difficult to visualise unless you have the car in front of you, & even then its hard to get your head around it! :eek:

I`ve been looking at it for about 10 hours in the last 2 days, & I still cant visualise how the original inner panels would have looked...

I need to get it finished by tomorow night ideally as the electric is due to go off on Wednesday (we`re moving units), so I may well have to "MOT bodge" it & re-do invisibly at a later date.

We`ll see how tomorrow goes.. :)
 
It all a right arse Giacosa!

Amen to that! I'm glad to know other cars are more straightforward. I'd assumed that as Pandas/Y10s are very simple, other cars had an even more complicated panel design:eek:

I`ve been looking at it for about 10 hours in the last 2 days, & I still cant visualise how the original inner panels would have looked...

Like a riddle wrapped in an enigma ;) Not helped by the fact your lying on your back while looking at it which you have to reverse in your mind when you go back to the workbench. Are you using an angle grinder? I found I had to use a dremel with an extension
 
Hoping mine will be ok, its never been welded and I was hoping it wouldn't need any anytime soon, but we'll see.

I see you have the same welder as me, interesting about your feed problem, I've been using our welder at work recently and have been finding that alot easier to use than mine on thin bodywork. Maybe I have a problem with mine aswell:chin:

Looks good anyway, aslong as the welds are strong thats all the really matters, they can easily be hidden with some sealer and stonechip(y)
 
I did a repair a couple of years back of the vertical seam at the front of the rear wheelarch. It was nothing like as bad as yours, but still a bit of a pig of an area to repair, mainly as its really tight to be able to use a welder and grinder, so I can only wish you luck with it!

Unfortunately the pictures are on my work computer, but i'll try and upload some tomorrow.
 
Well, your lucky to have gone this far without it Panda1408, but if you dont want to have to go through all this you better deal with anything vaguely resembling rust now!

Its not actually my welder, its the one we keep at the unit & it rarely gets used, I have had some blow through with it even on its lowest setting, but the feed speed varies significantly wherever you have the feed dial...

I actually forgot to take my welder today (its currently at my parents because I had to do some welding on the Boxster exhaust mounting, which is 5 miles in the opposite direction to the unit!), so I had to struggle through with it.

Its not fun is it Totnesmonster, thing is, if the seam you did had gone, its likely the inner paneling is going to be similar to mine...

Well, I`ve just got in, its 12:30am, started it at 1pm.. I have had to stop several times to do other work.

Basically, its still not finished.... I did 4 more sections, had to shape some of what I`d already done to fit them, thing is I`ve had to get her out of the unit tonight, so I`ve had to prime over the lot for now.

My backs not given out yet, its tinging, but not gone, but I have got some swarf in my right eye thats driving me nuts... hopefully it`ll come out when I sleep...

Looks like the Uno`s not getting its gearbox for a few days yet!

Anyway, heres a few more pics..
 

Attachments

  • 290320112566.jpg
    290320112566.jpg
    765 KB · Views: 86
  • 290320112574.jpg
    290320112574.jpg
    581.5 KB · Views: 89
  • 290320112576.jpg
    290320112576.jpg
    643.7 KB · Views: 80
  • 290320112578.jpg
    290320112578.jpg
    577.4 KB · Views: 89
  • 290320112580.jpg
    290320112580.jpg
    639.7 KB · Views: 82
Last edited:
A few of mine, it was mainly just the vertical seam, the inside was OK which was lucky, and the left hand side was fine, so I guess it was just shoddy rustproofing!
 

Attachments

  • IMG_3415.JPG
    IMG_3415.JPG
    791.8 KB · Views: 93
  • IMG_3417.JPG
    IMG_3417.JPG
    820.8 KB · Views: 83
  • IMG_3411.JPG
    IMG_3411.JPG
    967.3 KB · Views: 99
  • IMG_3407.JPG
    IMG_3407.JPG
    953.3 KB · Views: 105
  • IMG_3401.JPG
    IMG_3401.JPG
    728.6 KB · Views: 100
  • IMG_3418.JPG
    IMG_3418.JPG
    662.8 KB · Views: 79
Thats nice welding totnesmonster! much better pictures than mine, I`m assuming you used a camera as opposed to a mobile!

The swarf is still in my eye today & has given me the mother of all headaches, so I wont be working on it (or the Uno) today :mad:
 
Last edited:
Well finally got round to having a poke in the same area on my CLX and I have myself a nice hole on the N/S:( Nothing bad, just kicking myself because if I'd got my act together and waxoyled the thing when I got it two years ago it would probably be ok.

I will get some pics up when I get it sorted, just wondering what the best way to go about it is at the moment.

Is it the same area? I`d say take the underseal & paint off the area cut a neat rectangle round the rust (at least 3cm biger than any sign of rust) & the have a good look inside at the vertical seam. If theres rust there you really have to cut the rectangle much bigger to give you access to grind the inner rust out & be able to weld it.

For the record, mines on the back burner. The metal in my eye had to be taken out at an eye hospital a coupe of days later (in 3 pieces), that took me out for a week, & I havent had time since.

I also went to change my Uno`s gearbox yesterday with the Panda one I`d got off Bowman, after removing it, sticking a new clutch & new inner outer driveshaft gaitors on, I went to to swap the mounts over... I`ve then found the gearbox casing on the Panda doesnt have mounting holes for the different Uno mountings, despite the internals being the same :bang: So thats on the backburner as well now :mad:

I may take the diff out of a 4-speed box I`ve got spare, & if the tooth count is the same, stick that diff in my original Uno box, I do have `gearbox-internal-phobia` though... :eek:

If that ends up happening, I`ll then put the Panda 5-speed box into my 4-speed 750 Panda, but its all work I really dont have time for at the moment.

Heres some pics...
 

Attachments

  • 3103201125991.jpg
    3103201125991.jpg
    171.5 KB · Views: 42
  • panda uno.jpg
    panda uno.jpg
    374.7 KB · Views: 54
Last edited:
Back
Top