Are replacement floor pans supposed to be welded from the bottom of the car or from the top side? A body shop installed new floors from the bottom side and the square cross support tubes under the pans are not flush with the sills. One tube sits 2.5cm proud. It looks like ass in my opinion. Feeling grumpy.


You are using an out of date browser. It may not display this or other websites correctly.
You should upgrade or use an alternative browser.
You should upgrade or use an alternative browser.
Technical Floor panel replacement
- Thread starter TeleSpeed
- Start date
Currently reading:
Technical Floor panel replacement
Are replacement floor pans supposed to be welded from the bottom of the car or from the top side? A body shop installed new floors from the bottom side and the square cross support tubes under the pans are not flush with the sills. One tube sits 2.5cm proud. It looks like ass in my opinion. Feeling grumpy.
It's part and part....some bits go under and some bits go over. I hope this, "in progress" image from a few years ago helps.
Over at the footwell, under at the rear re-inforcers, under the inner-sill and over the central tunnel except you end upwith a fiddly bit at the back where it has to pass from over to under.
")
Thank you Peter, that is helpful. The fellow that replaced my original floors did it the easy way, not the correct way. Next week I will be moving the car to a different shop. Time to order another set of floor pans.
Eric
Eric, hold fire, that might not be far out. I don't like the way he's hattached it to the outer sills annd I would have expected a bit more removal of paint prior to welding. But you may have scored by having the chunkier crossmember which was fitted to the 126 and some late 500s. Do you have any more images from the inside?
- Joined
- Sep 27, 2020
- Messages
- 390
- Points
- 166
That join to the outer sill is definitely not right...
He's beaten/folded the return on the floor pan back the wrong way, and joined it to the outside of the sill. It should be folded downwards the ground, so the strengthening bars sit hidden behind the seam at the bottom of the sill.
I suspect the new floor has been laid in over the top of the remains of the old floor rather than fully removing the old floor, which is why the floor isn't tucking up under the car enough to hide the strengthening bars, or to allow them to attach the floor tot the outer sill I the normal way.
While in principle I can't see it makes a huge difference how it's attached to the outer sill, the floor should also be welded to the inner sill creating box section which is where the strength in the sills comes from, but I'm not seeing any signs of that in your picture,
Last edited:
I do not have any photos from the inside. This is a 1959 built car, so perhaps use of the later type crossmember support bar is part of the issue. The fact that they are at various heights relative to the sills annoys me greatly. The hatchet stitch weld along the edge of the sill is incorrect too. Originally the welds were a more discrete spot type. I am inclined to move the car to a different shop and have the job redone.... correctly.


Excellent insight. Thank you.That join to the outer sill is definitely not right...
He's beaten/folded the return on the floor pan back the wrong way, and joined it to the outside of the sill. It should be folded downwards the ground, so the strengthening bars sit hidden behind the seam at the bottom of the sill.
I suspect the new floor has been laid in over the top of the remains of the old floor rather than fully removing the old floor, which is why the floor isn't tucking up under the car enough to hide the strengthening bars, or to allow them to attach the floor tot the outer sill I the normal way.
While in principle I can't see it makes a huge difference how it's attached to the outer sill, the floor should also be welded to the inner sill creating box section which is where the strength in the sills comes from, but I'm not seeing any signs of that in your picture,
Whatever has happened, it's a exceedingly amateurish job just there. From what I can see, the bit he's bent a flange which should be left horizontal, as manufactured. The section of the sill bottom on an F and later car is an "L". The way it's been done is messy and created an addition rust trap, so you're right to expect better.Excellent insight. Thank you.
Beware though, I see signs of the sill having filler; it's unlikely a car that old hasn't had reapairs or replacement. It's possible that at some time, the sill has been fitted or repaired incorrectly and that has compromised the alignment of the floor flange.
I dont know if its an optical allusion. but the box rib profile looks physically taller on the passenger side then the driver side. I wonder if the rib was manufactured a bit off cantered.?
I installed a complete 126 floor pan into my 500, and although the fit was adequate, there is some sloppy mfg on the overall build of the strengthening ribs and the like. Its design is much stronger then the original 500 design, but its unfortunately the way things can be with aftermarket parts to restore these cars.
And yes, typically that flange that was bent over usually stays horizontal. Ideally in that case, i would just cut off the excess bent over flange, to prevent water from being trapped in the u profile.
Would i go about pulling the pans out and redoing them in your case?... honestly it would depend on the interior fitment, finish and such.. The inner sill flange will dictate how deep (up) the floor pan goes. From a glance it seems like nothing is welded in yet?? That horizontal flange on my 500 is excessively long, so i will be trimming it down as i finish the body work. Anything to eliminate a place for water to collect is key.
One last thing, i realize what i say is not an excuse for a properly done job, but just keep in mind, the overall fit and finish of these 500's are not the best. They were an economy car first, and were mass produced at a fast rate. There is a possibly that this fitment issue is compounded by previously replaced parts that were not the best fit also.
Best of luck in getting your 500 back on the road
Last edited:
I've dug out another image which I've posted before. Enlarge it and you can see where the inner sills are welded to the floor and get the idea just how right you are about the general fit of things.

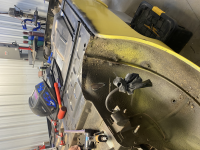
UPDATE - I moved the car to a more competent metal shop and they have removed the bodged floor pan installation from the previous shop and are doing the work to a high standard. The new replacement floor will be installed this week. It is a single piece floor like originally fitted.
Bigvtwin996
Established member
- Joined
- Jul 19, 2011
- Messages
- 1,395
- Points
- 445
Jolly good
I have some pictures somewhere of how the bottom of the screen pillars should be shaped using lead
I have some pictures somewhere of how the bottom of the screen pillars should be shaped using lead
Lookin good!.
Did you have it media blasted, or chemical strip?
Im still vacuuming media and sand out of all the channels as i spin the car around on the rotisserie.
Did you have it media blasted, or chemical strip?
Im still vacuuming media and sand out of all the channels as i spin the car around on the rotisserie.
Bigvtwin996
Established member
- Joined
- Jul 19, 2011
- Messages
- 1,395
- Points
- 445
I am just in the process of setting up a media blasting system...
After meeting a guy who had been doing it for over 40 years... he explained with some examples of why he would never advocate chemical stripping.....
There are pros and cons... but I would say getting media out is far better than watching chemicals leech out after 5 years....
After meeting a guy who had been doing it for over 40 years... he explained with some examples of why he would never advocate chemical stripping.....
There are pros and cons... but I would say getting media out is far better than watching chemicals leech out after 5 years....
Yeah im leaning away from doing a chemical strip too. I was contemplating chemical stripping my doors. However after doing some research, learned about the horrors of the potential of trapped chemical in the seams, and issues with the primer delaminating and such down the road.I am just in the process of setting up a media blasting system...
After meeting a guy who had been doing it for over 40 years... he explained with some examples of why he would never advocate chemical stripping.....
There are pros and cons... but I would say getting media out is far better than watching chemicals leech out after 5 years....
Bigvtwin996
Established member
- Joined
- Jul 19, 2011
- Messages
- 1,395
- Points
- 445
Yep......
If you think about simple capillary action chemicals will get right into tight seams.....
but unless you leave the shell in a tank of neutralizer for days it would be hard for the same penetration to take place so there is always a risk that it will find it's way out.....
blasting with AL Oxide or such also needs to be done with care as I have a VW van shell thta the corners are warped due to the heat generated....
Soda will probably be outlawed soon as too many setups simply wash the spent media and crap down the drains... now tell the local Authority you have just dumped 100kg of alkaline media and rust etc into the sewage system....
Media blasted. Afterwards there was about 5 gallons of sand trapped in the inner sills and the metal guy had to open them at the bottom to get it all out. Once the sand was removed the shop coated the inner sills with rust preventative.Lookin good!.
Did you have it media blasted, or chemical strip?
Im still vacuuming media and sand out of all the channels as i spin the car around on the rotisserie.
Out of curiosity, where in the US are you and what (competant) shop is doing the work? I'm on the hunt for my Giardiniera project soon. Thanks.
Similar threads
- Replies
- 21
- Views
- 275