Technical Electric Windows

Currently reading:
Technical Electric Windows

Big mistake!!:mad:

Pulled my working model apart and now I can't get it back together! So I have 2 that wont work!.

The motors are fine, even if one does have bad bearings in it.

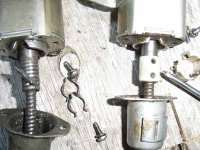
The issue is how the drive mechanism connects to the motor. In the early model, on the right of the photo, it is a plastic fitting that at one time had 2 pins or a ball bearing that went in the grooves of the spiral tube, this was held on by the plastic surround. You can see the two holes where the pins/ball bearings went, and the plastic clip above the screwdriver.

The later model had a metal U shaped section, in place, (I wish i left it there!) with ball bearings inside it and held on with the 2 metal clips, between the screws.

I am trying to figure what I can use to drive the spiral tube but not hold it too tight to stop the motor. I don't want to pull another one apart and wreck it too, at least not till I figure how to make it work again.

I tried using larger ball bearings and cable tying them in, unsuccessful!
Might try a modified idea of this next.

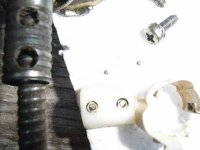
You can see the size of the holes I tried cable tying the ball bearings into in the 2nd picture. The small dots are the ball bearing out of the later model U piece I mentioned above.

Any ideas/suggestions people.
 

Attachments

  • F01.jpg
    F01.jpg
    43.7 KB · Views: 58
  • fo7.jpg
    fo7.jpg
    24.2 KB · Views: 60
Last edited:
alexGS - Did you have a good day finding what you wanted at Mal's?,

it is done! - FIXED, for now anyway!

I discovered I didn't break one them when I unseized it. I never took the plastic fitting off till today, it was already broken, the ball bearings/pins long gone.
But I did break the other one with the noisy bearings.

I have repaired the mechanism, but I am not sure if it will be a permanent fix. Time will tell.

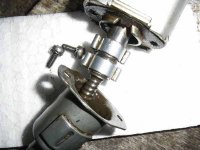
I used 2 gas crimp fittings, 2 larger ball bearings, and two pieces of plastic from a sheep eartag!

1 piece of plastic went inside the external shaft as a spacer to hold the groved wire section away from the inside of the motor shaft, the other piece of plastic has 2 holes the size of the ball bearings and went over the outside of the motor shaft. I then crimped it all together, not too tightly!! with the gas pipe fittings.

Sorry I haven't got a step by step picture, and I am not going to pull it apart to get the photos.
It was very trial and error, it took me all day, and like I say I am not sure it will be a longterm fix. The tension provided by the 2 crimped pieces could let me down.

However, I put it on here so others can think about it and maybe come up with a better idea.

The next issue will be will it work in the car with the extra resistance of the window.

I will get that back in when I get the bit from Mal.

And I have discovered, my early 84 70s has a later model motor and regulator, with the plastic fitting that attaches to the window.
 

Attachments

  • F40.jpg
    F40.jpg
    32.1 KB · Views: 59
Last edited:
Good effort there :)

I sometimes use Jubilee clips in that situation, but they might not have fitted, so I think you've done well. The ball bearings are small, aren't they? Did you get them back in?

Both Mal and myself agree that the earlier cars usually have the glass sitting in a metal channel, bolted to the regulator. We've both taken apart several early Unos (pre-'88) and never seen the plastic peg design on those.

Yes I did get what I wanted from Mal... rear brake pads for my 164 (well actually, it's a 168, but same thing), strut bearings (yellow plastic), and of course I drove my working 164 back to my place having left it there last night.

Things could have turned out even better today - I was offered a slightly-damaged 166 for $3500 but it sold within an hour. It's still listed on Trademe. I was a bit dejected to miss out on that one, would have been a bargain and a great project.

I didn't get any work done today, though. Now I'm wondering what to fix first tomorrow! Just any progress will be good, I suppose. I have two un-WOFable 164s but at least they're both here now along with the two working cars. I think I'll start by giving the latest arrival a wash. I cleaned the wheels this evening and they came up lovely - no baked-on dust.

-Alex
 
No I didn't get the small (tiny) ball bearings back in.
They look like a foolish idea.

Small jubilee clips would be better if there was clearance inside the housing, they would be more adjustable. I fixed the regulator with the plastic drive connector.

It had no ball bearings so I took the plastic connector off and replaced it with my own invention that included larger ball bearings that fitted into the existing holes in the drive part of the motor.

I ordered the bits from Mal but I am going to try to fix the other one I broke, I might try small jubilee clips this time.
 
Last edited:
Now for the 2013 revival... I linked to this from the temp Turbo Collective forum as someone needs the relay setup (y)

I'll not use it as I have winders in my Uno Turbo, and it's not been out the garage for 7 years :(

still a good post Alex :D
 
Last edited:
Now for the 2013 revival... I linked to this from the temp Turbo Collective forum as someone needs the relay setup (y)

I'll not use it as I have winders in my Uno Turbo, and it's not been out the garage for 7 years :(

still a good post Alex :D


that be me then lol

thanks Louie
Alex this is perfect help, should have my lecky windows back to normal again.
 
Last edited:
that be me then lol

thanks Louie
Alex this is perfect help, should have my lecky windows back to normal again.

You're both too kind :eek:
Good luck with it... For my Uno I found it useful to pour some engine oil (with an oilcan) into the translucent plastic tube that takes the 'excess' flexible rack as the window winds down.

-Alex
 
Back
Top