Technical Distributor alignment w/o points

Currently reading:
Technical Distributor alignment w/o points

1. Going back to points. I don't have any of these parts. Points failed me the first week I owned the car 8 years ago. They were the first thing to go.
2. Faulty induction pickup. I tried my original first without any changes, and then bought a different one, both with the same result.
3. Checking for suction at the plug. I can try this next. I have a mity-vac. Haven't attempted to vacuum down a cylinder before, but it's worth a shot. If it leaks, the head is coming off. If it doesn't...the head is coming off anyway as I'm out of ideas.

The big thing I changed from a perfectly running engine to now running on one cylinder is the pistons/rings/cylinders/head gasket. The most likely culprit is there somewhere. I just doubted everything else first, as that's a lot easier to get to.

The whole reason for this endeavor is the 'Sport' 650cc engine I bought from a prominent U.S. supplier was built without snap rings on #1 wrist pin. It bounced back and forth and scored the cylinder down both sides. Oil leaks by and starts oozing out the weep holes in the head. I thought it was just a head gasket.
Re the Mityvac test, I see the inlet splits into two so not possible to test individual cylinder inlet valves as the opposite one will probably be open giving a false reading, though you could test the exhaust valves .
Having said that if you have the head off with the rockers disconnected the vales should all be shut allowing you to test them, you could also with the head upside down and the plugs in pour petrol or cleaning fluid into / fill the combustion chambers and none should leak out the inlet or exhaust ports if the valves are seating correctly.
After the cylinder damage due to the wrist pin/gudgeon pin movement what was done to rectify?
Another thought if the rocker gear was removed prior to dismantling so all valves were closed and head was still on it would be possible to do a "leak test" where compressed air (150psi) is applied via a spark plug adaptor which should show where most of the loss is.
 
I really appreciate the help! Thanks for helping me track this down. I found a vacuum / pressure gauge and installed it at the plug hole in the head. Rotating the engine by hand, I get 12 inches of mercury suction on both #1 and #2. They both leak down at the same rate, which was from 5 inches to zero in around 5 seconds. I thought about testing the valves when I had the head out, but then thought it only has about 7k km on it and was working fine so I didn't bother. I just ordered a leak-down tester.
 
I really appreciate the help! Thanks for helping me track this down. I found a vacuum / pressure gauge and installed it at the plug hole in the head. Rotating the engine by hand, I get 12 inches of mercury suction on both #1 and #2. They both leak down at the same rate, which was from 5 inches to zero in around 5 seconds. I thought about testing the valves when I had the head out, but then thought it only has about 7k km on it and was working fine so I didn't bother. I just ordered a leak-down tester.
I was first introduced to a Sun Tune Leak tester+ other tuning equipment in the 1970s as an award our workshop won from the car importers, it soon proved it's value. If you are not bothered about measuring the percentage of loss/leakage a basic one can be made from a length of airline with a spark plug adaptor and a 150psi compressor. It is important to do it correctly to get good results. I have a Bosch one for diesels also with injector and heater plug adaptors. I found it was good for water cooled engines with a very slow coolant loss via the head gasket seeping, it would show exactly which cylinder was causing the issue, something often missed even when inspecting the old head gasket.
 
The mystery deepens. With both valves closed at TDC for each test, I get 4-5% leak-down. This is really good. So, I have OK compression, very good leak-down, tried two sets of new plugs, new coil, wires, cap, rotor and Hotspark inductor pickup, and a rebuilt carb. It will start and run on #1 only. #2 exhaust remains cold. After starting on #1, if I pull the plugs, #2 plug is wet with fuel so I know we're getting fuel in there and it's a single-inlet anyway. No fuel would keep #1 from firing. If I leave the plug and wire out and grounded, I see the plug firing. Fuel, air, compression and spark usually equal BANG.
 
It's good you have been able to eliminate some possible causes.
No1. Can you expose the metal of the number 2 plug, then with the engine running hold the lead just off the plug, this creates a temporary bigger spark as the voltage has to increase to jump the plug gap. I have done this with a fouled plug (oil or petrol soaked) to get an engine to run, see if it tries to fire then. It can also show a HT lead, cap or coil shorting, though yours are all new so unlikely. Note, only do this if your not suffering from a heart condition as it has been none to bite;)
No2. This is highly unlikely, but I have experienced it on pressed cranks (mainly three cylinder two strokes) so just possible for a solid crank to be out of true/bent. Turn engine to TDC on No1. exactly, using two methods, with the rocker cover off turn engine to the exact point that No2. cylinder inlet and exhaust rockers are, one starting to open and the other starting to close, try and be very precise with this, as it should correspond exactly with No1. piston being exactly at TDC and also exactly with your TDC mark on the crankshaft pulley (Note, not your firing/timing mark on pulley)
This method of timing was taught to me at college 53 years ago as a way of timing an engine with no timing marks at all for ignition or valves and definitely worked before the advent of variable valve timing! On a four cylinder engine you used No1. and No4. respectively and obviously on a six or eight cylinder engine which ever two pistons reach TDC at the same time on different strokes of the four cycles.
No3. Whilst rocker cover off measure the maximum amount of movement/lift of each rocker as I have known engines where the cam lobes have worn down when compared with other cylinders. Notably Ford Pinto OHC amongst others ;).
One of the other benefits of checking the exact timing for TDC is you can then move the crank pulley opposite the direction of rotation to the timing mark and check it against a protractor or timing disc to confirm the timing marks.
 
1. Going back to points. I don't have any of these parts. Points failed me the first week I owned the car 8 years ago. They were the first thing to go.
2. Faulty induction pickup. I tried my original first without any changes, and then bought a different one, both with the same result.
3. Checking for suction at the plug. I can try this next. I have a mity-vac. Haven't attempted to vacuum down a cylinder before, but it's worth a shot. If it leaks, the head is coming off. If it doesn't...the head is coming off anyway as I'm out of ideas.

The big thing I changed from a perfectly running engine to now running on one cylinder is the pistons/rings/cylinders/head gasket. The most likely culprit is there somewhere. I just doubted everything else first, as that's a lot easier to get to.

The whole reason for this endeavor is the 'Sport' 650cc engine I bought from a prominent U.S. supplier was built without snap rings on #1 wrist pin. It bounced back and forth and scored the cylinder down both sides. Oil leaks by and starts oozing out the weep holes in the head. I thought it was just a head gasket.
Your "prominent US supplier" wouldn't happen to be "Mr Fiat" (in Atlanta) by chance would it? Having spent some considerable time getting a friends engine running properly (guess who supplied it) I have come to the conclusion that these engines are thrown together by somebody in Europe---the cylinder head on my friend's engine was only fitted on engines marketed in Europe (and maybe only Italy).
 
I haven't had much time to devote to the little car lately. I ordered new plugs to try: NGK BP6HS non-resistor type. Put them in today and the engine fired up, ran fine and even idled. For about a minute. Then #2 stopped participating as the engine was now warm. Same thing happened on my first attempt at running it after replacing the pistons/cylinders. Pulling plug #2 shows it's wet with fuel (since it wasn't firing) and plug #1 was dry chalky black (it was firing.) I'm resolved to taking the engine out and apart to see what's going on. Just doesn't make sense. And it's leaking oil more than ever, which I'm guessing is the cheap black rubber pushrod tube seals? TBD
 
I haven't had much time to devote to the little car lately. I ordered new plugs to try: NGK BP6HS non-resistor type. Put them in today and the engine fired up, ran fine and even idled. For about a minute. Then #2 stopped participating as the engine was now warm. Same thing happened on my first attempt at running it after replacing the pistons/cylinders. Pulling plug #2 shows it's wet with fuel (since it wasn't firing) and plug #1 was dry chalky black (it was firing.) I'm resolved to taking the engine out and apart to see what's going on. Just doesn't make sense. And it's leaking oil more than ever, which I'm guessing is the cheap black rubber pushrod tube seals? TBD
No chance No.2 cylinder valves sticking in their guides when hot. Three cylinder Vauxhall Corsa's had a habit of doing that.
 
No chance No.2 cylinder valves sticking in their guides when hot. Three cylinder Vauxhall Corsa's had a habit of doing that.
Thinking about it, the fault has got to be something along those lines. If the timing or ignition or fuel supply were faulty, it would affect BOTH cylinders,not just 1 (and the same one every time). Logically, it has to be something mechanical on/in number 2 cylinder. For the time it takes, I would suggest that the head is removed and checked. If that looks OK, sadly it might be an engine out job and an inspection of the pistons and rings. If you DO have to take the engine out, may I suggest that you get yourself a cheap engine rotisserie (the 500 engine is relatively, very light)--this makes it MUCH easier to work on the engine.
 
I modified my bench-mounted VW type 1 engine rotisserie to fit the Fiat engine when I replaced the pistons/cylinders. I couldn't find one that fit the Fiat engine, or one made specifically for it. My 'normal' engine stand I last used for the Chevy LS engine wouldn't adjust small enough. By far. Is there one just for the Fiat 500?

I keep thinking that #2 exhaust valve must be sticking open, either by the cam follower or the valve itself. The cam followers fell out when I tipped the engine over on the rotisserie so I didn't keep track of which one went in which hole. They went back in at random, but the engine is nearly new so it shouldn't have mattered that much? I did a hot compression test a while back and convinced myself it was fine, so that will need re-doing. If it sticks randomly, that could be a false reading I suppose.
Worth checking, you have checked nearly everything else :(.
On the three cylinder Vauxhall engine, it was out of warranty but nearly new and very low mileage. It happened on the motorway with engine missing but still running on one and a bit cylinders, they towed it to the dealers who offered them a £1000 and told them the engine was scrap and would need replacing.
Price was an insult, so my friend offered it to me and his wife who had worked for BMW dealership bought a new Mini.
I completely stripped and rebuilt the Vauxhall engine, a lot of stretch bolts and fancy gaskets so not cheap plus new valves etc.
What had happened was the valves were sticking in the valve guides, staying open and melting the plastic inlet manifold which then sucked air in around the fuel injectors and made it even worse. By all accounts it was a common fault and dealers were aware of it at the time.
I do wonder if the salesman was going to lean on his mates in the warranty department and get an ex gratia warranty job done :(.
When I was looking for a rotisserie to use for my '126' engine,i bought a very cheap version (being that the engine is so light), but still had to carry out a fair bit of fettling (filing!) with the bolt holes to enable me to fit the engine onto it. I also made myself what I call my 'Italian' mount, which like on a lot of u-tune films showing engines being worked on in Italy, fits on the FAN-SIDE of the engine. I concede that you can't fit the fan. fan-shrouding or alternator/dynamo onto the engine with this mount, but it is a heck of a lot easier to fit the crank, flywheel and clutch onto the engine.
If your 'bench-mounted VW' rotisserie is anything lke the '4-pronged' Porsche bench mount that I saw at Goodwood (at a 'Revival), that is about as good as it gets---I would love to make myself one of that type.
It is entirely possible that you have an intermittantly sticking valve, and the only way to check it out is to remove the cylinder head and inspect. I would also suggest that you take the opportunity to remove No. 2 piston and check the bore-to-piston clearance and that no rings were broken during installation. In no way am I accusing you of breaking rings, just that whilst you have the opportunity, check them.
 
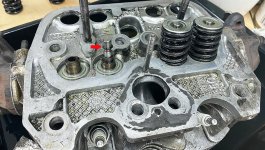
Last ditch effort before removing the engine, I started it cold and it ran great. I held the throttle open for about 5 minutes before it started to intermittently miss. Kept it at higher revs for another 5 minutes like this, starting to miss more and more. Letting off the throttle, it tried to idle on #1 but then just dies. I did a hot leak-down test on #2 and it was holding pressure without issue (<1%.) So, without an obvious smoking gun here, I pulled the engine out and apart. Still nothing obvious! My oil leak was probably the (old, reused) rubber valve cover gasket starting to fail. Pulled the head off and turned it upside-down on the bench and filled both chambers with Automatic Transmission Fluid. This sat for two days without losing a drop, so the valves sealed as well as I thought they would. I pulled the springs off the intake and exhaust valves of #2 and both were moving freely. The intake appears to have a donut seal on it, but I'm not sure where it belongs. It is trapped in the end of the intake valve stem so I can't remove this valve from the head. Where does this normally reside? So, the valves feel free and since it isn't very old, they're in good condition. With dual springs I can't imagine a little heat would cause it to stick, and only now after I replaced the p/c.

My other thought was the cam follower getting stuck. Everything is cold, but all of these move freely in the block. Pushrods all look great. Head gasket was fine.

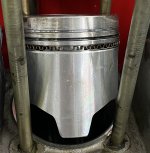
Pulled the cylinder off of #2 piston and it still looks new. The piston isn't cracked, the rings look fine. The oil control rings aren't like the ones the came out of the previous pistons. They didn't come with any instruction so I'm not 100% sure they're correct, but 99%. Has anyone replaced a cylinder with the piston in place? Is it even possible? And with marginally OK compression, should I take this opportunity to fit better rings? Any recommendations for a stock 77mm p/c for 650cc?

So...I'm at a loss. What should I check or inspect or change before putting it all back together? I've got a std and copper head gasket coming. Is one better than the other? And new dark red pushrod tube seals vs. the black rubber ones.
 

Attachments

  • Piston No2.jpg
    Piston No2.jpg
    483 KB · Views: 63
  • Valve Stem Seal.jpg
    Valve Stem Seal.jpg
    459.4 KB · Views: 59
Last ditch effort before removing the engine, I started it cold and it ran great. I held the throttle open for about 5 minutes before it started to intermittently miss. Kept it at higher revs for another 5 minutes like this, starting to miss more and more. Letting off the throttle, it tried to idle on #1 but then just dies. I did a hot leak-down test on #2 and it was holding pressure without issue (<1%.) So, without an obvious smoking gun here, I pulled the engine out and apart. Still nothing obvious! My oil leak was probably the (old, reused) rubber valve cover gasket starting to fail. Pulled the head off and turned it upside-down on the bench and filled both chambers with Automatic Transmission Fluid. This sat for two days without losing a drop, so the valves sealed as well as I thought they would. I pulled the springs off the intake and exhaust valves of #2 and both were moving freely. The intake appears to have a donut seal on it, but I'm not sure where it belongs. It is trapped in the end of the intake valve stem so I can't remove this valve from the head. Where does this normally reside? So, the valves feel free and since it isn't very old, they're in good condition. With dual springs I can't imagine a little heat would cause it to stick, and only now after I replaced the p/c.

My other thought was the cam follower getting stuck. Everything is cold, but all of these move freely in the block. Pushrods all look great. Head gasket was fine.

Pulled the cylinder off of #2 piston and it still looks new. The piston isn't cracked, the rings look fine. The oil control rings aren't like the ones the came out of the previous pistons. They didn't come with any instruction so I'm not 100% sure they're correct, but 99%. Has anyone replaced a cylinder with the piston in place? Is it even possible? And with marginally OK compression, should I take this opportunity to fit better rings? Any recommendations for a stock 77mm p/c for 650cc?

So...I'm at a loss. What should I check or inspect or change before putting it all back together? I've got a std and copper head gasket coming. Is one better than the other? And new dark red pushrod tube seals vs. the black rubber ones.
You are certainly suffering with this one:( .
On the Vauxhall I mentioned with the sticking valves it only showed when engine was hot when the tight tolerances between valve and guide closed up altogether causing the valves to stay open allowing hot gases back into the inlet manifold, so once cooled down there was nothing to see. It was a known issue on that model.
Can you have the head crack tested or do you have a spare cylinder head?
Any chance piston ring gaps are too tight?
On close inspection of engine any signs of partial seizing?
The auto fluid test is a good test but as fault only shows when hot, probably less relevant in your case.
Any odd noises when it starts to misfire, apart from the one cylinder engine?
Any signs of combustion gas leaks on the old gasket/ warped cylinder head etc.?
 
Very puzzling your engine, not sure if you need a specialist mechanic or a priest 🤔
looking at your pictures I can make a couple of observations.
I have never seen a set of piston rings like that in any 500 or 126 engine I have worked on. Top ring looks OK, I can’t quite make out the detailing on number 2 but it should be a stepped outer solid ring and the bottom scraper is normally a one piece cast ring with an internal spring core. I took a picture of a set.
5957C572-6ACB-4921-A2B9-3BB355C5D2A8.jpeg

As for the cylinder head I can see that you have one of the late Polish 650 heads as can be seen by the date on the casting, the 96 represents 1996. It has the later type valve guides on the inlet valves which are designed with a step to take a more effective cap type seal, not the simple o-ring that somebody has fitted. It looks like the inlet port may have been opened up a little. Other than that I can’t say any more but I wondered what the history of this engine is?
 
Any markings on the piston crown?
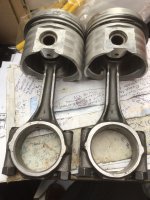
The 126 pistons are made with an off centre gudgeon pin so the pistons must be assembled the correct way around to the conrods. The conrods in turn must be assembled to the crankshaft the correct way around with the numbers on the big end caps facing the camshaft side.
When I work on 594 & 650cc engines I always assemble pistons to conrods then conrods & pistons to cylinders then cylinders etc to crankcase and crankshaft.

89A77E0D-B5C6-42E9-8477-664B2C6808ED.jpeg
ignore the grooves on the piston skirt
 
Any markings on the piston crown?
The 126 pistons are made with an off centre gudgeon pin so the pistons must be assembled the correct way around to the conrods. The conrods in turn must be assembled to the crankshaft the correct way around with the numbers on the big end caps facing the camshaft side.
When I work on 594 & 650cc engines I always assemble pistons to conrods then conrods & pistons to cylinders then cylinders etc to crankcase and crankshaft.

View attachment 417355
ignore the grooves on the piston skirt
I managed to find a set of 'BORGO' (as used by the Abarth factory) pistons when I had my '652' engine bored +40thou---it came with 3-piece oil-control ring rings. The trick is to fit the 'wiggly-wire' part first and then one of the thin flat rings above the 'wiggly wir', follwed by the 2nd flat ring below the 'wiggly wire' section. care must be taken to ensure that the 3 joints aren't in line. As David (Toshi) has pointed out---there is a specific direction that the pistons, which are slightly offset with regard to the gudgeon-pin (aka Wrist-pin), are fitted to the con-rods and then the con-rods to the crank-shaft.
Your induction port has been opened up a lot--and badly! For 'just-road use' It should not be opened up any more than about 1/8th of an inch all round, and should match the throat of the inlet manifold.
My '126' 652 head required valve-guide seals--I found that "ELRING 195-925" did the job---if you are very careful, thay can be fitted with the use of a socket. The exhaust valves only require the '0' ring seals
 
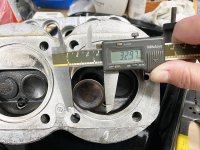
This is the 'Sport' 650cc engine sold by Mr.Fiat here in America. It was (still is) advertised as "sport camshaft 40 / 80, enlarged valves 35.3mm/28mm and a sport timing chain kit." It's been great for 8+ years but has leaked oil out of the head's weep bolts for at least half of that time. I find now that the head is not sporting the larger intake valves, and it was built without restraining the wrist pin on piston #2 which caused the cylinder walls to become grooved.

I tried to find the Elring 195.925 valve stem seals and they appear to be unobtanium. Elring's website doesn't list this part number: https://www.elring.us/
At least in the U.S. site. Could you mean 195.952? I see some Fiat parts vendors have the OEM style BIS seal and will get two of those, and the o-ring seal for the exhaust valves.

New Mahle pistons with what looks like the recommended rings installed are on their way. I was careful assembling it the first time to ensure the pistons and rods went back in the correct orientation. Doesn't mean I didn't screw it up, of course, but I'll re-check that.
 

Attachments

  • Valve Intake 33mm.jpg
    Valve Intake 33mm.jpg
    221.5 KB · Views: 42
  • Valve Exhaust 28mm.jpg
    Valve Exhaust 28mm.jpg
    199.4 KB · Views: 41
This is the 'Sport' 650cc engine sold by Mr.Fiat here in America. It was (still is) advertised as "sport camshaft 40 / 80, enlarged valves 35.3mm/28mm and a sport timing chain kit." It's been great for 8+ years but has leaked oil out of the head's weep bolts for at least half of that time. I find now that the head is not sporting the larger intake valves, and it was built without restraining the wrist pin on piston #2 which caused the cylinder walls to become grooved.

I tried to find the Elring 195.925 valve stem seals and they appear to be unobtanium. Elring's website doesn't list this part number: https://www.elring.us/
At least in the U.S. site. Could you mean 195.952? I see some Fiat parts vendors have the OEM style BIS seal and will get two of those, and the o-ring seal for the exhaust valves.

New Mahle pistons with what looks like the recommended rings installed are on their way. I was careful assembling it the first time to ensure the pistons and rods went back in the correct orientation. Doesn't mean I didn't screw it up, of course, but I'll re-check that.
Those valves look pretty standard to me! When tuning (for road use only) I normally recommend + 2mm for the inlet and keep to standard for the exhaust. With regard to valve-stem seals, my letter from Elring suggested that the "195-925" seals would be the correct seals, but I agree with you, they no longer seem to be available or even listed on the Elring site. The "195-952" seals would seem to also be just the right size. It would seem from your "tale of woe" that, once again, a "Mr Fiat" engines is not really up to scratch. Having spent a fair bit of time on my friends "Mr Fiat" supplied engine, it would not be wise to put into words what I am thinking!
 
My bad luck just keeps going. New Mahle pistons with pre-installed rings went in fine. I had to use a Gates-style hose clamp to compress the rings to slide the cylinders down on top of them. Worked perfectly. Neither of my ring compressors would have been removable after this, but the hose clamp was. Put it all back together and in the car. I get 129 psi on #1 and 1 psi on #1. Leakdown test shows the intake valve is leaking, so I can only assume the new valve seal is causing it to jam/stick open. I'll have to do the rope trick to hold the valve closed, to attempt to remove the springs and replace that seal. But, geez, can't a guy catch a break?

Back to my original post: I'm still wondering about the distributor orientation. Can someone show me how theirs looks? The body of the distributor (mine has the wiring notch facing the coil), the rotor at #1 TDC (pointing at that same wiring notch?), and the cap (my cap is marked I and II, with the I (#1) aligned with the wiring notch in the distributor body. So, with #1 at TDC (both valves closed, crank pulley mark pointing at the case marking for TDC), the rotor should be pointing at the cap's I (#1) which is pointing toward the coil mounted in the right rear flank of the engine bay's stock location. Right?
 
Back
Top