Technical Dipped lights not working.

Currently reading:
Technical Dipped lights not working.

Padraigl

New member
Joined
Aug 17, 2017
Messages
7
Points
1
I have a 2005 x244 fiat based a class motorhome.

My dipped lights stopped working with not symbol on the dash.
Switching on the headlights the blue symbol was showing on the dash. Both indicators were also showing on the dash.

Following lights weren't working....
Dipped lights.
All side marker lights.
Rear lights.

Working lights were....
Main lights.
Indicators.
Break lights.

I noticed that I could hear the relay (engine fusebox) clicking for the headlights but not the dipped lights.
The dipped lights is relay R2. I swapped out the horn (working) R4 relay with R2 and no difference.

I also checked fuses F14 and F15 for each dipped lights which were ok but I didn't suspect the fuses as both dipped lights were gone together.

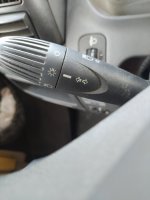
Then I thought it was something to do with the steering wheel stalk. Took the covers off around the steering wheel.
Noticed if I shook or moved the wires on the connection (arrowed in picture) the dipped light would come on.
I did take the connector apart and the black wire connector is discoloured.

So I got them working again and I left the covers off while driving and the connector gets so hot I can barely touch it. The back of the dipped lights/indicator stalk also get extremely hot.

I did a site search but didn't find this exact issue.

Can anybody give me advise to look further into the issue.

Connection 2.jpg
Connection 4.jpg
Connection 1.jpg
Connection 3.jpg


Thank you.
 
I have a 2005 x244 fiat based a class motorhome.

My dipped lights stopped working with not symbol on the dash.
I am not sure that I understand this. Do you mean that the sidelight indication or was not illuminated?
Switching on the headlights the blue symbol was showing on the dash. Both indicators were also showing on the dash.
Does "indicators" relate to relate to the lights on indications, or to the direction indicators?
Following lights weren't working....
Dipped lights.
All side marker lights.
Rear lights.

Working lights were....
Main lights.
Indicators.
Break lights.

I noticed that I could hear the relay (engine fusebox) clicking for the headlights but not the dipped lights.
The dipped lights is relay R2. I swapped out the horn (working) R4 relay with R2 and no difference.

I also checked fuses F14 and F15 for each dipped lights which were ok but I didn't suspect the fuses as both dipped lights were gone together.

Then I thought it was something to do with the steering wheel stalk. Took the covers off around the steering wheel.
Noticed if I shook or moved the wires on the connection (arrowed in picture) the dipped light would come on.
I did take the connector apart and the black wire connector is discoloured.
Taken with information given above, this suggests either faulty wiring or switch in the sidelight circuit. You mention that the vehicle is a motorhome and also mention side marker lights. If additional side marker lights have been supplied directly from the sidelight circuit and not via a relay, this will exacerbate any high reistance problem.

For explanation, the heating effect of an electric current is proportional to the square of the current. So double the current, and you have 4 times the heat. Think how many additional 5W marker bulbs you have. Including number plate, the original compliment would be 6.

To illuminate the dipped beams, the switch control panel (attached behind the four push buttons in the centre of the dash) needs to receive 12V via the instrument panel illumination fuse, F24, in the LH cab fuse panel. If this supply is not present, no dipped beams.

So I got them working again and I left the covers off while driving and the connector gets so hot I can barely touch it. The back of the dipped lights/indicator stalk also get extremely hot.
So it could all be due to a failing, and perhaps overloaded sidelight switch contact, or hopefully connection to the switch.
I did a site search but didn't find this exact issue.

Can anybody give me advise to look further into the issue.
I am attaching annoted, and edited drawings of eLearn sidelight, and dipped headlight circuits plus some charts of my own creation.

Please post resolution of your problem on this thread. It is from the reports of others that I have learned of the effects of F24. Also worth noting that the main beams require a supply to the switch control panel via F37.
 

Attachments

  • H090 Switch Control Panel.pdf
    78.8 KB · Views: 53
  • Fusebox B002 Cab LH.pdf
    194.3 KB · Views: 58
  • Fiat Wiring Colour Codes.pdf
    70.1 KB · Views: 55
  • eLearn E2011 Dip Beam.pdf
    69.4 KB · Views: 70
  • eLearn E2010 Side & Rear Lights.pdf
    87.5 KB · Views: 46
Thank you so much. I will have a look at the documents.

I will reply to your questions later.

Just had my mechanic look at it (van happens to be currently in for a different job)and he said the steering wheel switch unit needs replacing.
He rang his supplier who said he couldn't get them.
I had a quick look with the part number 735374800 and found a couple of different makes in Autodoc.
Will talk to him when he is finished.
 
Thank you so much. I will have a look at the documents.

I will reply to your questions later.
Probably no need, if I have interpreted correctly.
Just had my mechanic look at it (van happens to be currently in for a different job)and he said the steering wheel switch unit needs replacing.
If the problem was on my vehicle, I would be looking at exonerating the connector before changing the switch assembly. The fact that the dipped beams came on when the wiring was moved suggests a possible problem with connector "B" poles 5&6.
He rang his supplier who said he couldn't get them.
I had a quick look with the part number 735374800 and found a couple of different makes in Autodoc.
Will talk to him when he is finished.
 
Just an update..

I drove with only the parking lights on (picture).

The wire connector again got very hot. Plastic at the back of the light stalk also got very hot.
 

Attachments

  • 16977268909445082546236291737473.jpg
    16977268909445082546236291737473.jpg
    1 MB · Views: 27
Communicator do you happen know the pin size as I think I will change the pin on the black cable.
 
Communicator do you happen know the pin size as I think I will change the pin on the black cable.
Sorry, I do not have the pin size, as I have never had cause to remove the connectors on mine. I have a spare column switch, dated 03/08/06 from a Fiat Alfa Romeo 147, and from which I have removed the cruise control squib. I expect this unit to be of similar construction but I could be wrong. The pins on what I believe are the appropriate connectors are quite small perhaps about 1.5 x 0.75. They are moulded into the housing, so if the housing is damaged you may have to contemplate replacing the complete switch unit, as previously suggested. More is possible with the harness end, but extremely fiddly. Replacing the complete connector with a salvaged item may easier.

My advice is to unplug the connector if possible, and make an assessment based on that inspection. Replacing the complete column switch assembly, is not the simplest of tasks. The steering wheel has to be removed, and there is the driver's airbag to consider.
 
I am contacting scrap yards about the plugin connection as on inspection the black wire pin has some discolouration.

My steering wheel doesn't have an airbag so it should be easier to replace the whole unit if needed.
 
I am contacting scrap yards about the plugin connection as on inspection the black wire pin has some discolouration.

My steering wheel doesn't have an airbag so it should be easier to replace the whole unit if needed.
May I draw attention to a minor error on previously attached eLearn drawing E2010 for x244 sideligts etc. Near upper RH cprner of drawing the wire connected to H005 B6 should be colour coded LN, and not BL.

Here is a link to an eLearn diagram of the connector and wiring details.
 
So went to the scrapyard today and got a connector.

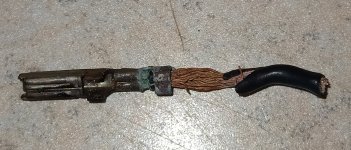
The Blue/Black cable or pin 6 was in a bad way, see photo.
Replaced and checked other cables which were ok.

Hopefully it will fix the problem as 2 mechanics said it was a stalk unit problem.
 

Attachments

  • IMG_20231021_191804.jpg
    IMG_20231021_191804.jpg
    982.2 KB · Views: 37
So went to the scrapyard today and got a connector.

The Blue/Black cable or pin 6 was in a bad way, see photo.
Replaced and checked other cables which were ok.

Hopefully it will fix the problem as 2 mechanics said it was a stalk unit problem.
Obviously changing the stalk unit would not have fixed that problem. The wire on pin 5 carries the same current
The green corrosion round the crimp is caused by chlorine released when PVC degrades due to overheating.

I remember a similar problem in a large power station, where vital connections in a hot location were failing due to similar corrosion. The insulation was OK, but the terminations had been made using pre-insulated crimps which had PVC as the insulator. Solution was to use uninsulated crimps.

Your basic problem may have been due to low contact pressure, but if you wish to reduce the possibility of a repeat, you could consider using LED bulb in appropriate places. That is side, tail, number plate, and additional side marker lights.
 
Back
Top