Technical cooling plates

Currently reading:
Technical cooling plates

thanks peter, just had a look and its a big help, at least i know what am missing though i need to get under luigi to understand how and where it fits... lot more complex than i had in mind!i thought there may be two? one undercarb and one sealing off exhaust?
 
These pics are the best I can do at the moment. There does appear to be a plate above the exhaust but it is very frazzled on mine and will need remaking
The main tray looks non original and seems to be a simple plate.
I think the idea is to seal the engine compartment so that the radiator scoop doesn't take in already heated air. By being closed at the bottom there will also be a more positive air pressure assisting hot air from the radiator which is pushed into the compartment to flow up and out of the louvres...... or maybe it works the opposite way? :)
 

Attachments

  • 1453734912476.jpg
    1453734912476.jpg
    66.4 KB · Views: 62
  • 1453734980217.jpg
    1453734980217.jpg
    64 KB · Views: 56
  • 1453735021006.jpg
    1453735021006.jpg
    64 KB · Views: 54
thanks peter, those picks really help me understand. most info i have found says it draws cool air in thru louvres andforce hot air thru rad and out under van. its been a mystery as i have none there! i ran it hot last year, whilst it never overheated it was always very hot.... i cut numerous holes in engine cover and fitted elec fan into top cover to try and assist cooling - it did help but not pretty and always only supposed to be temporary fix. it got me up to stranraer and back tho!
 
That airflow makes more sense Andy. The plates will help but in reverse of my hypothesis. I suppose you don't want already heated air drawn over the exhaust or from over the engine
The better sealed off from these directions, the more likely cool air will come through the louvres.
 
Last edited:
My engine undertrays were all present and correct and I took them off when I removed the engine. They were in good nick. No holes or major rot, just surface rust and a thick layer of congealed dirt and oil...

I cleaned them up and der-rusted and painted with POR-15.

When I came to refit them before Christmas, they'd been off so long I had forgotten how they fitted. The tray and the scoop by the radiator was fairly obvious, but the other had me stumped...

Looking at this thread https://www.fiatforum.com/850t-900/323017-850t-garage-find-after-24-years-soon-back-road.html I found the answer...

I had the exhaust fitted to my engine. I had to take it off. The tray would then fit, with the exhaust loosely hanging down. Once the tray is fitted you can then offer the exhaust up from underneath and refit...
 
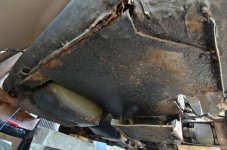
The undertrays on Connie have been patched up so many times its hard to work out what the shape is supposed to be most of the time. These links are really helpful.

I can also confirm that the airflow is supposed to be in through the side louvres and out under the radiator - the previous owner of Connie had put a small scoop on the side to help push air into the engine bay. Not a bad idea but totally useless when stationary which is when the overheating problems happen.

The main problem is when the van is stationery - especially after a good run. The engine tickover simply doesn't spin the fan quick enough to get rid of the hot air. This is made worse by the exit from the radiator finishing under the engine bay.

I've had to wait several times on petrol station forecourts due to fuel vapour lock :(

When I put Connie back together I'm going to add a boxed tube to the air exit and take this beyond the back of the van to stop the hot air rising back into the engine bay - I'm also playing around with a ram effect design that will help pull the hot air out when moving forward - not sure if Connie will ever get fast enough to make it work but it won't hurt.

I'm also looking at adding an auxillary electric fan (or fans) to improve airflow around the engine bay.

Finally, I got hold of an Arbath 4 branch exhaust and twin barrel carb so I gain all the space that was previously taken up by the airfilter 'dustbin'. I need to fashion a new tray to fit around the new exhaust - has anyone dones this before?
 
Hi
When I took mine off Connie they fell apart into several pieces - they had been patched (and patched over patches) several times over the years (with pop rivets), so I'm going to have to remake them.

The job is still a few weeks away (hopefully done by April) and I need to find where I've buried them :(

I'll post photos as I rebuild them and you will be welcome to have copies of the patterns, if you haven't managed to get hold of some before then.
 
If all goes to plan I should be in a position to put the engine and gearbox back in early March and then I will be able to start working out the rebuild of the under trays and general airflow. I also have to rebuild the fan cowling as this has crumbled (and wrecked the fan in the process). I will also be adding an auxiliary electric fan to give the main fan a helping hand when Connie gets hot and bothered.

Reading elsewhere the extra electric fan shouldn't be needed if all the airlocks are cleared and under trays are in place but it won't hurt to add some help - especially if running up a few mountain passes in summer.
 
my boot lid was well corroded so i saw no harm in putting a load of 2inch holes in it in an attempt to aid cooling! coupled wiyh an electric fan mounted on rear shelf it works but looks ugly and i know its not right!By all accounts the factory spec trays and scoop system work fine so ultimately am aiming to get back to that spec.
 
Back
Top