

Hi all and welcome to my guide!
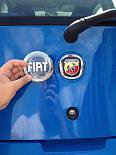
PLEASE NOTE: Before you read on, I must inform you that the badge doesn't sit completely flush to the car. This is because the boot lid on a Mk2b is slightly more curved than a Grande Punto. It is also slightly smaller than the original badge.
What you'll need:
- An Abarth badge (85mm)
- Bug and Tar Remover or Tar and Glue Remover.
- A hair dryer.
- Fishing wire.
- Flat-headed screwdrivers.
- A few soft cloths, preferably a microfibre.
- Time and hard graft!
Step 1:
First of all you want to heat up your badge with a hair dryer. Be sure to keep it moving well and try not to leave it standing in one place for too long. This is to avoid damage to your paintwork.
Step 2:
Next you want to cut quite a long bit of fishing wire. Slide the fishing wire behind the badge and use a see-saw motion around the whole badge. You'll soon realise that it won't go the whole way through the badge. This is because there are two lugs that give the original badge more stability on the car. Just try and split all the glue apart that you can get to.
Step 3:
Here comes the first hard bit! Now is the time to have a helper. Wrap the screwdrivers in the cloths and push them behind the badge. Lever the badge off from all angles while your helper pulls at the badge. NOTE: Be careful with the screwdrivers to try and avoid damaging the paintwork (unfortunately I damaged a little on mine). Eventually, with a bit of force, the badge will pop out of its retaining lugs. Hooray!
Step 4:
Heres the second hard part.. You will be left with a lot of gluey residue. This is when you need to use the Bug and Tar remover. I got mine from Halfords for only a fiver, and it worked great. Just follow the instructions on the back, spray 15-18cm away from surface and leave for 1 minute before removal. Once you have left it for a minute to soak in, start scratching at the residue with your nail. I found this was made a lot easier when wrapping your finger in the micro fibre cloth. You may need to spray more remover onto the surface if it starts to dry out again. The hairdryer can be used at this point too.
Step 5:
For the final step you need to polish the area well to make sure all residue has been removed. Be sure to clean the area with hot soapy water so the adhesive on the new badge will stick well. Once you've cleaned the area well, take the backing off the new Abarth badge. The scary part comes next! Line the badge up straight and central for a nice modern, sporty look!
NOTE: I was told by someone else on the forum to wax/ polish the area, and make sure to remove all the run and excess Bug and Tar remover as it can effect paintwork.
Then its done!
PLEASE NOTE: Neither I or the Fiat Forum are responsible for any injury or damage to vehicles.
Hope this helps!
Rhys
